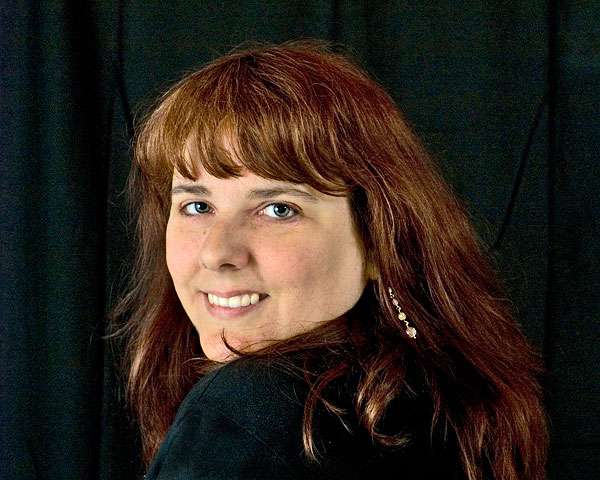
1st Portrait with new lighting

wildmaven

TPF Noob!
Joined
Aug 3, 2007
Messages
985
Reaction score
0
Location
Picking up dog poops
Website
wildmaven.org
Can others edit my Photos
Photos OK to edit
I just received my new lights. This is with 2 lights, each at 45 degrees, 5 feet from the model (me), the one on my right is about 7 feet high with the light between the umbrella and me, the one on my left is about 3 feet high with the umbrella between me and the light (the umbrella is a soft, translucent white). Comments, corrections, help of any kind is welcome. :)

4qgvksm.jpg
 
A couple of suggestions for a more dynamic portrait:

Increase the ratio of key to fill, or in other words: decide which light is your key and which is your fill, adjust your fill until it reads 1 stop (or more) less than your key.

Buy or make a reflector (white foamcore, tin foil), and use that for fill. Take the 2nd light and move it behind and to the side for a rim light. Adjust it to various ratios, like 1 stop over, to 1 stop under.

Same setup as above, only remove the umbrella and use on the reflector on the light, and put it high above the subject and down onto the hair.
 
Altho I know absolutely doodly about portrait lighting, the image as posted seemed very dark.
Also, the image as posted is Abobe RGB profile. You need to convert to sRGB for posting on the web or the colors look bad.

Image below I used Shadow Highlights tool and converted to sRGB.
Is this color closer to your coloration?


4qgvksmrgbum0.jpg
 
Lighting is fun and it is very easy when you know what to look for. Matt's suggestions are very good, especially considering that this is a low key photo and the hair could use some separation from the background.
In general, the goal of studio lighting is to give the illusion that only one light source illuminated the subject when in fact several lights are used at times. In this case, you cross-lit the photo by having the main/key light to the left and the fill to the right. This will cause shadows that don't go the same direction--look at the shadows of the bangs then look at the shadow by the right ear. Leave your key light where it is and place the fill right behind you. Bounce the light off a white wall or an umbrella and you'll see the difference. I'd also take the fill's power down a little--the light here is flat and is not shaping the face. You need shadows and highlights to give a 3d look.
This is all traditionally speaking, of course. Learn the fundamentals first, then you can break the rules. :)
 
Separate the subject from the background. Unless the floating head look is what you were going for a hairlight or a lighter coloured background may help define the shape of the subject.
 
I like the forelighting. :) As suggested, maybe just a light on the back set a few stops under.....
 

Most reactions

Back
Top