Timoris
No longer a newbie, moving up!
- Joined
- Mar 14, 2011
- Messages
- 284
- Reaction score
- 34
- Location
- Australia
- Can others edit my Photos
- Photos NOT OK to edit
EDITED AUGUST 2017 - UP TO DATE INFORMATION
Having obtained a Fuiji Finepix W3 and toyed around with 3D picture taking, it was time to get editing.
But how?
Lightroom and Adobe in general do not support MPOs (Multi Picture Objects), so how is one to effectively edit their pictures?
After doing some research and testing, I found a pretty nifty (and free!) way.
Materials:
MPO Split (splits the Jpegs inside the MPO)
ADDED: ABOVE LINK BROKEN, USE FOLLOWING:
MPO Extractor - Browse Files at SourceForge.net
StereoPhoto Maker
1- Drag .mpo onto mposplit.exe (1st Left // 2nd Right)
2- Edit Both jpegs with "AUTO SYNC" in Lightroom
3- Open stphmkre.exe
4- Open L/R Images
5- Easy Adjust or Auto Align to get an idea
(Note: Auto Align does not yield best results)
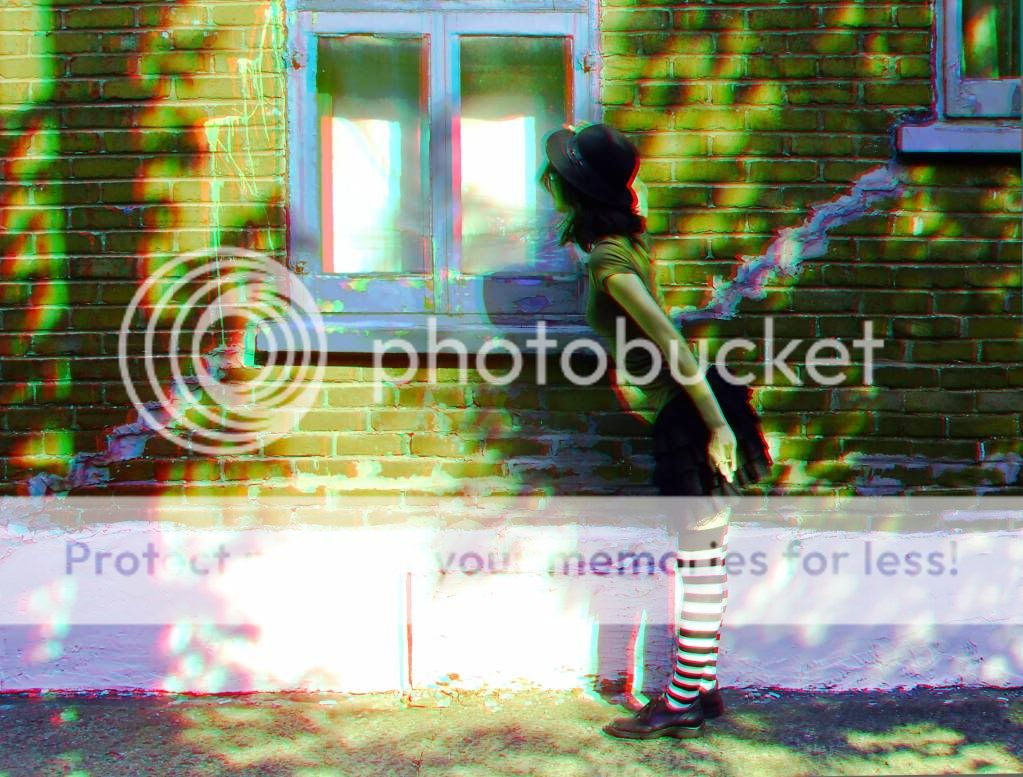
6- Use Coloured Glasses (Red//Cyan) in Easy Adjust and trust
what you see using them
NOTE: Blue on the left = Pops out.
I find that the Subject's point of interest should have close to perfect red/cyan Overlap for best effect.
7- Note the Parallax adjustment and save as Anaglyph
8- Click Alignment mode to go back to default.
9- Combine and save as .mpo (First Left // Second Right)
Note: MAKE SURE TO SET QUALITY TO 99 !
GOOGLE CAMERA AND DEPTH MAPS
1- Take a Picture using Google Camera in Lens Blur Mode
2- Tap to create Bokeh effect
3- Send to PC
4- Drag and drop Picture onto gcamera.exe
5- Open resulting files in stphmkre.exe
6- Edit - Depth Map - Make 3D from 2D + Depth Map
7- Edit as above
3D CONVERSIONS AND MANUAL HEATMAPS / DEPTHMAPS
1- Use a scene with defined depth layers
2- Photoshop, add layers by Polygonal Lassoing shapes from Closest (Black) to Furthest (White)
2a - Each Shape is it's own layer
3- Save image as seperate file
4- Import Both Images into Stereo Photo Maker
(Original Left, Depth map Right)
5- Go to Edit => Depth map => Make 3D From 2D
6- Adjust Numbers for intensity
Inspiration for technique: www.youtube.com/watch?v=HVSf22VT1t4
I use all three Images the Camera outputs
1- Reference JPEG
2- Left Jpeg
3- Right Jpeg / Depth Maps
Optional:
Go to Fuiji SeeHere or Snap 3D to bring your images into real life.
TA-DA!
Now, there are other free programs, but they leave watermarks.
Having obtained a Fuiji Finepix W3 and toyed around with 3D picture taking, it was time to get editing.
But how?
Lightroom and Adobe in general do not support MPOs (Multi Picture Objects), so how is one to effectively edit their pictures?
After doing some research and testing, I found a pretty nifty (and free!) way.
Materials:
MPO Split (splits the Jpegs inside the MPO)
ADDED: ABOVE LINK BROKEN, USE FOLLOWING:
MPO Extractor - Browse Files at SourceForge.net
StereoPhoto Maker
1- Drag .mpo onto mposplit.exe (1st Left // 2nd Right)
2- Edit Both jpegs with "AUTO SYNC" in Lightroom
3- Open stphmkre.exe
4- Open L/R Images
5- Easy Adjust or Auto Align to get an idea
(Note: Auto Align does not yield best results)
6- Use Coloured Glasses (Red//Cyan) in Easy Adjust and trust
what you see using them
NOTE: Blue on the left = Pops out.
I find that the Subject's point of interest should have close to perfect red/cyan Overlap for best effect.
7- Note the Parallax adjustment and save as Anaglyph
8- Click Alignment mode to go back to default.
9- Combine and save as .mpo (First Left // Second Right)
Note: MAKE SURE TO SET QUALITY TO 99 !
GOOGLE CAMERA AND DEPTH MAPS
1- Take a Picture using Google Camera in Lens Blur Mode
2- Tap to create Bokeh effect
3- Send to PC
4- Drag and drop Picture onto gcamera.exe
5- Open resulting files in stphmkre.exe
6- Edit - Depth Map - Make 3D from 2D + Depth Map
7- Edit as above
3D CONVERSIONS AND MANUAL HEATMAPS / DEPTHMAPS
1- Use a scene with defined depth layers
2- Photoshop, add layers by Polygonal Lassoing shapes from Closest (Black) to Furthest (White)
2a - Each Shape is it's own layer
3- Save image as seperate file
4- Import Both Images into Stereo Photo Maker
(Original Left, Depth map Right)
5- Go to Edit => Depth map => Make 3D From 2D
6- Adjust Numbers for intensity
Inspiration for technique: www.youtube.com/watch?v=HVSf22VT1t4
I use all three Images the Camera outputs
1- Reference JPEG
2- Left Jpeg
3- Right Jpeg / Depth Maps
Optional:
Go to Fuiji SeeHere or Snap 3D to bring your images into real life.
TA-DA!
Now, there are other free programs, but they leave watermarks.
Last edited:
")

![[No title]](/data/xfmg/thumbnail/37/37136-40f690dc7da693c09d7c99c3782954b8.jpg?1619737884)
![[No title]](/data/xfmg/thumbnail/37/37132-262f6a30f085c3ab6d83925db41b553b.jpg?1619737884)