A couple more C&C please :-)

lucas123

TPF Noob!
Joined
Sep 15, 2009
Messages
62
Reaction score
0
Location
Nova Scotia
Can others edit my Photos
Photos OK to edit
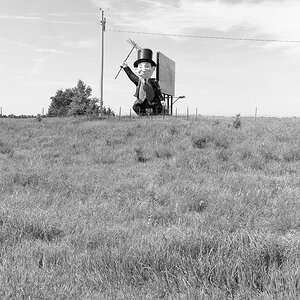
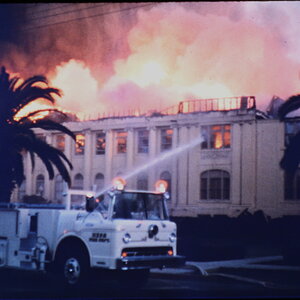
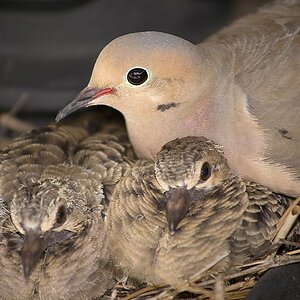
here are a couple more i took today C&C please

#1
DSC_0103.jpg


#2
DSC_0118.jpg


#3
DSC_0105.jpg


#4
DSC_0116.jpg


Please feel free to comment as i need some advice :)
 
All 4 photos would benefit from more contrast. It looks like there are some interesting textures on the door that could really pop if you were to play with that a bit. At this point, that would be post processing, but if you want to fix that while you shoot, be careful of what you meter off. One trick I heard (and am still trying to master myself) is to find the "neutral grey" in your subject and meter off that. It will give you a better exposure and contrast overall.

I like #4 the best, but I think it might have been more interesting from a different perspective or with a wider angle. #1 is somewhat ruined for me because of the pole in the upper left hand corner. If you cloned that out, it would improve it greatly. I think you have a good eye for interesting subjects, now play with it more! Thanks for sharing.
 
:Dthanks for taking the time to reply to my post however i am not sure it understand the whole metering off thing you were talking about? or metering in general? and what do i need to do to make the textures really stand out ?
once again thanks for your interest
 
:Dthanks for taking the time to reply to my post however i am not sure it understand the whole metering off thing you were talking about? or metering in general? and what do i need to do to make the textures really stand out ?
once again thanks for your interest

Let me see if I can explain this... I'm by no means a professional, so I would highly recommend extra reading or googling on metering and using neutral grey for more information. Hopefully someone else will jump in and correct me if I say anything way off. ;)

First, are you shooting in manual mode? If not, I'm not sure this is going to be much help. I shoot in manual mode which means I set my f-stops and shutter speed to what I think it should be. (I don't know if what I'm going to say relates to automatic mode...) BTW, I highly recommend going that route if you're not just because of the control. It took me a while to really get the hang of it, but once you start shooting manual, it's hard to go back.

Metering is the process of reading the light off your subject to correctly expose your photo. I shoot with a Nikon d70s and in order to meter, I hold my shutter release button about halfway down. I then (in non-technical terms) get lines in my display that show me how over or underexposed my shot is. This exposure is based on my current shutter speed, f-stop, and what I metered off of, so it's important to know what you want to stand out in your photo when you meter. In the case of your picture, if I metered off the sky and then took a shot of the door, it would be way dark. If I metered off the door, the sky will be way bright.

This is where neutral grey comes in. (Again, google this - there's lots of good information.) If you find a color that would be your neutral grey for the shot and meter off that, your photo will be better exposed and will have higher contrast between the highlights and the lowlights. I prefer high contrast black and whites, so I tend to either over or under expose while shooting and add additional contrast during post processing. People have different tastes and techniques for creating contrast - these are just mine.

I hope this helped a bit!
 
I'm not an expert when it comes to digital, but I suggest that you look up the different methods for converting a color image to black and white. Quite some time ago I experimented with the channel mixer method of conversion and found that it allowed a good deal of control over contrast in post processing. What ever method you are using (conversion to grey scale I presume) results in a very narrow range of tonal values (i.e. you do not have an even range from pure white to pure black), rather your darkest areas are grey, and the lightest areas a sort of grey-ish white.

Take a look at this bar - it shows a 20 step grey scale. It's intended for something else, but for our purposes it will do just fine. Compare the highest (whitest) and lowest (blackest) tonal values of this bar with your images. When something is low in contrast it means that it is clumped together somewhere along a scale similar to this. In order to boost contrast you want to spread these values out, like this bar, so that you have more tonal range.

Most people prefer more of a tonal value range than you have in these images because it gives the image 'pop' - it makes it jump off the paper, or in this case the screen, far more than images with a narrow range of tonal values. It also improves the apparent sharpness of an image (because it is easier to discern the edges of things when they stand out more from their background). Using a different method for converting color to black and white will allow you more control over that range of values...

- Randy
 
All the images are underexposed by a stop or two. You might want to look into some post-processing software, as exposure is generally the primary technical aspect of any photo. Also, like others have said, it looks like you just converted to B&W in camera or with "convert to grayscale" in some editing program. Regardless, to get true blacks and true whites, Photoshop or Gimp (free) are your best bet.

As far as composition, I think 3 and 4 might be the best. But, I don't feel like there is much more subject than the door. But, again, if it were properly exposed and had proper white and black points, and way more contrast, I'd think they were far better photos.
 
All 4 photos would benefit from more contrast. It looks like there are some interesting textures on the door that could really pop if you were to play with that a bit. At this point, that would be post processing, but if you want to fix that while you shoot, be careful of what you meter off. One trick I heard (and am still trying to master myself) is to find the "neutral grey" in your subject and meter off that. It will give you a better exposure and contrast overall.

I like #4 the best, but I think it might have been more interesting from a different perspective or with a wider angle. #1 is somewhat ruined for me because of the pole in the upper left hand corner. If you cloned that out, it would improve it greatly. I think you have a good eye for interesting subjects, now play with it more! Thanks for sharing.

When you say metering, that refers to where in the view your camera will focus correct?
 
When you say metering, that refers to where in the view your camera will focus correct?

Again, I'm not a professional... Where your camera will focus is called the focal point and if you're shooting in manual mode, you can change your focal point while metering.

Metering is the process of gauging how your camera is reading the light in your photo. Generally you want to meter on the area of your composition you want to be well exposed. You probably want your entire pic to be well exposed, but depending on the conditions, you might want/need to over/under expose one area to ensure a correct exposure in another. At its simplest concept, how your camera reads light is determined by your f-stop, shutter speed, and ISO setting.

There are some great books on exposure and metering as well as information on the web. Hope this helps!
 

Most reactions

New Topics

Back
Top