A Few Questions About Filters and Tips for Capturing Vivid Colors

No one makes a camera that can "capture images true to what my eye sees".
Simply because a camera does not work like our eyes do and a photo only has 2 dimensions.

Polarizing filters are limited.
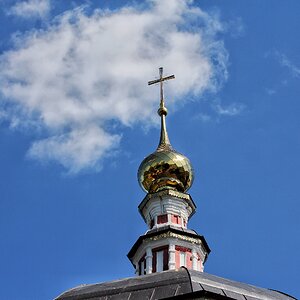
A polarizing filter will add the most saturation to blues and greens, but not much to 'golden hour' sunset colors.
But for the effect to be even across the entire image frame the angle of the sun to the lens long axis needs to be 90°, and the sun can't be more than about 30° above the horizon. So to get that nice deep blue color and white clouds in the sky you need to shoot in the morning or in the evening before the sun gets up in the sky.

'Protection' filters are not something you need.

In fact, many 'protection' filters cause more problems than they solve. Inexpensive 'protection' filters usually cause the most problems.
Problems like focus softness, Newton's Rings, lens flare, and when they break the sharp shards of broken glass are often driven back into the lens element scratching the lens element they were intended to 'protect'.

Cheap filters often have aluminum bodies. Many lenses have steel filter threads. Aluminum that is in constant contact with steel often corrodes by the process of electrolysis which can making removal of a cheap filter difficult.
Get filters better made (more expensive) that have a brass body. Brass does not react with steel like aluminum does.
 
WARNING: Aluminum ring filters have also been linked to high blood pressure, E.D., and early onset dementia. In addition to sharp shards of broken glass being driven back into lens fronts, authorities have reported an alarming new trend, as bands of roving young tough filters are now roaming through city neighborhoods and are extorting protection money from shopkeepers, as well as partying late at night in the streets, and setting fire to camera straps. Experts in science have reported that the filter/filter ring electrolysis between aluminum ring filters and metal filter rings (found on perhaps 40% of lenses in today's market) begins almost immediately after the offending aluminum ring filter is installed, and the process advances with astounding speed, often taking as little as 10 to 15 years to create a stuck filter. Some stuck filters are so difficult to remove that it requires expensive, rare material tools, such as a dycem square from a kitchen drawer, or a segment of the very rare material known as "inner tube", from a tire shop.--

All of the above is true; I know, I read all this on the internet.
 
................All of the above is true; I know, I read all this on the internet.

Never believe everything you read on the internet.
.........................................................................Thomas Jefferson
 
I am obsessed with sunrise / sunset pictures. I have a cheap camera and would rather endure an extended root canal procedure than pay the exorbitant prices for filters (please no "you get what you pay for'"replies) and I still get what I want by adjusting exposure during the event:

sunset46.jpg

wakrasun7.jpg

Neither of these pics were colour enhanced, it actually looked that way.
 
I am obsessed with sunrise / sunset pictures. I have a cheap camera and would rather endure an extended root canal procedure than pay the exorbitant prices for filters (please no "you get what you pay for'"replies) and I still get what I want by adjusting exposure during the event:

View attachment 97890
View attachment 97891
Neither of these pics were colour enhanced, it actually looked that way.
Yep, under exposing for saturation is a very old trick.
 
Yep, under exposing for saturation is a very old trick.
The point is that buying another widget is not always the answer. Modern cameras are amazing bits of technology, experiment a bit with them.

I am not that old!
 
Try cpl filters or change to Fuji XT-1
Hi NoFX, my name is John Bates, for about 10 years I worked as a pro' photograper, in the UK, where I live in Leeds. Most/all of what has been posted is good advice, except: You do not have to buy different sizes of all your filters! There are two things you can do to minimise this expenditure:.
1) Buy a single over large filter & buy what are called 'stepper or stepping' rings, or adaptors! These have 2 different sized threads, one on each face, which allow you to screw the adaptor to the front thread of the lens & then screw the large filter to the outer thread of this adaptor.
2) You could invest in a 'square' filter system, such as 'Lee' or 'Cokin'. These also use an adaptor which screws to the front of the lens, on this is slotted a plastic or metal holder, into which you can position up to 3 different filters. Very useful systems.

In addition, re: 'polarising' filters they are also useful for removing glare/reflections fom shiny leaves, floors & jewellery, etc. No matter which photo s/ware you buy, they CANNOT replicate what a polarising filter can do! Nor can they remove glare, etc, from a photo you have taken! WHY? Because, the portion of the photo with the glare/reflection in it, is 'damaged', ie the original information is not there, as it has been replaced by the glare/reflection information.
Last 2 points: your camera has s/ware functions built in for specific 'scene modes' which will 'enhance' the colours etc. Autumn colours & sunsets are 2 of the modes mentioned! R T F(lipping) I for further help! Lastly the D5500 has In-Camera-Image-editing. Which may help you to achieve what you want to do! Again RTFI!!! That's what they are there for.
Very lastly: if you are going to buy s/ware, try a couple of the free ones on the internet FIRST! Do NOT buy photoshop! It promises to solve all your photo problems, but it is soooooo complicated you need a degree just to read the manual. MY advice to you would be to buy/rent lightroom in about six months time. This will help with cataloging all your photos, as well as providing about 85-90% of the functions of photoshop.

Sorry for ALL the information! Hope this helps. If you need any other help just ask.

WJB.
Yep, under exposing for saturation is a very old trick.
The point is that buying another widget is not always the answer. Modern cameras are amazing bits of technology, experiment a bit with them.

I am not that old!
 
Hi, John Bates again! Sorry, I forgot to say one thing. UV flters. Personally, I believe a UV filter is very useful, kept on the front of the lens. For 2 reasons: 1) in hazy conditions, which I believe happen quite often, they can help in removing/cutting through the haze, any colour-cast they may put into the picture, is automatically cancelled by the white balance within the camera. 2) The filter provides a degree of protection to the front element of the lens! Lenses are, to say the least, expensive items. If the front element of the lens becomes damaged, it means the lens becomes anywhere up to unusable. Repairing it may mean replacing the front element or, even buying a new lens! Both will be expensive options!
Putting a filter over the front of the lens, means, that filter becomes the new front element. Replacing that will be a lot cheaper than the other options.
Buy the most expensive UV filter you can afford, pref from a recognised brand! Most UV filters are very good & make no discernible difference to the quality of the photos you take. Only you can decide if any possible minimal loss of quality is worth the cost of replacing or repairing any damage to the front element of the lens? It is personal choice, but I would do so!

Reg... . WJB.
 
I am obsessed with sunrise / sunset pictures. I have a cheap camera and would rather endure an extended root canal procedure than pay the exorbitant prices for filters (please no "you get what you pay for'"replies) and I still get what I want by adjusting exposure during the event:

View attachment 97890
View attachment 97891
Neither of these pics were colour enhanced, it actually looked that way.
Well I also do the under exposure trick, but when you want the foreground exposed as well, and not in shadow you need filtration. For the position of the sun as in yours then a hard edge ND is your friend.
For filtration the ND, GND, and CP are the only filters that programs cannot reproduce.
Now as far as getting better colors for your Jpegs if that is what the OP is shooting then you have your Picture Controls in your Nikon. You can adjust each of the controls to taste for the saturation you want. Personally I suggest you shoot in RAW+Jpeg Fine, that way as you learn processing you can go back to some of your older photos, and give them new life. Also if you like what turned out in Jpeg you can apply as shot to the RAW file, and, or do minor tweaks if needed, and save to something other than Jpeg.
The whole thing is you need to experiment with your camera, and its settings to see how each adjustment affects the final image. After all this is digital now, and a whole lot easier learning than the old days of film. I literally kept a notebook on shots with everything listed for each shot. That is how I learned what works, and what does not.
Also a yellow filter is great for overcast flat light days. Just measure the WB and have at it. It brings out detail nicely, over nothing at all.
 

Most reactions

New Topics

Back
Top