Black and White Fashion Photography Tips plz

clee27

TPF Noob!
Joined
Jun 12, 2008
Messages
176
Reaction score
1
Location
Atlanta, GA
Can others edit my Photos
Photos OK to edit
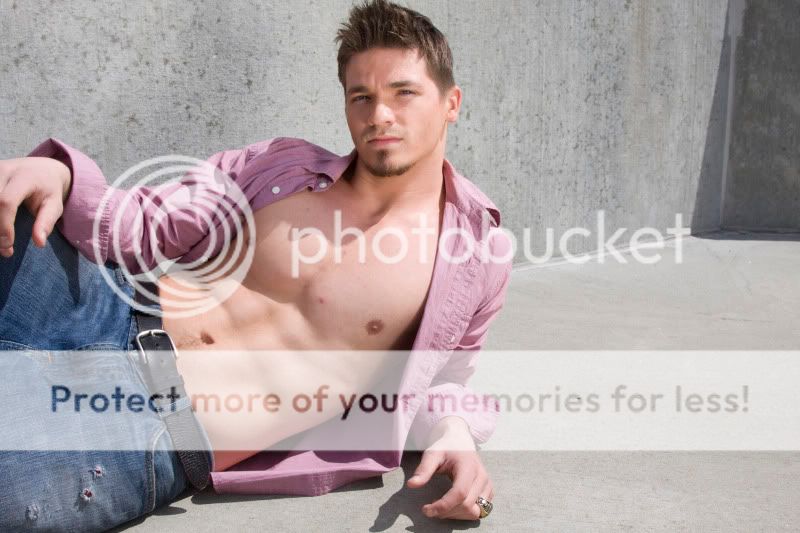
IMG_0080w.jpg


I can't seem to get B&W pictures down....what are your tricks or tips plz?
If you can edit it and help me that would be great too!
Anything would be much appreciated! Thank you!
 
A couple things, in no particular order:

1) I think you overdid the processing.
2) The environment doesn't speak to me other than being a background. So I think you could crop closer on the right.
3) Lighting on the subject is good.
4) Hair is generally a lot more important than you'd think. Don't throw away the detail in the hair in the name of processing.
5) Avoid limbs/extremities being closer to the camera than the face (I'm taking about his hand). It makes them look fat.
 
Also, strictly speaking this isn't really fashion. It's more glamour, as the emphasis here is more on the model than the clothes.
 
Also, strictly speaking this isn't really fashion. It's more glamour, as the emphasis here is more on the model than the clothes.


thank you very much....should i post the original image and see how you would do it? i know i'm still very new to all this so anything would help! let me know if i should post the original thanks!
 
If you're so inclined, I'd be happy to take a crack at it, thought today I'm working on my crappy laptop.
 
I did this in a couple minutes. Not the world's best edit, and I don't know what I would have done with it given more time to study it and work.

General goals:
1) Emphasize interesting lines
2) Increase contrast/sharpen (per your original edit)
3) Tone

I think I cropped the way I did because of #1. Cropping from the bottom emphasizes the diagonal line at top-right.

Contrast/Sharpening was done by converting the image to Lab color mode and applying unsharp mask to the L channel. Then highlight using the shadow/highlight tool (I can't remember if I did this on the whole thing or just the L channel). The point of this is to put some detail back in the highlights, which you inveitably lose when you increase contrast.

Toning is very subtle and is a reverse split-tone. Typically a split-tone is a cool color in the shadows and a warm in the highlights. I did a "deep yellow" in the shadows and a "deep blue" in the highlights. Dont' know why I picked those two. Pink and blue are all the rage these days for some reason. To split tone, go to Select, Color Range. Choose a shadow area (don't choose one too dark). When it selects those areas, copy and paste- it will create a new layer. Then apply a photo filter, gradient, or you can hand color. Do the opposite for a moderately bright highlight range. I believe I used the chest highlights for the highlight range and the jeans or a dark spot on the wall for the shadow range.

I hope you find a little bit of that useful, and that it's not too over anyone's head.

Regards,
Alpha

img0080testedit.jpg
 
I don't like that edit. Looks too blue in the highlights, but I understand you did it fast.

To OP, when you did your conversion, did you desaturate or do it the *right* way with a monochrome mixer? If you use your monochrome mixer, you can adjust the colour levels still and get the look you want, highlighting what needs to be. The biggest issue with your original edit looks to be his face is super blown out and overprocessed. When I look at his jeans and shirt, it all looks fine. It's just wayy to bright and contrasty on the face and hair.
 
Fair point. I'm not really seeing what you're seeing, but this monitor isn't calibrated and the toning was a random addition anyway. In any event...

There is no "right" way to convert an image to monochrome. You can take a photo of your monitor with black and white film for all anyone cares. The end-product is what's important. At the very least, considering end result of the original edit, the contribution of the conversion method is negligible.

Also, contrast is not the problem. Lack of detail is the problem.
 
True, the end result is all that matters, but if you have two buttons to make an image black and white, you may as well use the one that will give you the most control over the final product;)

Yes, lack of detail is the problem, but it looks like she selectively bumped up the contrast on his face in the original image, which in turn looses a lot of details depending on the program used and file format. By adjusting RGB sliders on a monochrome mixer, you can get the desired effect quite easily, especially with skin tones, pink, and blue all on a grey bg.
 
Here are 2 I did quickly. You can achieve many different results just by playing around with fill lighting and contrast. Not sure if this will help you but I usually adjust the levels while the picture is in color, than convert it to B&W and tweak it from there.

IMG_0080test-4.jpg


IMG_0080test-3.jpg
 
It may be there are not more responses, as you are using Lightroom for PP. It is excellent for PP, but many do not use it. They got used to using other programs, then got Lightroom. Old habits die hard, they may use LR for some things, like I did. Then switch to PS, etc for finishing touches.

But, the more I learn about LR, the more I like it.
Now use LR for 95% + of all my images. Its quicker than switching. Most of what I do in PS today is add frames or do major changes or retouching and things that cant be done in LR.
Most may like it exactly as it is, especially your edit after checking the help already given. Personally liked the first, then the edit you did better. Your idea was Waldo or to focus on the People and the latter one shows them in more detail... so feel you don't need help.

Being Picky, Only one thing in it that you might change, that might have to be done in another editor, would be capture the windows in the upper right, and change them to match the other windows. They draw the eye away from the center of attention.
 
Big_Pink_Snapper? I like what you have as a second variant....

really appealing and lovely) better than any other version here) Bravo!
 

Most reactions

Back
Top