Care to help a beginner? Lighting setup for xmas cards :)

memily

TPF Noob!
Joined
Jul 12, 2011
Messages
98
Reaction score
18
Location
Bay Area, CA
Can others edit my Photos
Photos OK to edit
Hi All,

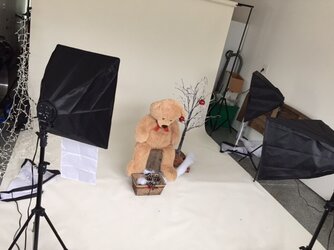
I am WAY new to studio lighting. I usually do everything outdoors and had this crazy spur of the moment idea that I could set up a little "studio" for an xmas card photoshoot with my 4 year old. I bought a super cheap set of three lights, a background stand, and a roll of savage white seamless paper and have quickly realized this is a very different ballgame.

I have messed around with a few different combos so far and have also looked online at some diagrams showing a basic setup. I was having issues getting my white paper to photograph white at first and determined I needed way more light directed at the paper so it wouldn't photograph gray or off white. When I use two lights pointed at the paper I'm able to get closer to a bright white background, but then I only have one light for my subject plus my flash.

My original idea was to have xmas lights in the background and shoot wide open to get a pretty bokeh but I don't quite have enough room to put her far enough from the background to get the look I want -- I may try that in another location.

Anyone care to help a beginner out and let me know how you'd set this up using what I've currently got? A photo of the area is attached but pay no attention to their current placement....I've been moving things all around and practicing with this big bear hahaha.
 

Attachments

  • IMG_1981.JPG
    IMG_1981.JPG
    60.1 KB · Views: 249
Well, yeah, the idea is solid: use two identical lights aimed at the background paper, to "make it white". If the background paper receives more light than the subject, it WILL BE rendered as white. If the subject (bear or child) is in front of the background, and you expose properly for the foreground subject, and the foreground light exposure on the subject is at least one stop DIMMER (yes, dimmer!) than the background, white paper will be rendered as a very bright, pure, detail-free white.

In other words, you WANT the subject in the foreground to be lighted with LESS light than the background! Then, when you exposue correctly for the dimmer-lighted foreground subject, the backdrop will be as white as the driven snow!

Your setup looks fine. Two at 45 degrees shooting onto the seamless...one main light in front, on the subject, from 15 to 50 degrees. BOOM!
 
For the Christmas lights background shots, use your 100mm f/2.8 macro lens at f/2.8 to f/4, in order to "magnify" the background's lights, and to render them nice and large and fairly round. WIde-openm, the aperture ought to be perfectly round; stopped down the blade shape might tend to creep in.

This gallery minilights gallery 2 Photo Gallery by Derrel at pbase.com has some EXIF information and data shot using seven strands of old-fashioned mini-lights. Not the new-new, LED mini-lights, but the old-school kind of mini-lights. Tips: set the ISO to 400 to make the lights brighter, and use slow-ish shutter speeds at wide apertures, to get the lights bright. The old-fashioned Christmas lights generally look better with the camera's white balance set to Tungsten, so for accurate skin color on a person (or bear!) in the foreground, the color temperature of the flash used on the foreground ought to be gelled with an orange gel of some type to "orange-up" the white light.
 
One thing not addressed yet (or I missed it): Set up your POWER on each light separately before you turn them all on! Set one get it right, Turn it off and do the same with each successive lightI Get each PERFECT, then proceed with any minor placement adjustments. I cannot emphasize this enough.:band:
 
Well, yeah, the idea is solid: use two identical lights aimed at the background paper, to "make it white". If the background paper receives more light than the subject, it WILL BE rendered as white. If the subject (bear or child) is in front of the background, and you expose properly for the foreground subject, and the foreground light exposure on the subject is at least one stop DIMMER (yes, dimmer!) than the background, white paper will be rendered as a very bright, pure, detail-free white.

In other words, you WANT the subject in the foreground to be lighted with LESS light than the background! Then, when you exposue correctly for the dimmer-lighted foreground subject, the backdrop will be as white as the driven snow!

Your setup looks fine. Two at 45 degrees shooting onto the seamless...one main light in front, on the subject, from 15 to 50 degrees. BOOM!

For the Christmas lights background shots, use your 100mm f/2.8 macro lens at f/2.8 to f/4, in order to "magnify" the background's lights, and to render them nice and large and fairly round. WIde-openm, the aperture ought to be perfectly round; stopped down the blade shape might tend to creep in.

This gallery minilights gallery 2 Photo Gallery by Derrel at pbase.com has some EXIF information and data shot using seven strands of old-fashioned mini-lights. Not the new-new, LED mini-lights, but the old-school kind of mini-lights. Tips: set the ISO to 400 to make the lights brighter, and use slow-ish shutter speeds at wide apertures, to get the lights bright. The old-fashioned Christmas lights generally look better with the camera's white balance set to Tungsten, so for accurate skin color on a person (or bear!) in the foreground, the color temperature of the flash used on the foreground ought to be gelled with an orange gel of some type to "orange-up" the white light.

Derrel, thank you so much! This is all super helpful! I wouldn't have ever thought to use my 100mm for the lights, was going to use my 50mm at 1.8 -- see, this is why you're the pro ;)

Are these continuous lights or strobes?

Continuous.

One thing not addressed yet (or I missed it): Set up your POWER on each light separately before you turn them all on! Set one get it right, Turn it off and do the same with each successive lightI Get each PERFECT, then proceed with any minor placement adjustments. I cannot emphasize this enough.:band:

If I ever have a set where I can adjust the power I will absolutely take your advice. This was a super cheap set, I can't adjust the power or adjust the brightness/dim. I can only control the light by diffusing it. Thanks of the tip!
 
It's very likely than that these lights simply do not have the power to do what you want to do.
 
It's very likely than that these lights simply do not have the power to do what you want to do.

I think that's exactly it. They aren't very strong and now that I've researched it a bit I understand it better. See, this is what happens you make a spur of the moment purchase from Craigslist hahahhaa! I'll just do the best I can with it.


Remember that you can adjust non-adjustable lights by simply moving them closer or farther away. Inverse law remmber? Double the distance 14 the light etc etc. You may find these low end lights quite usable for small sets like you are attempting. remember to that those things have stands, on which you can put good used flashes on. I have 5 550Exs and never paid over $100 for any of them. those soft boxes should be easy to adapt also. so long as the flashes can be set up manually you can fire them by cable, wireless optical, or RF. You can get a tx, and 3-4 rx's rf on ebay for less than $40. And they WORK!!!!

...and you can alway just add a flash or two and use those for fill and such.

hang in there! ;)

Haha yes definitely can adjust by location. I had to bring the lights much closer in order to light up the paper...it's still not as bright as I'd like but it will work for now. Thanks for the tips! I definitely think for a small personal set up like this I can make is stretch in the ways you suggested.

Thanks! :)
 
Just an update: It actually all worked out to my surprise but I can definitely see how more powerful lights or strobes would've made things MUCH easier. I didn't get to try with xmas lights this time -- my 4 year old was over this "photoshoot" before it ever begun! Here's my favorite shot...
 

Attachments

  • IMG_7502.jpg
    IMG_7502.jpg
    106.7 KB · Views: 188
Just an update: It actually all worked out to my surprise but I can definitely see how more powerful lights or strobes would've made things MUCH easier. I didn't get to try with xmas lights this time -- my 4 year old was over this "photoshoot" before it ever begun! Here's my favorite shot...

Looks really good!
 

Most reactions

Back
Top