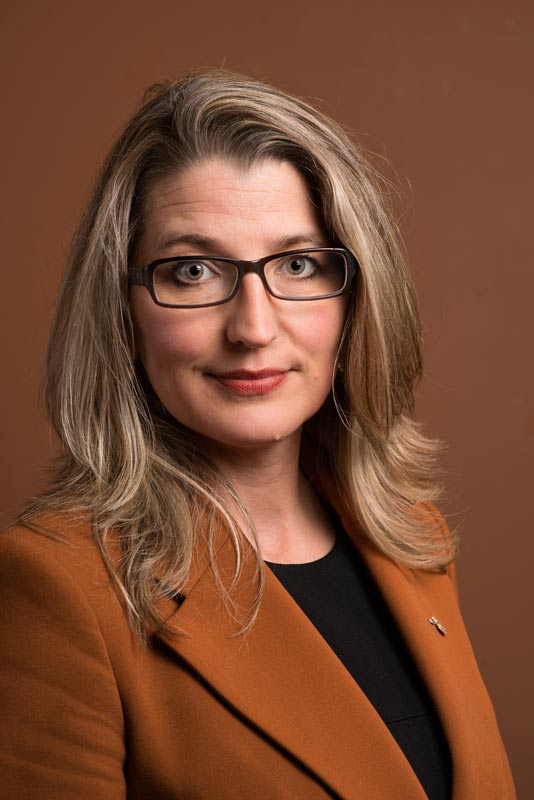
Casual-Executive Portrait- FINAL RESULTS (5pic).

I have my clarity slider on +10 on default. Ive never gone negative with it ever and I always also add sharpening on top.

Ok, thanks for that. I'll play around with it. I guess I thought women wanted their skin smoother rather than crystal clear.
 
I agree that these would have benefitted from a bit more top space. I think the solution is simply to crop these, and eliminate the excess shirt/blouse, and change these into "headshots". I think that just eliminating all the chest/shirt/blouse will significantly improve them, and make that lower camera position/superior subject feeling significantly less of a factor. I would add a bit of the tooth whitening tool in Lightroom.

I would crop the mens' shirts down to one button on most, two on the suspender-wearing fellow, and also lop off the left and right hand sides of the frame as needed to get the right balance. More head, less shirt will change the feel of these quite markedly, and that goes double if these will be seen smallish.

I'll mess around with the crop and see if I can get something to work out nicely. Thanks for that comment.

Tooth Whitening tool? I'm not aware of that. I've been using the adjustment brush, and brushing in exposure.
 
PropilotBW said:
Tooth Whitening tool? I'm not aware of that. I've been using the adjustment brush, and brushing in exposure.

Yes, works sooooo amazingly well. Perhaps the best Adobe invention since...well, Iris Enhance.
Teeth Whitening adjustment brush.jpg
 
I use the Teeth Whitening in Lightroom too. I think it not only boosts exposure but also desaturates a little. If the person already whitens their teeth, it can be a bit strong and I have to tone it down. But usually it's great as-is.

I think they look great. I agree with the other comments. I'm not real crazy about the half-white half-purplish lighting in the background, but it sounds like they chose that spot for a reason so it has significance to them. I wish a couple of the eyes were a little brighter.

As for skin softening, this is what I usually use: How to Professionally Retouch Portraits in Lightroom - Digital Photography School

I saved those brushes and use them nearly every time I edit an adult's face (children generally don't need it.) There are some brushes already in LR, but I found them to be a little too heavy-handed. These were more natural. I also like editing the skin (pores) separately from creases and wrinkles, as it shows in the tutorial. It's worth a shot to see if that workflow works for you.

I think your clients will be very happy with these!


Thanks for the link and comments!
 
Thank you, folks, for ALL the tips!!

The client really liked the pics!
I wasn't able to correct some of the flaws, but I stI'll think they looked great. ( and I surprised myself, too!)
 
As long as you can trigger that speedlight off-camera, your golden. If not, well, it's still 100% do-able. Ideally, have the speedlight off-camera , 30 degrees off of lens-axis, use some sort of diffuser if possible, if not consider bouncing off of a white card or wall, and have your reflector close in on the opposite side. Have the client turn their body so they're facing the light ("See the light") and then turn their head back to you. This is my quick & dirty headshot recipe and produces images like this:

_DSC0985.jpg

This was done with one speedlight, a 30" Lastolite Ezy-Box and a 42" reflector.
her expression is too blank and her pupils are too dilated here.

It was a great example, and it helped me figure out what lighting I needed to replicate.
His pic isn't posted for critique.
 

Most reactions

Back
Top