Crisp clear star photos

citjet

TPF Noob!
Joined
Sep 17, 2009
Messages
131
Reaction score
0
Location
Brightwood Oregon
Can others edit my Photos
Photos NOT OK to edit
Im struggling with this one and am wondering what is going to be the best ISO and f stop combonation for the milky way. Am I assuming correctly that the f stop should be with the lense wide open or is that going to help creat noise with high ISO's?

I did find that a long exposure looks blurry because the stars are moving accross the sky hense my ISO confusion.

Any help would be great.
Yes, wide aperture will let you use a faster ISO and shutter speed, decreasing the chances for noise.

The real key is nailing the exposure and to do that you need to be at a really dark site, well away from any light pollution.

To minimize the amount of atmosphere you're shooting through, shoot straight up and get to as high an altitude as you can.

The atmosphere is always moving and will cause some blurring. So, another thing you can do is shoot when the atmosphere tends to be most still, a couple of hours before daybreak and give the glass in your lens plenty of time to adjust to the ambient air temperature.

The Earth's rotation can be compensated for with a motor driven equitorial mount for your camera.
 
The only way I know to get those images is with High ISO, full aperture and a decent shutter speed. The noise you get depends on your camera. The actual best way to get a great star field shot is, to piggy back your camera on a telescope and use lower ISOs where the NR wont automatically kick in. Doing that I would tray an ISO and say a 3 minute expsoure and, if I didnt get what I wanted I would try a higher ISO and, a different exposure time if the image was too dark or, try less exposure time if it was too bright.
 
Im struggling with this one and am wondering what is going to be the best ISO and f stop combonation for the milky way. Am I assuming correctly that the f stop should be with the lense wide open or is that going to help creat noise with high ISO's?

I did find that a long exposure looks blurry because the stars are moving accross the sky hense my ISO confusion.

Any help would be great.

I did some playing last weekend, 10 seconds, ISO 1600, f/3.5, 28mm and they did OK with nice points of light. Focusing is the first problem, so find a nice bright start for that. Since the subject can be a variety of light years away, I don't think depth of field is very important.

The above was a total guess, based on past memories. Honestly I still like film better for star photos, but here we are in the digital age, might as well get along with it.

No wind helps, or sand bag the tripod, throw an old anvil on it, or hang anything you have over the cross supports on the bottom.

Remote release is good, but using the self timer will let things settle down after you push the button. One way or another, you need something beyond your finger, so you don't get "jiggles". :lol:

I'm sure that some people use the mirror lock up, I don't bother. But I'm just playing. Shooting with a telescope it can be an issue.

The reason I was trying different settings was for the space station which can traverse in about 3 minutes or less, and I wanted the streak, but also wanted the stars. I don't want it blown out, but at the same time, to get a proper exposure for that long, if it's stopped down, then you don't get the stars or the trails.

It's always a balancing act, give and take.

My suggestion as usual, beyond reading EXIF data, is go out and shoot at different speeds and openings and TAKE NOTES! Sure you can read the data on the files, but the notes (aka analog documentation) makes it easier to page through the photos and see what you did and how it affects things. Second reason for notes, you can circle things that work and read them in the field or find a startng point when the situation comes up again in two years. ;)

If it's of any interest, one hour of exposure will produce 15 degrees of arc in the stars. You can calculate how much motion you will expect with some simple math. Look at the above, and figure 15 degrees x 24 hours = 360 degrees. Hey, isn't that amazing?

Since everything is manual I have considered adapting an old 50mm 1.2 lens to the digital so I'd have a way to get more light to the sensor for less dollars.

Oh yes, above all... Have Fun!

Here's a good website for some better and more specific information.

http://www.danheller.com/star-trails.html
 
Last edited:
Thanks Racephoto, I'll give some of those suggestions a try. Part of my kit needs to be some sand bags and a remote shutter release. Youre right on taking notes as one can go back over them to see which shot worked and the corresponding numbers are written down.

I'll play around more and post some shots if they turn out well.

Sand bags was a joke. Just hang anything heavy over the center, pry bar, junk from the trunk, rocks... whatever you have. :D

Cable release you can find all over the place. I bought about four on eBay, because I used one for a R/C remote, one for a wireless optical trigger (using a $15 driveway alarm from Harbor Freight) one just for the cable connector, one to give to a friend. Then another with the built in interval timer for making animated AVIs.

Cheaper to buy four from Hong Kong than one made by the camera company.

See the link above.

Here's another cool site. Time Lapse using a still camera.

Dan Heller's Photography Business Blog: Time-Lapse of Milky Way over Crater Lake
 
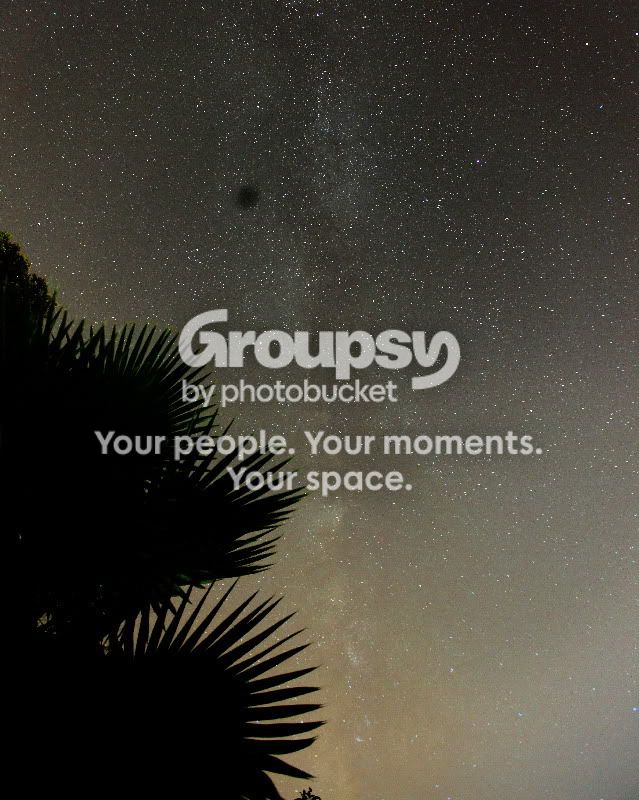
Many great suggestions and info above. I just thought I'd add an example I took just last weekend and a few of my own thoughts.

For the milky way, the #1 most important thing as KmH said is dark skies (and obviously no moon). If you've got too much light pollution, you're sunk. After you've found the dark skies, go wide angle (50mm or wider). The milky way goes across the entire sky, although it's more interesting area is the center of the galaxy which is only visible during the late spring and summer (assuming you're in the northern hemisphere). Last weekend was the last really good one for its position in the sky, but in 3 weeks you'll have another chance at it for 2 weeks or so, but it's quickly setting in the SW sky.

As for exposure, it depends on lots of stuff. If you don't have a motorized mount to counteract the earth's rotation, then you're going to be concentrating on getting a fast exposure. I always used a rule of thumb where you take the focal length times the number of seconds and that number shouldn't exceed 500. Example: 50mm x 10 seconds = 500. For web resolution you're probably fine with 1000, but if you want a really high res shot and you like to examine at the pixel level, don't go more than 250 or even less. That makes for a really short exposure!

F-ratio is going to depend on the above, but also what you can tolerate to look at. The wider open you go, the lower the quality of the stars is, but the shorter your exposure will have to be. Pro glass helps and of course so does stopping down.

ISO once again is a balancing act. Use high ISOs to keep your exposure time down, but it will have more noise.

If you've never done processing on a milky way shot before, you will find it extremely difficult and frustrating. All I can say is do lots of reading!

Here's the example from Saturday night. This was taken from my back yard in norther Lancaster county, PA. It was an incredibly clear and transparent night, so this is about as good as I can do in my area. Compared to a city we have dark skies, but compared to the desert SW, our skies are bad.
16mm
f/2.8
30 seconds
ISO 800
IMG_8317web.jpg


Where to find the forecast for how clear and transparent it's going to be:
Clear Sky Chart Homepage

Where to find the lowest light pollution for your area:
Dark Sky Finder

EDIT: sorry about the dust bunny on my sensor. I was too lazy to clone it out. That's not a UFO hovering overhead!
 
Last edited:
It's a black hole! :lol:

If you don't have a motorised mount one option is to use stacking techniques. Image stacking uses simple mathematical addition, on a pixel level to determine the final image from a set of multiple pictures. That means if you take several photos and ALIGN THEM, then stack them together you effectively have an increased shutter speed without causing star trails.

Isn't that how you actually MAKE star trails?

No. You missed the words, "align them."

Oops I gotcha.
 

Most reactions

New Topics

Back
Top