First Attempt At Low Key

smoke665

TPF Supporters
Staff member
Supporting Member
Joined
Mar 29, 2016
Messages
14,820
Reaction score
8,264
Can others edit my Photos
Photos NOT OK to edit
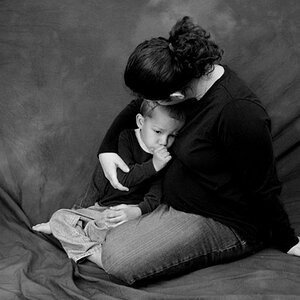
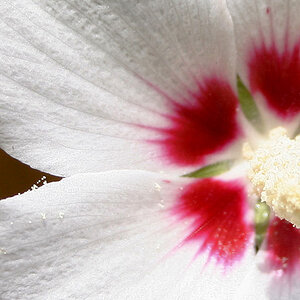
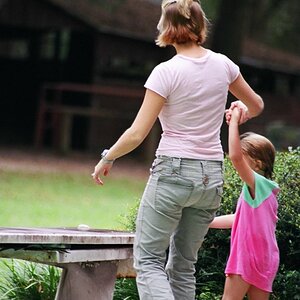
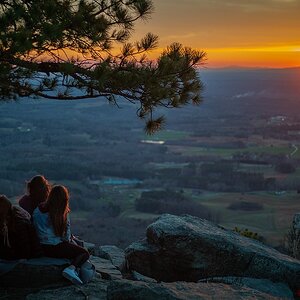
Seeing the rash of low key shots lately, made me curious to try. Using two off camera speed lights, one on the left 45 off center, high (Bare), and one on the right side low with a makeshift snoot. I can already tell my lights need to be adjusted, but any other comments or suggestions?
View attachment 130005
 
Not an expert in this area but to me a couple things; too much of the frame is filled with light and holy heavy contrast man! :D
 
Trever1t said:
Not an expert in this area but to me a couple things; too much of the frame is filled with light and holy heavy contrast man! :D

Heavy contrast, or odd tone-mapping, I'm not quite sure how to describe what it is that bugs me about the processing on this photo, but it does look a bit off in terms of the shadow that is formed around his mouth, which is solid and deep black, but the cheek on the left is very "light".

I think this would look better in B&W than in color.
 
It looks way oversharpened and has way too much contrast in my opinion.
 
Way too specularity in the highlights IMO.

The light on the left side of the face was hotter than I intended and concentrated to tightly on the cheek. I had intended to use a reflector on the lap to bring light back up in the shadow area, but forgot it. Learning experience for me so back to practice.
 
Quick B&W conversion, not spending a lot of time, because it is practice, but I'm thinking the B&W holds possibility for the next one. Is it possible that the flash high on subjects right needs to be brought more to the front, so it doesn't rake across the face/shirt so much?

IMGP1636 -bw.jpg
 
Deciding WHERE to place the key light is always up to the photographer. In the example photo, the key light lights up his right cheek quite a bit, and creates a strong shadow to the side of his cheek/outer lip area: I personally do not find that especially flattering.

The tricky thing when using raw, unmodified speedlight lighting is that the light is HARD, and at close range, it has a LOT of fall-off in a very short distance; if it is moved back to 7 to 10 feet, the light becomes more-even, not so fast a rate of fall-off.

It's not 100% clear what the desired lighting effect is supposed to be. You have two sources as well, competing for attention, one on the left, the other on the right.

I dunno...I think these need to be shot, looked at, learned from, repeated, and so on...every set-up is a little bit different from the one that comes before or after it...there's plenty to be learned from these kinds of shots, but it's tough to offer valid, meaningful advice when we're not 100% sure what **your** intentions are in a lighting set-up.

My opinion is to just shoot these, look at 'em, see what you think. After a bit, you will learn what does what, how that looks, and so on. learning how to light things like this, is "a process", as coach Nick Saban says!
 
This was a tough one to work with. I made a duplicate layer, created a negative image from it and removed the color, then blended the two with a burn at about 60% opacity and merged them, then adjusted the brightness and contrast levels.

And there is still too much spectacular light...


IMGP1636b.jpg
 
.. any other comments or suggestions?
This is not low key in my opinion. Aside from repositioning the lights, you can dial them back a lot.

What I like about this is the texture. Texture everywhere, and in good proportions. Good model, good pose, good frame.

I agree that the processing has detracted from this shot, and the B&W conversion is a fail.

Is it possible that the flash high on subjects right needs to be brought more to the front, so it doesn't rake across the face/shirt so much?
A light that is raking the surface is probably a good thing, in terms of defining the surfaces. If you can get this gentleman to pose for you again, make some adjustments to your lighting and try again.
 
It's not 100% clear what the desired lighting effect is supposed to be.

The goal was to capture the roughness/stubble of the face in a Low Key setting. My thinking was going bare light would add to the harshness of the skin and give more detail. The light on camera left was supposed to be "fill" illuminating more of the hat on top and right, and providing some rim light. Unfortunately fooling around in the dark setting up combined, with space limitation, caused it to be to low/forward on the face, overpowering the light on camera left.

This is not low key in my opinion.

I agree, way to much light on the subject. Not what I was shooting for.

What I like about this is the texture. Texture everywhere, and in good proportions

That was one of my goals, and maybe the only thing I accomplished. :)

holy heavy contrast man! :D

Again part of the goal to get the rough, harsh look, but my finger might have slipped a little on the curves adjustment :)


On my next setup, my plan is add a shoot through umbrella as a modifier on the camera left light and move it more frontal. Move the camera right light up, back and dial it way back. Add a reflector on the lap to bring the light back up on the face. Does this sound logical?
 
Last edited:
On my next setup, my plan is add a shoot through umbrella as a modifier on the camera left light and move it more frontal. Move the camera right light up, back and dial it way back. Add a reflector on the lap to bring the light back up on the face. Does this sound logical?
It would be difficult to judge your setup without actually seeing the effect. While two lights and a reflector might be the ideal setup, it sounds like you're trying to make the light even, which is not always necessary or wanted.

How about this: No umbrella, maybe just a little more to the front, snoot the other light onto his cap, skip the reflector, and turn both lights down - WAY down.

One method you can use to get the lights more to your liking without wearing out your model is to set up a dummy model and fiddle with the lights before you even call your model in.

Since you are trying low key, study some good examples of low key before you try it again. Don't try to make the light even, just put the light where it needs to be.
 
gotta be extra careful with us old guys, and our white stubble....can ruin a shot
 
Last edited:
I would really love to do this but can't find a substitute with same reflective quality of skin
Your dummy doesn't have to have the same qualities as your model. You could probably do it with a Teddy bear or even a basketball. All you're looking at is how the light falls, not the model.
 

Most reactions

Back
Top