First Ever Attempt at Studio Photography

sm4him

In memoriam
Supporting Member
Joined
Oct 4, 2011
Messages
10,726
Reaction score
5,467
Location
The Beautiful Hills of East Tennessee
Website
sm4him.500px.com
Can others edit my Photos
Photos OK to edit
I've not been THIS nervous about posting photos here in a while, but here goes! Not only are they first attempts, they are also selfies, and I hate pictures of ME! One of my goals this year is to get more comfortable with various means of lighting--flash, studio lights, etc. Recently, a couple of monolights came in to my possession--they aren't anything that great but they were free, and a means of learning something.

I've never tried any form of "formal" studio photography before. AND, to complicate matters my current home studio is really NOT big enough for this. My studio is meant to give me room for working on macros, abstracts, stuff like that--not for people photography. I *might* eventually be able to switch to a slightly longer room, but not for a while yet.

So--10x10 feet of space is about all I have to work with, from wall to wall.

The setup:
--Black sheet for a backdrop, hung on the wall. It's very wrinkled, but THAT I'll deal with later.
--Chair was about 2' out from wall. I know it should be further, but I felt like that was about all I could spare.
--Three lights: Two monolights as main and fill light, one off-camera Yongnuo flash as hair light.
--28mm f/2.8 lens. I chose this lens because of the space, but for just headshots, could possibly get away with the 50mm f/1.4 or even the 70-200, at 70mm.

Main light was at *about* 45-degree angle to subject, backed up as far as I could get it, which made it maybe 4' from me.
Fill light was just to the left of the camera, also at an angle, but less than 45-degrees, and also about 4' away.
Hair light was behind me; more on that later.

I'd love any comments or suggestions on how to make this setup work better, in terms of the lighting.

What I am NOT looking for:
--comments about the focus. I find it nearly impossible to get good focus doing self-portraits, but that shouldn't really be an issue with someone else as the subject.
--comments about the posing. I suck at posing myself, okay? And I also suck at posing others. But right now, it's ALL about the lighting.
--comments about the crappy wrinkled background. Yes, I was too lazy to even iron the sheet. :D

What I'm *especially* interested in:
--Given the cramped space, how would YOU set this up?
--What can I do to help with the reflection on my glasses, without causing unwanted shadows elsewhere?
--Overall, how is the lighting? Too hot? Not enough? I especially think that my hair light was absolutely useless. Not sure if I had it too low, or maybe accidentally pointed too much at the background (because I did have to darken the background in post), but it seems completely unnoticeable to me.

Okay, here goes!

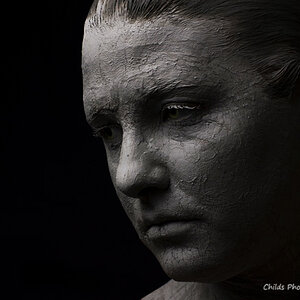
This was the first attempt; the fill light was fairly high, about the same height as the main light (maybe 6 ft?). The reflection on my glasses isn't TOO bad, but I don't like the shadows under my chin.
Studiolights_5684editweb.jpg


In this one, I lowered the fill light. It helped with the shadow under the chin, but made a bad reflection on the glasses.
Studiolights_5713editweb.jpg
 
Great first try. I'm not brave enough yet ! As far as the reflection in the glasses. Raise your ear pieces higher to engle the lenses of the glasses. Let me know if that helps. To try this if you have a second pair hold them in front of you and notice the reflection difference when you slightly change the angle
 
Good to see your playing with lighting. I find it fun and need to do more myself. Some comments (realize it's just my opinion).
1. I like shadows in a portrait so backing down the fill light does this.
2. Shifting the main light even more around to the right will also help. This because your already facing right. Also the main could be up around 45 degrees too.
3. Dropping the chin makes for a better jaw line. The shadow under the chin is ok with me.
4. Are you using any diffuser on the lights? The larger the better.
5. Bring the lights in even closer for softer lighting.
6. I would try the 50mm lens as you can't get back very far with the camera for a long lens.
Positives:
1. The background seems to work fine.
2. The rotated position I like.
3. Having the head tilted down as you do is better. Makes the yes not level with the ground.
4. The hair light works as is.
So I like #1 better but not the flat lighting so much. Also I know you don't want to hear about focus but I know the problem and my solution was to change from back button focus to shutter button focus and try to center the eyes.

OK, I'm done....
 
Also getting Mannequin head lets you focus on the lighting and not think about your own posing. Do that later after you like the lighting.
i-qRf9GN4-S.jpg
 
Glasses usually call for higher than otherwise on the main light...lifting the earpieces up can tilt the front of the lenses downward just a few degrees, often enough to eliminate most glares. As far as the shadow under the chin...a reflector board like a piece of foamboard, held by you, could be used as a traditional under-chin reflector. Look at butterfly lighting for set-ups...the shadow under the nose being the butterfly name's source. That's pretty much what you have going on here. I would be very tempted to eliminate the fill light, and go with the main light elevated a bit, then angled forward, so it bounces off the under-chin fill card.

Selfies are very challenging to shoot, compared to having an actual sitter there in front of you, so you can actually look at the effects of the lights as the lights are moved through an arc, and higher and lower, and so on...it's very slow going most of the time shooting self portraits.

Some people like the two-catchlight look that a key light + fill light provides, other people dislike the dual catchlights, and some are so anti-dual catchlights that they insist that only one catchlight is acceptable, and that the fill light catchlight ought to be retouched out. So...who is right? Is anybody right?

As for the hair light...if it had been removed for some shots, it'd be possible to tell if it was doing anything. You did a good job burning the background down to a deep black. No wrinkles are visible as-shown. The small-sized catchlight on the one eyeglass lens can be cloned out without too much of an issue.
 
I think given your restrictions and experience at this sort of work, you've done quite well. Pretty much all of the key points have already been raised.
 
--Given the cramped space, how would YOU set this up?
I prefer a modified "clamshell" lighting setup. it gives me the nice, even lighting that I like and eliminates most shadows.

--What can I do to help with the reflection on my glasses, without causing unwanted shadows elsewhere?
take the glasses off.


--Overall, how is the lighting? Too hot? Not enough? I especially think that my hair light was absolutely useless. Not sure if I had it too low, or maybe accidentally pointed too much at the background (because I did have to darken the background in post), but it seems completely unnoticeable to me.
lighting wise I like these. on the first i might take the highlights down just a hair more, but thats really just nitpicking.
how did you darken the background? for me, I usually have the subject a few feet in front of the background for good separation and it usually means all I have to do is bring the "black" slider down a little in LR to completely finish off the black background. I almost never use the brush on the background unless im getting rid of spots or clone/healing something out.

Studiolights_5713editweb.jpg
 
Thank you all so much for your comments--and from exactly some of the people I was wanting to hear from too! :D I've really just scanned the comments, but there's some really good feedback here; I'll have to read it again more carefully before my next attempt.

Good to see your playing with lighting. I find it fun and need to do more myself. Some comments (realize it's just my opinion).
1. I like shadows in a portrait so backing down the fill light does this.
2. Shifting the main light even more around to the right will also help. This because your already facing right. Also the main could be up around 45 degrees too.
3. Dropping the chin makes for a better jaw line. The shadow under the chin is ok with me.
4. Are you using any diffuser on the lights? The larger the better.
5. Bring the lights in even closer for softer lighting.
6. I would try the 50mm lens as you can't get back very far with the camera for a long lens.
Positives:
1. The background seems to work fine.
2. The rotated position I like.
3. Having the head tilted down as you do is better. Makes the yes not level with the ground.
4. The hair light works as is.
So I like #1 better but not the flat lighting so much. Also I know you don't want to hear about focus but I know the problem and my solution was to change from back button focus to shutter button focus and try to center the eyes.

OK, I'm done....

Wow, thanks! REALLY helpful. One thing I didn't mention is that currently there is a futon on the far wall (to the left of camera, where the main light was), so that hampered me and reduced the WIDTH of the room I had to work with. But I should, in theory, be able to fold that up--it's just stuck in position right now, so I gotta wait until my son comes by and helps me with it.

As to #4: I forgot to mention that, but yes, both the main and fill lights had 32" softboxes. The hair light was just a bare flash.

Also, on the focus: I don't use back-button focusing anyway; I've just never managed to get the knack of it. But for these, it seems like a moot point, since I wasn't using either. I set my focus by putting a spare lightstand where the chair would be, focusing on that, then switching to manual focus, and *trying* to then place myself where that lightstand had been, and using the wireless remote to actuate the shutter.

Good idea about the mannequin head, except--you can't really adjust them can you? I mean, so the chin is up a little or down a little, that sort of thing.
 
Glasses usually call for higher than otherwise on the main light...lifting the earpieces up can tilt the front of the lenses downward just a few degrees, often enough to eliminate most glares. As far as the shadow under the chin...a reflector board like a piece of foamboard, held by you, could be used as a traditional under-chin reflector. Look at butterfly lighting for set-ups...the shadow under the nose being the butterfly name's source. That's pretty much what you have going on here. I would be very tempted to eliminate the fill light, and go with the main light elevated a bit, then angled forward, so it bounces off the under-chin fill card.

Selfies are very challenging to shoot, compared to having an actual sitter there in front of you, so you can actually look at the effects of the lights as the lights are moved through an arc, and higher and lower, and so on...it's very slow going most of the time shooting self portraits.

Some people like the two-catchlight look that a key light + fill light provides, other people dislike the dual catchlights, and some are so anti-dual catchlights that they insist that only one catchlight is acceptable, and that the fill light catchlight ought to be retouched out. So...who is right? Is anybody right?

As for the hair light...if it had been removed for some shots, it'd be possible to tell if it was doing anything. You did a good job burning the background down to a deep black. No wrinkles are visible as-shown. The small-sized catchlight on the one eyeglass lens can be cloned out without too much of an issue.

Thanks, Derrel! Good information; definitely one I'll have to re-read before I tackle this again.
Yeah, the self-portrait part is a challenge, but for now it's my only option--unless maybe I can somehow con my youngest son into doing it for me sometime.

I should've thought to do one WITHOUT the hair light!! I'll do that when I do Take 2. And maybe one at slightly higher power as well.

I'll just experiment with some of the different lighting options mentioned as well--like ditching the fill light, using a reflector, etc.

I think given your restrictions and experience at this sort of work, you've done quite well. Pretty much all of the key points have already been raised.

Thanks, John! I really value your opinion about this, because your style is definitely the sort of portrait work I'd see myself doing. One day, many many years from now.
 
Thank you all so much for your comments--and from exactly some of the people I was wanting to hear from too! :D I've really just scanned the comments, but there's some really good feedback here; I'll have to read it again more carefully before my next attempt.
As to #4: I forgot to mention that, but yes, both the main and fill lights had 32" softboxes. The hair light was just a bare flash.

Also, on the focus: I don't use back-button focusing anyway; I've just never managed to get the knack of it. But for these, it seems like a moot point, since I wasn't using either. I set my focus by putting a spare lightstand where the chair would be, focusing on that, then switching to manual focus, and *trying* to then place myself where that lightstand had been, and using the wireless remote to actuate the shutter.

Good idea about the mannequin head, except--you can't really adjust them can you? I mean, so the chin is up a little or down a little, that sort of thing.

With a big softbox you can bring the light in close.
On the focus, that's what I did and didn't work so well. But shutter focus seemed to help.
Your right about the mannequin. Sometimes I put something under it to tilt it
and also do a lot of rotating in Lightroom. Or I rotate the camera on the tripod. This requires some space around the head. I don't know why they raise the chin on those things.
Happy Lighting!
 
--Given the cramped space, how would YOU set this up?
I prefer a modified "clamshell" lighting setup. it gives me the nice, even lighting that I like and eliminates most shadows.

--What can I do to help with the reflection on my glasses, without causing unwanted shadows elsewhere?
take the glasses off.


--Overall, how is the lighting? Too hot? Not enough? I especially think that my hair light was absolutely useless. Not sure if I had it too low, or maybe accidentally pointed too much at the background (because I did have to darken the background in post), but it seems completely unnoticeable to me.
lighting wise I like these. on the first i might take the highlights down just a hair more, but thats really just nitpicking.
how did you darken the background? for me, I usually have the subject a few feet in front of the background for good separation and it usually means all I have to do is bring the "black" slider down a little in LR to completely finish off the black background. I almost never use the brush on the background unless im getting rid of spots or clone/healing something out.

View attachment 99288

Thanks, Pix! You're another one that I'd be happy emulating style-wise with portrait work, so I'm very interested in your thoughts.

I did actually DO some without glasses, and certainly it DOES eliminate the glare problem--but I've worn glasses for something like 40 years (got them in second grade, but spent a few years in high school wearing contacts)--I just look ODD to myself without them!! (Granted, I think I look odd anyway...lol)

Pretend I'm ignorant on the topic, and explain what clamshell lighting is. I could google it--but I'd rather hear it from you. :winksexy:

On the background: Yeah, I just adjusted the levels a little, just until the wrinkles started to fade enough. Your results look better though--how do you deal with the problem of the black that shows through my hair? I wasn't quite sure how to handle that (so I just didn't mess with for now).
 
Rule of thumb on modifiers: The working distance should be no more than 1.5x the size of the modifier and ideally, around 1:1 or less, so, since you were using 32" SB (and ideal size for this sort of image), your 48" distance is pretty much right at the maximum edge of effectiveness. I would have probably had them closer in, say 24-30". I would consider bringing your key a little closer to the lens axis, say 30 degrees or so, and your fill more right on lens-axis, and drop it down to 1 stop below key. That will give you a little more dynamic range. Shadows in portraits are rarely a bad thing.
 
--Given the cramped space, how would YOU set this up?
I prefer a modified "clamshell" lighting setup. it gives me the nice, even lighting that I like and eliminates most shadows.

--What can I do to help with the reflection on my glasses, without causing unwanted shadows elsewhere?
take the glasses off.


--Overall, how is the lighting? Too hot? Not enough? I especially think that my hair light was absolutely useless. Not sure if I had it too low, or maybe accidentally pointed too much at the background (because I did have to darken the background in post), but it seems completely unnoticeable to me.
lighting wise I like these. on the first i might take the highlights down just a hair more, but thats really just nitpicking.
how did you darken the background? for me, I usually have the subject a few feet in front of the background for good separation and it usually means all I have to do is bring the "black" slider down a little in LR to completely finish off the black background. I almost never use the brush on the background unless im getting rid of spots or clone/healing something out.

View attachment 99288

Thanks, Pix! You're another one that I'd be happy emulating style-wise with portrait work, so I'm very interested in your thoughts.

I did actually DO some without glasses, and certainly it DOES eliminate the glare problem--but I've worn glasses for something like 40 years (got them in second grade, but spent a few years in high school wearing contacts)--I just look ODD to myself without them!! (Granted, I think I look odd anyway...lol)

Pretend I'm ignorant on the topic, and explain what clamshell lighting is. I could google it--but I'd rather hear it from you. :winksexy:

On the background: Yeah, I just adjusted the levels a little, just until the wrinkles started to fade enough. Your results look better though--how do you deal with the problem of the black that shows through my hair? I wasn't quite sure how to handle that (so I just didn't mess with for now).

clamshell lighting is basically where you set up two lights on either side of the subject. like a clamshell, where the subject is the pearl. the exact positioning isn't really set in stone, it just depends on how you want the light to fall. i dont put mine quite "on the sides" but more around a 45 degree angle for each. or so.
the background is easier to manage if you have a few feet of separation. then its just making adjustments to "black" "white", and "shadow" to get the background where you want it.
you can make a lot of lighting changes without actually moving the "exposure" slider much. highlight, white, and shadow are all good for minor adjustments after you move "exposure" more or less where you want it. the rest is good for fine tuning, depending on where you feel the picture needs the most work. If you have to bring the highlights down a lot, you can make the fixing adjustments with the white and shadow sliders. its really a lot of trial and error. I get the background where I want it first, and then see what adjustments need to be made the the subject. it sounds kinda backwards, but setting my background adjustment first gives me one thing to start from, and then i can work my way forwards.
 
Rule of thumb on modifiers: The working distance should be no more than 1.5x the size of the modifier and ideally, around 1:1 or less, so, since you were using 32" SB (and ideal size for this sort of image), your 48" distance is pretty much right at the maximum edge of effectiveness. I would have probably had them closer in, say 24-30". I would consider bringing your key a little closer to the lens axis, say 30 degrees or so, and your fill more right on lens-axis, and drop it down to 1 stop below key. That will give you a little more dynamic range. Shadows in portraits are rarely a bad thing.

Okay, that's great information. I just rechecked to make sure I wasn't mistaken, but yeah, the lights were right at 4', so next time, I'll adjust those accordingly and give your suggestions a go.

I know that some shadow can be a good thing, just not sure yet where and how much shadow is good--and felt like the shadow on my neck drew attention to my chin, and I hate that. :D
Another con to practicing on oneself--I end up critiquing the photo as much on the basis of how I think I look as on the actual quality of the photo. I need to look at the results more objectively, I think.
 
--Given the cramped space, how would YOU set this up?
I prefer a modified "clamshell" lighting setup. it gives me the nice, even lighting that I like and eliminates most shadows.

--What can I do to help with the reflection on my glasses, without causing unwanted shadows elsewhere?
take the glasses off.


--Overall, how is the lighting? Too hot? Not enough? I especially think that my hair light was absolutely useless. Not sure if I had it too low, or maybe accidentally pointed too much at the background (because I did have to darken the background in post), but it seems completely unnoticeable to me.
lighting wise I like these. on the first i might take the highlights down just a hair more, but thats really just nitpicking.
how did you darken the background? for me, I usually have the subject a few feet in front of the background for good separation and it usually means all I have to do is bring the "black" slider down a little in LR to completely finish off the black background. I almost never use the brush on the background unless im getting rid of spots or clone/healing something out.

View attachment 99288

Thanks, Pix! You're another one that I'd be happy emulating style-wise with portrait work, so I'm very interested in your thoughts.

I did actually DO some without glasses, and certainly it DOES eliminate the glare problem--but I've worn glasses for something like 40 years (got them in second grade, but spent a few years in high school wearing contacts)--I just look ODD to myself without them!! (Granted, I think I look odd anyway...lol)

Pretend I'm ignorant on the topic, and explain what clamshell lighting is. I could google it--but I'd rather hear it from you. :winksexy:

On the background: Yeah, I just adjusted the levels a little, just until the wrinkles started to fade enough. Your results look better though--how do you deal with the problem of the black that shows through my hair? I wasn't quite sure how to handle that (so I just didn't mess with for now).

clamshell lighting is basically where you set up two lights on either side of the subject. like a clamshell, where the subject is the pearl. the exact positioning isn't really set in stone, it just depends on how you want the light to fall. i dont put mine quite "on the sides" but more around a 45 degree angle for each. or so.
the background is easier to manage if you have a few feet of separation. then its just making adjustments to "black" "white", and "shadow" to get the background where you want it.
you can make a lot of lighting changes without actually moving the "exposure" slider much. highlight, white, and shadow are all good for minor adjustments after you move "exposure" more or less where you want it. the rest is good for fine tuning, depending on where you feel the picture needs the most work. If you have to bring the highlights down a lot, you can make the fixing adjustments with the white and shadow sliders. its really a lot of trial and error. I get the background where I want it first, and then see what adjustments need to be made the the subject. it sounds kinda backwards, but setting my background adjustment first gives me one thing to start from, and then i can work my way forwards.

Ah, makes sense, thank you! I'll try this as well. Seems like that setup (as well as John's) would also buy me a little more space to give more separation between subject and backdrop.

On the background adjustment: That is very helpful! What *I* did was adjust levels AFTER moving the photo from Camera Raw to PS. Sounds like you do it all in ACR, which makes sense.
 

Most reactions

New Topics

Back
Top