Help improve my images?

ihsmendez

TPF Noob!
Joined
Apr 7, 2015
Messages
5
Reaction score
0
Can others edit my Photos
Photos OK to edit
Hello all! I am wanting to get into photography a lot more (especially with spring just around the corner)! This is my first post on this forum and i'm hoping to be a long-term member! :) I am brand new with photography so go easy on me :p Now, to the problem at hand!

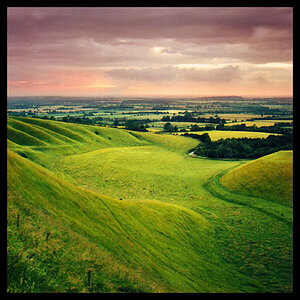
I took a (what I thought to be) cool image, or good image idea. Here it is:

Gravel Road Flickr - Photo Sharing

Here's some info on my camera.
Camera: Canon EOS Rebel T5
Lens: canon ef 75mm-300mm (used to shoot this image) and the stock
18-55 IS II lens the camera (I bought my camera with the other lens from QVC)

I took this photo at f/32 at 2.5sec. exposure time. it isn't as sharp as I thought it would look (maybe because I fucused the wrong thing?). I have photoshop CS6 and i've been playing around with it but I have no idea what to do to make this image look... better, or cool. I guess my question is, is there anything I can do in post to make this shot more, dramatic?
Also, I didn't know how to compensate for the bright sunset... I figured if I set my shutter speed to the sunset the foreground would be waaayyyy too dark.. Any tips would be awesome!! Thanks!
 
Welcome!

To shoot at the sun and hold the shutter that long, you would throw on a ND filter and open up the aperture. Did you shoot this on a tripod? If not, that would be your first problem. You should also shoot in raw if you want to post. You start in lightroom then go to photoshop if needed.
 
Oh shoot, I forgot to mention that info!
Yes, I did use a tripod and yes I do shoot in RAW format. I guess it was a bit windy that day, and the straps don't help either..

If I toss a ND filter onto the lens wouldn't the sunset be still brighter than the foreground? or does it kind of equal out and lesson the contrast between the two?
 
Definitely need to open up the aperture regardless.

And even with the ND filter the sun will be brighter than the foreground
 
for a shot like that you will either have to expose for the sky or the ground. Or you can do both and layer the two images in post processing. Or you can buy a gradient ND filter where itll be dark on one half and clear at the other end. This way itll expose for both the sky and ground in one shot.
 
Last edited:
As suggested, you're going to want to start by opening your aperture (f/ number). I'm seeing a fair amount of diffraction and chromatic abrasion in your supplied pictures. Shooting that at, say f/16 would be plenty. Absolutely no need to go up to f/32.
 
Here's the histogram for your image:
Screen Shot 2015-04-07 at 9.31.26 PM.png

To capture this so that the land isn't too dark, you had to over-expose the sky. The histogram shows the number of pixels at each "brightness" level (from 0 being "black" to 255 being the brightest white.) The big spike on the right edge indicates that all the sky actually pushes beyond the right (but the camera can't collect that -- so it's just lost detail.)

When this happens, editing software cannot recover the detail.

You can shoot "high dynamic range" (which means you take several shots at different exposures and the computer merges them) or you can use a "gradient neutral density" filter. This is a filter which is tinted in one half, and clear on the other half. You position the filter to dim the sky, and the ground is visible through the clear part.
 
You start in lightroom then go to photoshop if needed.
1wjfq
 
Thank you guys soooo much! I am looking into gradients now.. Just for some reference.. what f-stop ND gradient filter should I use for this shot again(assuming the tint of the ND gradients are measured in f-stops)?
 
I think this is rather tricky for someone starting out, shooting facing into the sunlight with a darker foreground. Not that you can't do it, it just may take some time learning to do this, trying out different ways til you find what works for you. I find that losing light late day can be more challenging to meter as the light keeps changing.

I usually lower the camera somewhat and meter the scene in front of me, then reframe the shot. You might also want to start plenty ahead before the sun's going down and watch and wait, so you can get the sun not too much coming directly into your lens (it looks like you might have been almost getting lens flare to the right). Try taking a number of photos to get a good moment as the light changes.

You could try moving around, changing your vantage point, maybe try moving toward one side of the road so the sun's coming thru the trees at a different angle; think about how the lens is coming into your lens/camera. You might want to move closer to the houses to keep the posts out of your pictures as they seem distracting more than adding to your composition. (I use prime lenses; if you're using a zoom obviously you could zoom more or less, but consider moving around and trying different vantage points to help you learn about framing shots).

Keep going out and trying various techniques and get lots of practice, this photo seems like you're on the right track and just need to keep learning.
 
I would suggest to start with to side light some images as @vintagesnaps has suggested... Shooting into the sun can be tricky at the best of times so turn around 45 degrees to the sun and have a play. Graduated ND's still come in really handy for this I would advise a 0.3 - 0.6 and 0.9 hard and soft grad. However depending on budget the 0.6 hard and soft's come out my bag far more than the rest.

Hope this helps
 

Most reactions

Back
Top