Help needed with pano

Lizocain

TPF Noob!
Joined
May 28, 2010
Messages
16
Reaction score
0
Location
Greece
Can others edit my Photos
Photos OK to edit
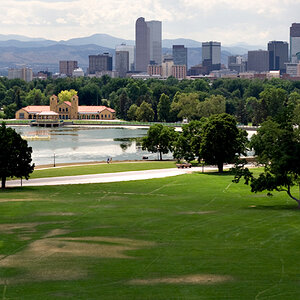
Hi all, i had some free time today and went to a high spot where i could make a pano of my town.I decided i should try my first hdr.I set aparture to F8(max) for max depth of field and set my autobracketing to take 5 pics each time.So i made a pano of 10 pics in 5 different exposures.

However when i went home i got quit disappointed,as the pictures had very big difference in brightness.I guess this is due to the different shutter speed which i didnt really considered while capturing the pics :banghead:\

P6230601Panorama.jpg


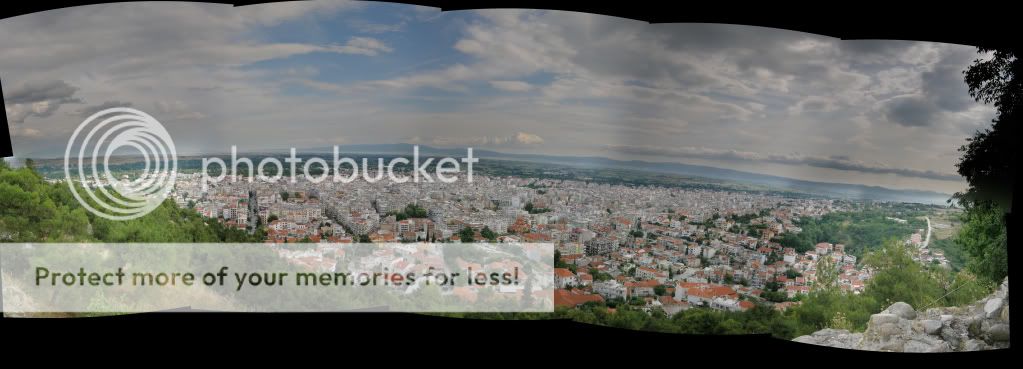
Anyway im going back and try again with only one exposure this time or manually change the shutter will see.What id like to ask is this : i noticed the horizon is not straight,is there a way to fix this op or pp in photoshop?i dont really like it like this.
Will be thankful to hear some advices thanks.

p.s. programs i use ptgui for pano,photomatix for hdr,ps cs 3 for pp.
 
First of all, I have to ask where in Greece?

Mine - Chennai


Okay, panos, a subject near and dear to my heart. First of all, a repost:

John's basic 'How-to' guide to Panoramas...

1. In order to get a good pano, your camera has to be level, and has to rotate around the nodal point. This the point at which the image inverts. For practical purposes, with most lenses, using the sensor plane will work fine. What this means is that you have to shoot from a tripod for best results.

Therefore, put your camera on your tripod and level it. Even though my tripod legs and head both have levels built-in, I carry a small dollar-store spirit level in my camera bag to make sure everything is as close to level as I can get it.

2. Once I'm satisfied that everything is level and square and my tripod is locked (except for the rotating axis) where I want it, it's time to work on the exposure. Another important factor is to NEVER SHOOT PANOS IN AUTO (this includes WB)! Set your camera to a manual or semi-manual mode (I use full manual, but either shutter or apeture priority will work as well).

Determine the range of your pano (eg the left and right limits) and then go through and meter the different areas. Find out what the camera is recommending as maximum and minimum exposure, and when you've done this for the full range of the image, then average the settings. Don't change these settings; yes some will likely be slightly under exposed, and some slightly over, but deal with it in post.

3. Now you're ready to start shooting. I always start at the left-hand end of the intended pano and work right, simply so that the images are in the correct order when they're on my computer, but that's up to you. Expose the first image, and choose a landmark about 2/3 of the way to the right-hand side of the frame. Now, being careful to ensure that you don't upset your level, move your camera so that the left-hand edge of the frame lines up on the land mark you just chose. Ideally you want about a 30-35% (or 1/3) overlap between each image. Continue shooting in this manner until you have the whole sequence captured.

4. Download and stitch using your favorite software.
A few tips: With respect to the issue of exposure: If there is an extreme dynamic range within the pano, (say bright sun to deep shade) I will often bracket each image 1/3 stop on each side, so that for every image used in the pano, you actually expose three. This gives you a bit of latitude in terms of trying to produce an image with a pleasing and realistic dynamic range, but be warned, it often looks hokey.

One of the most important tools you can have for taking panos (aside from a good tripod) are filters. There are two types, one is the circular polarizer (CPOL)for enhancing colours and deepening the blue in sky and the other is graduated neutral density(G-ND); these help to prevent blown skies and preserve detail on the ground. When using a CPOL, it's important to remember not to change it's setting through the course of the pano either. Find the optimum setting and use it at that setting for the whole image. Likewise with your G-ND; don't change their position or intensity.

The work-flow for panos is this: Shoot in TIF or RAW (and convert to TIF) and then merge the images. Once you have the final pano, then apply your image corrections, cropping etc. If you try applying light or colour corrections to a single image, it will be obvious in the final result. With respect to your question on sizing, once you have the assembled and PP'd image, crop/resize to suit. There is no standard size for panoramic images


Im trying to learn how to do pano's too. I got an acratech gp ball head to use it as a leveling base and a nodle rail to make sure i was level and turning around the nodel point. Here is one of the pics i took last night just practicing the techniques for it. Not an interesting pic but just tryin techniques. Check out acratech.net there is alot of info on there about taking pano. It is almost a 200 degree pan and the horizon is straight looking to me the whole way. Also autopanopro is suppose to help with exposure correction. It is a panorama dedicated software. I havent tried the exposure correction yet on it though. You can download a free trial version. You just cant save your work with the trial version. It is about 120 bucks to buy.

backyardpan.jpg
 
Its strange cause i did used a tripod and it was very stable..perhaps this curving came while merging the panos by the program itself?
The city is called Serres and its north ;)
 

Most reactions

New Topics

Back
Top