Help With Product Shots For Website

JaySki

TPF Noob!
Joined
Feb 13, 2011
Messages
15
Reaction score
0
Location
Philadelphia, PA
Can others edit my Photos
Photos OK to edit
I was wondering if someone could recommend camera settings for taking pictures of products for a website.
I just bought a Nikon D5000 and I have little experience with photography (I plan to change that) and no matter what settings I try to use the images come out either too bright or off-color and I can't seem to get a sharp picture...I need to remove the backgrounds in Photoshop so I can put the product image onto a different background image that all of the products are on.
Some pictures come out okay, but the "edges" of the products are soft/blurry.
The products are cans of spray paint. I'm using lightbox with white background because I thought that would make it a little easier but I can't get the pics sharp enough.

I heard most kit lenses aren't all that great so I'm wondering if I should get a new lens, but that would be a little expensive...

I'm sure the camera+kit lens would work just fine if I can figure the correct settings....

ANY help is greatly appreciated!!:D
 
can we see some pictures, its hard to recommend settings without actually seeing whats going on.

im guessing its your f stop number. and also post the gear your photographing the objects with
 
I'm using a Nikon D5000 with the kit lens..Nikkor 18-55mm 1:3.5-5.6G
also a lightbox (white background) with 4 clamp-lamps with 60w bright white bulbs.
I have the light facing the front of the object(s) when shooting...is this correct or should they be on the sides?
I don't have enough posts to post images so here's the urls to 2 images (copy & paste)
i52.tinypic.com/332urza.jpg
i52.tinypic.com/2eldpw3.jpg
 
The ground is bumpy and is creating shadows which looks bad, your not using any diffusers for your light i take it, so your getting harsh light and bad reflections. Try using white poster boards to defuse your light, so your not getting these things. Also make the surface even so you don't get shadows from the bumps, and try to fill light in around the object, not just in front of it, then you get unwanted shadows.

try these things and post back , also are you using built in flash?
 
You need to throw more light on that background to blow it out.
You might also find a way to raise the bottles off the "floor" and put them on a glass base, maybe an upside down wine glass, so you are isolating the subject on the blown background.

Expose for the subject, use a tripod, remote or 10 second timer. Manual focus with live view if your camera has it, or tethered to a laptop.
 
I appreciate all the help! I'll do what you guys suggested and post the results.
 
You need to throw more light on that background to blow it out.
You might also find a way to raise the bottles off the "floor" and put them on a glass base, maybe an upside down wine glass, so you are isolating the subject on the blown background.

Expose for the subject, use a tripod, remote or 10 second timer. Manual focus with live view if your camera has it, or tethered to a laptop.

This is great for a white background. But not so good when placing the image onto another photo or color.

Look into "clipping paths" in Photoshop.

-Pete
 
okay I took the advice offered and the pic came out a little better, but I can't seem to get rid of the soft white "blur" around the edges & bottom of the bottle.
first I used "bright white" bulbs on 5 clamp-lamps (2 on each side, 1 directly above) on a lightbox.
for this pic I used those full-color spectrum bulbs instead and they brought the color out better than the bright white ones did.
the settings I used were ISO=200 and f22. does that sound about right?
I'm 110% positive the quality of this image is no where near what I could get once I get the hang of the camera, but I hear that lighting is most important regardless of the camera used to take the pic.
is there a way to shoot a picture without getting these soft white edges on the sides & bottom of the plastic bottle?
2cwrfix.jpg
 
Are you difusing your light in any way? (shooting through tissue, paper, thin fabric, frosted glass, etc?)
How close are your lights to the product?
 
yeah, I tried wax paper. is that good or no?
I have the sides cut out of the light box with the wax paper covering the openings and the lights shining through there...plus one light directly above the bottle in the top of the box.
I'd say the lights on the side are about 6-8 inches from the bottle. the one on top is about 4 inches.
 
Hmmm...I dunno about waxed paper. I think it might be too transluscent, giving you real hotspots of light. Not sure.

Is the image posted, edited? Did you cut out the background?
Could you post the original?
 
I wasn't 100% positive about the wax paper, but I did see somewhere online that whatever the light was to pass through needed to be semi-opaque...I figured wax paper because you can't really see through it.
Compared to the other way I had the lights set up, when they were facing the object(s) and I was getting hot spots all over, the wax paper worked better...plus I moved the lights from directly in front to the sides of the box/object.
Both ways I still got the blurry edges...
here's the original image...all I did was crop it.
2qkl1d4.jpg
 
What I think you are calling blurry edges, just looks like reflection of the light source. I think you need your lights more at 45 degrees to the object. Or to put it in compas terms, if your camera is south and the back of box is north, I would try putting a diffused 60watt bulb at Southeast and Southwest and at least a 100watt bulb behind. There's a bunch of ways to set this up, some more complicated than others, but the idea is you want more light on the background than on the front/sides of the subject to blow out the background, which will help with your crisper edges.

I highly recommend the book, Light, Science, Magic. It is geared to product photography.


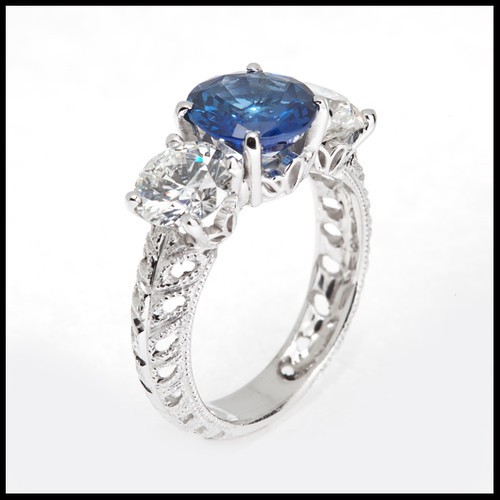
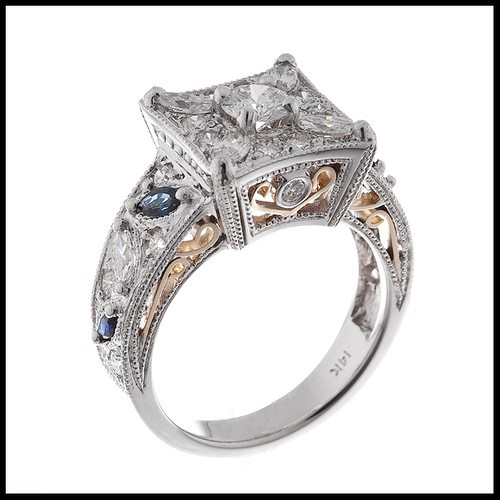
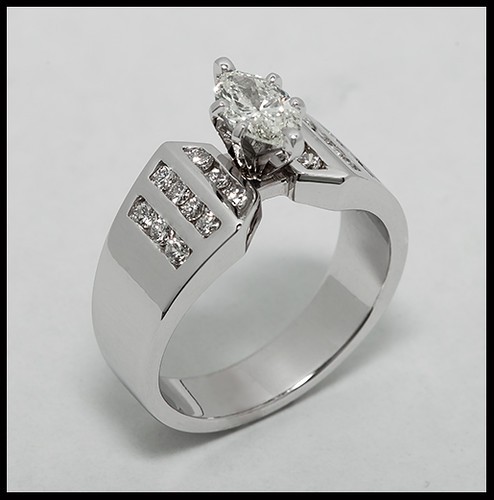
I shoot jewelry and have struggled to get the solid white background, but am finally getting better at it. I shoot on white paper on a piece of glass with a flash several inches below it to blow the ground out, then I have a flash either directly above or off to the side of a "box" made of paper, and position it so it partially lightbup the "ceiling" and partially hits reflector cards (paper) in front at various angles to throw light in at the subject. I'll try to do a drawing of my setup.

Here is what I achieve with printer paper...

This is after I bought a second light to add light from above:
5365683125_b01402659f.jpg


This was with just one light from below. You can see the top of the ring is just a little dull...
5222716426_cb0a5a90fc.jpg


This was just using light from above/front:
5091341425_e41a6a3c39.jpg
 
Last edited:
okay so I need more light on the background and I have to re-arrange the lighting. I'll try that in a little bit and post the pics once I'm done.
I'll check that book you mentioned also.
Thanks for your help and patience!:thumbup:
 

Most reactions

Back
Top