christopher walrath
No longer a newbie, moving up!
- Joined
- Mar 19, 2008
- Messages
- 1,265
- Reaction score
- 25
- Location
- In a darkroom far, far away...
- Website
- home.comcast.net
- Can others edit my Photos
- Photos NOT OK to edit
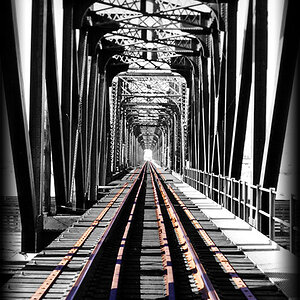
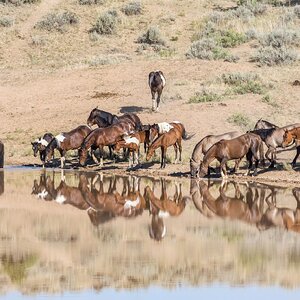
These are from a roll of APX 400 that I developed this morning.
Adonal 1+25 ,11.5 min, 20°
View attachment 93295 View attachment 93296 View attachment 93297 View attachment 93298 View attachment 93299
I pre-washed the film with distilled water at 20°, inverting and tapping.
Development was with initial agitation, inversion and tapping, then I turned and twisted the tank in my hands for the rest of the time. The developer was diluted in distilled water.
No stop bath was used but instead I used distilled water at 20° for approx 2 minutes, again with inversion and tapping.
I fixed for nearly 5 minutes in total with Adofix 1+9 at 20° diluted in distilled water.
Then I rinsed the film by filling the tank three times with distilled water at 20°, inverting 5 times on the first rinse, 10 times on the second rinse and 20 times on the third rinse.
Finally I used a watering agent (Adoflo) at 1+400 in distilled water at 20° before hanging the film to dry.
This is the first time I have developed my own film and would appreciate any comments and tips.
I would say you have a sound routine. Just make sure you can repeat it precisely and you get consistent results and can easily identify the cause of any problems that might arise. I read you were having trouble loading film onto the tank spools. I loaded a roll myself this evening. And still had trouble, always will with 135 roll film. But I muddled through. The key is repetition. Repetition is the key to insanity. Repetition is the key to insanity. Repetition is the key to insanity. Repetition is the key to insanity. Repetition is the key to insanity. Repetition is the key to insanity. Repetition is the key to insanity.
The prints (neg scans) look good. And I bet it felt great to see such a beautiful thing, your own creation.
")


![[No title]](/data/xfmg/thumbnail/37/37540-73002ccb910b97978bc38658622a34d3.jpg?1619738133)


![[No title]](/data/xfmg/thumbnail/37/37524-6c51828efbc2361f9cfed53f63f28aa2.jpg?1619738130)