how to reduce fisheye effect

JohnnyD5446

TPF Noob!
Joined
Aug 2, 2007
Messages
3
Reaction score
0
Location
New York
Can others edit my Photos
Photos OK to edit
Hello everyone :thumbup:,

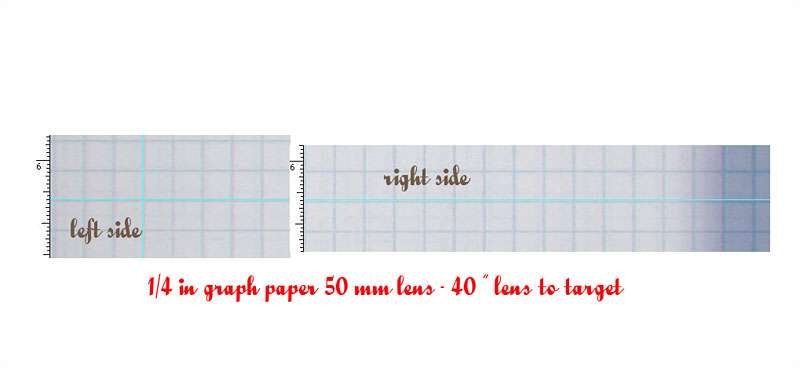
I am a PhD student at Columbia University and need some photography help. My project involves using yeast as a model to study human cancers. Part of the project involves conducting high-throughput screens on rectangular agar plates. When the screens are finished we use to scan the plates into the computer (with a high end flatbed scanner) in order to automatically analyze them. However we would like to instead take pictures of our plates with a digital camera as it is faster and reduces glare.

The current setup involves placing the plates on a light box, mounting a digital camera on a stand 1-3 feet above the plates, and quickly snapping pictures.

The problem I am currently facing is a fisheye effect (see attached photo). In order to automate the analysis process there can be no fisheye. How can I reduce this effect? Also, we would like to reduce vignetting as much as possible.

Right now i am using a crappy Canon Powershot, but my lab is willing to upgrade to any camera required to make this work.

I know nothing about photography, but am eager to learn and would really appreciate any suggestions.

check out a sample picture at http://www.rothsteinlab.com/graphics/P1040447.JPG (2.5 mb)

Thanks!
 
Welcome to the forum.

As a quick fix, you could try mounting the camera farther away from the plate, and then increasing the focal length (zoom).
 
Well to start with how big is the plate?. Also did they give you a budget? or do you at least know what they might find as an acceptable spending limit?.
 
This is called barrel distortion and is caused by being too close to the subject. Your camera can't really handle your level of zoom that close up.

Big Mike's solution works, if you're not already at max zoom. Otherwise you'll probably indeed need to upgrade your equipment. What model powershot are you currently using?
 
thanks for all the advice so far, I will try everything you all have suggested :)

Money is really not an issue (benefit of buying with the lab's funds and not my own, haha), we just need this to work well and reliably.

The plates are about 3 x 5 inches.

Currently we are using a Powershot S400, but only because that was what we had available. We will need to purchase another camera eventually because this camera is currently used for other purposes as well and we would like to just have a single dedicated camera to take pictures of the plates.

thanks again!
 
This is called barrel distortion and is caused by being too close to the subject. Your camera can't really handle your level of zoom that close up.

Isn't this called Perspective Distortion? Barrel distortion is a fault in the lens no and is really only visible in zooms?
 
There is a Photoshop Plugin I use called PTLens that will correct for barrel distorion. (http://www.epaperpress.com/ptlens/).
Whether it works as well as you need for the automated analysis to work is something else again.

Since PTLens depends on recognizing the camera and its attached lens you will have to consider a DSLR and a good sharp lens. A rough trial with my own camera leads me to believe that a 50 mm lens will cover that 9 x 15 area quite well with about 3.5 feet of relief between the camera lens and the plate.

You are in luck in that 50 mm lenses are the best price value you can get in dSLRs. If the accuracy is enough, you can bring this entire project in for under a $1000 with a dedicated camera and lens. (including an old enlarger to use for the camera stand.)

I will do a trial on this if you will post the number of rows and columns of dots on each plate so I can make a test pattern. (or link to a scan of a single dish)
 
Isn't this called Perspective Distortion? Barrel distortion is a fault in the lens no and is really only visible in zooms?
Is it? The lesson I took distinctly refered to it as barrel distortion.. I'll look it up later, and see if the guy was using the wrong term.. Thanks :)
 
'Barrel distortion' is curvilinear distortion and is due to variations in magnification over the area of the lens. Light rays striking the lens at different angles go through different points of the lens, not through the centre. Since various parts of most lens elements are of different thicknesses (that is the front and back surfaces are not parallel) the actual path of the ray does not conform to the theoretical path and the light is bent more at the extremities.
This was a problem with early lens design but with the introduction of symmetrical design it's virtually unheard of now.

'Perspective distortion' is an effect you generate by moving close to an object when using a wide-angle lens, and moving further away with a telephoto. If it is done so that the nearest part is the same size with both lenses it will be found that the WA lens produces a far steeper angle to the perspective than the telephoto. You can see the effect if you have a zoom lens. Start with the lens at tele and move towards an object as you zoom out to wide angle.

Wide angle distortion (often confused with perspective distortion) is caused by objects near the edge of the lens field being 'stretched'. You will see the effect if you use a wide angle lens and position a round object near the edge of frame. The circle will be stretched into an elipse. The effect gets more pronounced the wider angle the lens and the closer in you get.

Looking at the image posted, the problem is wide-angle distortion. As has already been suggested, move the camera away from the objects and use a standard lens or slight telephoto. That should solve the problem.
 
I've been doing a little bit of playing around and like the results I am seeing. Moving the camera further away from the plates helps with both the wide angle distortion and vignetting. The plug-ins you guys suggested look great, but I think the built in photoshop "lens correction" may be good enough. Now vignetting is the more prominent issue, although I can reduce this by snapping a picture using only 4 plates instead of 6 in the original image I posted.

The reason vignetting is an issue is because after I snap the pictures I crop them, convert then to grey scale, then threshold them (I do not know much about thresholding except that it converts the picture to a pure black and white image). It is during the thresholding step that the vignetting seems to get amplified. After thresholding I run a macro that I wrote that essentially lays a grid over each plate (so that each box only contains a single colony) and measures the amount of black in each box. This serves as a way to automatically measure the size of each colony.

In answer to The Traveler:
I do not have any single plates lying around to take pictures of since I am not currently conducting a screen (I'm doing the data analysis of my last screen). All I have are images with multiple plates on them or crops of individual plates.
We screen in two different densities so the plates have either 384 (16 rows x 24 columns) or 1536 (32 rows x 48 columns) colonies on them.

Thanks for helping me out guys...:hail:
 
I am a former research scientist (materials science) and so I jumped at the chance to look at this problem.

I photographed 1/4 inch graph paper at a sufficient distance (39 inches from lens element to paper) to have the camera field include a 16 inch width using a Nikkor 50 mm f1.8 lens. Then I straightened the resulting image and pulled down a ruler (in PS) and cliped an image at either end of the 12 inch width of the graph paper to see how much the image strayed from the PS ruler.

Not surprisingly the image was very sharp and rectilinear. This lens would be better than any point any shoot just because of the physical factors involved.

(You clearly didn't need this done but it made me nostalgic for the old days of lab work.)

testph9.jpg
 

Most reactions

Back
Top