I have failed at flash photography

map101

TPF Noob!
Joined
Mar 29, 2016
Messages
15
Reaction score
2
Can others edit my Photos
Photos OK to edit
I have gone to numerous events and have struggled to use my flash properly. Is it me, or the camera body, the lens or the flash? When I'm outdoors the pics come out stunning.

The problems I face indoor events is:
1. Either the subject or the surroundings is underexposed. If I increase flash exposure then subject becomes over exposed.

2. At times half of the subject or pic is overexposed.

3. Just cannot get the white balance to work. I've tried all pre-configured settings.

4. Colors are either pale or too warm. I suppose related to point 3.

My gear
Canon 5D Mark II
Lenses
Canon 24-70mm f2.8
Sigma 35mm f1.4
Speedlite EX600
And I often use Gary Fong lightspehere flash diffuser. But I've tried without as well. Similar results. My flash is almost always having the ceiling.

I'm uploading some images. What am I doing wrong. Please help! IMG_5653.jpgIMG_5898.jpgIMG_5860.jpg
 
it's you.


Or more specifically, your understanding of flash exposure. There's volumes written on this subject matter. You don't state what mode you are in, how you are using your flash (not the modifier)

Flash photography is something I struggled with too. Remember, it's 2 exposures. Ambient and flash...in one.
 
Sorry I am using it on ETTL mode
 
And TrevorIt why do first 2 pics look half overexposed and half underexposed?
 
Some may disagree but I don't like using ETTL. I manually control my flash always. It's what works for me and once you understand how that works it becomes fairly easy.
 
Some may disagree but I don't like using ETTL. I manually control my flash always. It's what works for me and once you understand how that works it becomes fairly easy.
Can you direct me to some links which touch upon that. As you can see from the pics I am struggling.
 
The camera is making exposure decisions when you use ETTL.
The camera can only guess what it is you are shooting based on a program some camera software engineer wrote way back before your make/model of camera went on sale.

So ETTL often gets it wrong. If you want consistent results you have to make the exposure decisions.
Take control. You're lots smarter than the camera.
Put the flash and camera in Manual mode, and learn how to do flash photography.

On-Camera Flash: Techniques for Digital Wedding and Portrait Photography
Off-Camera Flash: Techniques for Digital Photographers

Strobist: Lighting 101
Strobist: Lighting 102: Introduction
Strobist
 
As an Amazon Associate we earn from qualifying purchases.
Some may disagree but I don't like using ETTL. I manually control my flash always. It's what works for me and once you understand how that works it becomes fairly easy.
Can you direct me to some links which touch upon that. As you can see from the pics I am struggling.


get the speedlight book by Syl Arena Google it and buy it used. That will get you squared away. You have top equipment. just not enough knowledge. But no matter what start with Syl Arena!
 
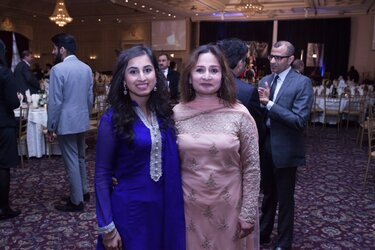
Straight bounce flash is what is giving the under-eye bags on the women: they eyebrow ridges are casting shadows on their upper cheek areas; look at the bosom of the older woman on the right--do you see how there is a wide, highlight on the top of her bosom, and then a shadow undernath the bust line, and how that light, which is raining straight down from the ceiling, is causing the wrinkles to show on the bodice of her dress?

Look at the men: shiny bald heads, as the ceiling being lit up, and then the light falling off terribly in intensity by the belt buckle level. Again, this is very typical of "pure, straight bounce" flash.

You need to add a small bit of light coming forward, or to eliminate ceiling bounce. There are multiple ways around this. Tape a small business card to the flash, or use a speedlight that has a built-in, sliding bounce card-- so part of the light kicks forward, while the other 85% goes to the bounce. CHange flashes, and locate a flash that has a smaller, secondary straight-ahead flash window.

Move to the Rogue Flashbender. Take the flash bounce surface and put it where you can control it better.

I have a suspicion too that you might be bouncing the flash at wayyyy too wide an angle: one of the biggest problems with automated flash is this: Using a 24-70mm at between 28mm and 35mm, the camera's automated system sets the flash head to the 28 to 35mm positions; this LIGHTS UP a large, wide ceiling area, giving the shiny bad-head reflections, but horribly dissipating the light over a massive area, and the returning bounce light falls-off in intensity to a horrific degree: witness the bright, hot heads, and the dim, dark belt area...

Your bounce shot needs to be done at a TELEPHOTO zoom head value--NOT at 28mm and not at 35mm....more like 70mm or 85mm.

Ceiling bounce done wrong...wrong settings, wrong understanding, bad fundamentals. You NEED to kick at least "some" light forward!

The Fong Diffuser is for extremely cramped, low-ceiling uses.

Both Nikon and Metz have made flashes with a main flash head and a smaller, straight-ahead flash window, just for this type of banquet ceiling bounce + micro-pop of straight ahead flash work. This problem was SOLVED, in hardware, in the 1980's. (Look up Nikon SB-16)

The poor results you are experiencing have absolutely NOTHING TO DO with E-TTL...this is a shooting/lighting gear fundamentals problem, not an exposure metering issue. Your light is "raining straight down on" the people; you could solve the issue by moving backward and shooting with a longer lens; the way you are using whatever equipment you have is causing the bounce flash to come in almost perfectly straight DOWN...you must modify either shooting or equipment techniques to get at least "some" light hitting the lower parts of the people.

If you shot these shots from 20 feet away, with an 85mm lens and the zoom head set to 135mm for a PROPER ceiling bounce, and the bounced flash rained down at 75 degrees, not straight down on them, they would be nice flash photos. Or use a bounce card + ceiling bounce. Or tape a plastic spoon to the flash head. Or use a Rogue Flash Bender.

Again, it is the gear and the technique that is all wrong-- not the exposure regulation system. These would be equally poor if they were exposed 2 stops more or 3 stops more--you'd still have too much light up high, and not much light by belt level.
 
Last edited:
flash bounce diagram.JPG
Here is what is happening with IMG_5653. Your photo of the two women was shot at the darker line, the 10 foot distance. Look at the older woman's left hand: see how her fingers are curved in slightly--yet are 2 full EV darker, and in shadow? The problem is that with the flash coming in from almost directly above, her hand falls into shadow. This back-of-an-envelope diagram I made for you shows what happens when the bounce point does not throw at least some frontal light rays onto the subject.

THe bounce point on the ceiling needs to be about half-way in between the camera, and the subject. Now: this is the technique and learning part of bounce flash. If you are using straight ceiling bounce, it is better to have the bounce point closer to the camera, rather than right at the mid-point. At 10 feet camera to subject distance, it is VERY easy for the bounce light that rains down to fall very much "straight down", causing eye bags, shadows under the bustline, and very unflattering light which is coming in at a very straight angle.

Moving back to 20 feet makes it easier to aim the bounced point on the ceiling, and also to get a slightly more frontal approach as the light rains down, and strikes the people a bit more frontally, providing more fill-in light, more frontal light, more-even light, better light. The real trick is to learn where to aim the flash head, to get the desired lighting effect, in different types of rooms, with different ceiling heights.

The flash instruction manuals of yesteryear told us to bounce at Maximum Tele-zoom on the flash head; automatic zoom head adjustment can screw up large-room bounce flash horribly. The real secret is to get the bounce point on the ceiling set **properly**, for the exact shooting scenario. Set the flash zoom head manually, for the situation, as-needed. Bottom line: being too close is the worst thing you can do if you have no secondary, straight-ahead flash light rays from a bounce card, a white plastic spoon, or even YOUR FINGERS of the left hand cupped over the flash a bit, to direct 15-20% of the light straight ahead, for fill light.

If you look at the shot of the two women, you can see that the MAN behind them, the fellow with the black-framed glasses on, has GOOD bounce flash lighting on him! This is evidence that the camera-to-subject distance and the exact angle of the flash head was not right for the women, but was quite nice for a slightly longer distance.
 
ETTL will expose more or less correctly with direct flash, but your high-ceiling bounce is throwing it off. As for white balance, I can speculate that you're on auto-WB, so the camera is adjusting for what it sees under ambient light, and the flash is daylight-balanced. The camera does not adjust for the flash, only for what it sees prior to the exposure. Keep it on manual daylight WB when using flash. There is also the consideration of the ceiling not being white, giving a color cast to the flash as it reaches the subject.

The other posts have covered the issues pretty well. Remember that light falls off with the square of the distance, so something twice as far away from the flash only gets 1/4 the light intensity. Something 4 times the distance only gets 1/16 the intensity. That ceiling is just way too high to use as your only bounce surface. It doesn't diffuse the light the way you want, it merely makes ALL the light come from nearly straight up. That's why the lower portions of your images are in shadow.

In the third image, the table is bright, so ETTL reduces the flash intensity, leaving the subjects a bit underexposed.

A bare flash, pointed not quite straight up, with a white card taped on that sticks up behind to throw some light forward. I've even used my hand as such a reflector in a pinch!
 
I'm thinking the ceilings might be a little high for bounce flash. Based on the first image of the two women it also looks like you have the flash unit attached to the camera. Use a synch cord to hand hold the flash at arms length and point it directly at the subjects. That will overcome the high ceilings and still provide some modeling. The third image looks like the flash isn't wide enough to cover the angle of the lens of the lens coverage. The second image is not bad. When I have shot events like this I normally use a device that mounts the flash high and to the left so I don't have to worry about hand holding it.
 
1. Get this book: Amazon.com: Speedliter's Handbook: Learning to Craft Light with Canon Speedlites (2nd Edition) (9780134007915): Syl Arena: Books

You don't have to get it from Amazon. I bought it on iBooks. But get the book and READ the book.

I'll second Derrel's recommendation:

2. Lose the Gary Fong thing. I tried one and quickly realized the impracticality of it. Get a Rogue Flashbender. Get the LARGE size.

When you bounce a flash, the ceiling needs to be "white" (if it's colored then that color will put a color cast into your light) and it needs to be relatively LOW. If the ceiling is too high then you won't get much of a return. There are more ways to take a shot with flash then bouncing off a ceiling. If using the Gary Fong lightsphere (don't) the cap should be removed so that it allows the full volume of light to reach the ceiling. Only put the cap on in a room with a very low ceiling.

The lightsphere allows flash to head in all directions and that's just a waste of light. I use the Rogue Flashbender (I have two of them) and while most light goes up to the ceiling, anything that would have traveled backward will hit the white surface and reflect forward -- filling in those shadow areas. I can bend the modifier to control the light. I might bend it so everything reflects off the surface and almost nothing can hit the ceiling.

It really helps to know the "inverse square" law. It sounds complicated but the concept is simple. As the distance from the light source increases, the light gets dimmer. Technically what's really happening is the photons of light are spreading out and that means that within any given unit area (say... a square inch) fewer photos will land in that same square inch if that surface is farther away.

Think of this like the sprayer nozzle on your garden hose. If you stand 1 foot from the hose and point it at your face, you're going to get a face-full of water. If you stand 20' away and the water spray nozzle is adjusted to fan out... you'll just get a few drops of water hitting your face. The SAME CONCEPT works with light.

This means if you have both "close" and "far" subjects in the same scene ten the "close" subjects will be brighter than the "far" subjects. This is

For this reason... on the Canon 5D II... go into your menu, navigate to the custom functions tab (orange camera tab), pick the top row ("C.Fn I: Exposure"), navigate to setting number 7 named "Flash sync. speed in Av mode" and set it to value "1: 1/200-1/60sec. auto" (the default was mode "0: Auto").

I find shooting in Av mode to be the most useful when using E-TTL flash. Here's why.

There's no way one flash can light up an entire scene evenly. So really what you want is a shot that uses ambient light for the overall room glow... but then uses flash to make sure your subjects aren't too dark. That means you're really taking TWO exposures in one shot.

The flash is momentary... it might be lit for the tiniest little fraction of a second... and then goes dark. But the shutter remains open and it CONTINUES to collect more light from the room (that light being created by other light sources -- not your flash). This helps create set the mood of the room in your shot.

If the Av mode flash is set to "auto" then it can use any shutter speed it wants (including something dreadfully slow that might result in a blurred shot.) There's also the mode that forces it to use 1/200th (the max flash sync speed on the 5D II) but that's too fast to collect much light in a room lit for ambiance. My favorite choice is the "1/200-1/60sec" range which means the shutter must not be faster than the max-flash sync (1/200th) but must not be SLOWER than 1/60th (below which you may have camera motion.) You can now use a low-ish aperture (something appropriate for your depth of field needs but large enough to capture ambient light) and get a pleasant result.

The flash itself is going to be subject to that inverse-square law. Remember... that is a law of physics. It's like gravity. You don't violate that law. There is no technology, we're not waiting for someone to make a better flash, etc. etc. it is what it is and we learn to work with it. If you're thinking "if only I could get the right flash, flash modifier, settings, etc." then you're going to be waiting a very long time -- because it's not about technology, it's a law of physics. You get better exposures through learning how the law works and learning to work within its limits. That's why I suggest you get the Syl Arena "Speedliter's Handbook".

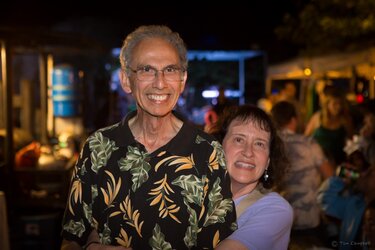
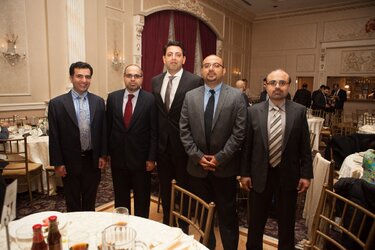
Edit: BTW, I didn't finish this... the attached thumbnail is an image taken at a Maui "town party" of some of my friends I was visiting. This is taken at outdoors and at night.

There is no bounce surface so the 600EX-RT is mounted on camera (5D III) and pointed directly at my subjects. But I'm in Av mode at ISO 3200 and using an aperture of f/4. The camera chose to use 1/60th (no surprise to me... it wants as much light as it can get - but remember that I've restricted it to the range of 1/200th to 1/60th.)

This is just an example of the result... lit but not over-exposed subjects in the foreground, but enough atmosphere in the background from the ambient lighting that you get the feel of the party atmosphere.

I did adjust in Lightroom but the adjustments are minor. I used the "adjustment brush" tool to apply just a tiny exposure reduction and brushed that on her shoulder (the lilac colored area) because it was just a tiny bit brighter. I also very gently hit their faces to reduce some shine. This were pretty subtle (the straight-out-of-the-camera vs. this image are not radically different.)
 

Attachments

  • VO3A7365.jpg
    VO3A7365.jpg
    171.8 KB · Views: 246
Last edited:
As an Amazon Associate we earn from qualifying purchases.

Most reactions

Back
Top