Ladies

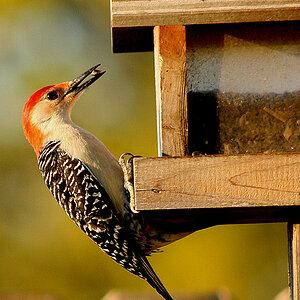
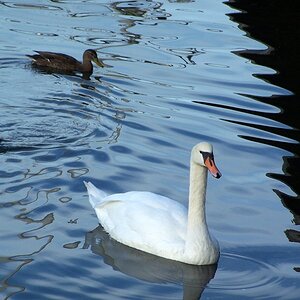
National Geographic quality in both content and technical competence.

Bravo!

I totally agree

Hey, what post-processing did you do? If you explained it somewhere else, let me know
 
Hey sorry, just saw this one.

Really it is quite simple, just a mixture of curves, masks, burning, dodging. I actually emailed it to a friend a few days ago so I will just copy and paste from that conversation.

For colour images, I just add a second layer with a masks, and use curves. Any blown highlights that weren't there before, I bring back using the mask. After that, I touch up the highlights and shadows using the burn/dodge tool - and if I feel something REALLY needs to be brightened up, I use the sponge tool at a very low opacity - or will rework it in curves. Then I save the full resolution image, as well as a smaller image that has been sharpened and convert the colour profile to sRGB.

Black and whites - I have just been playing around with my technique for these ones.

I generally convert all my images to colour first, and then choose which ones to go to bw, so most of these have already had the above 'treatment' per say.

After that, I make a gradient map (err.. I think that is right) layer through the layers palette (I am sure you already know where it is - but it is the half black/half white circle)

Next is Channel Mixers where you check 'Monochrome' at the bottom. Then I just play around with the levels. Most people say they should all add up to 100% by the end but -- mine are almost always 10-20% more then that. I watch only the skin tones here

Then I just click the eye beside the channel mixers level to see where any highlights were blown (there are generally lots), so using the mask tool on the channel mixers level I bring back pretty much all of the background generally.

I combine all of the layers here (Shift+Ctl+E)

Create a duplicate layer (Ctrl+J) and burn and dodge. This is probably where all of my finer work is done - and perhaps it is a waste of time, but... it makes a bit of a difference. Once again, I always hide then bring the layer back while I am doing it to make sure I didn't completely screw so mething out of proportion.

Oh! One thing I forgot, is sometimes I will bring the catchlights or highlights in the eyes out just a tad in BW, as I find they usually get lost. The dodge tool always makes them look muddy (even when on highlights) I find, so I create a dup layer, and curves, then bring back only the eyes. Sometimes that is too much so I decrease the opacity.

Other then that, I add a bit of a warm tone by adding a layer, Colour Balance (same place as Gradient Map and Channel Mixers)

Wa la :) Hopefully that all makes sense. I just did that from the top of my head, so if you happen to have any questions - feel free to ask.
 
Wow, amazing series...

I really have to get off my ass and see what people post more. This is fantastic stuff, Peanuts
 

Most reactions

Back
Top