Lighting Problems (Lack of Knowledge)

Olympus E300

TPF Noob!
Joined
Nov 22, 2009
Messages
345
Reaction score
12
Location
Ste.Anne, Manitoba, Canada
Website
www.fsharpphotography.ca
Can others edit my Photos
Photos OK to edit
Hey gang. I've been working all day with my new equipment. I'm trying to get a fundamental understanding of lighting in regards to portrait shoots. If anyone can recommend a decent book (for dummies) that is directed towards the beginner, I would be appreciative!

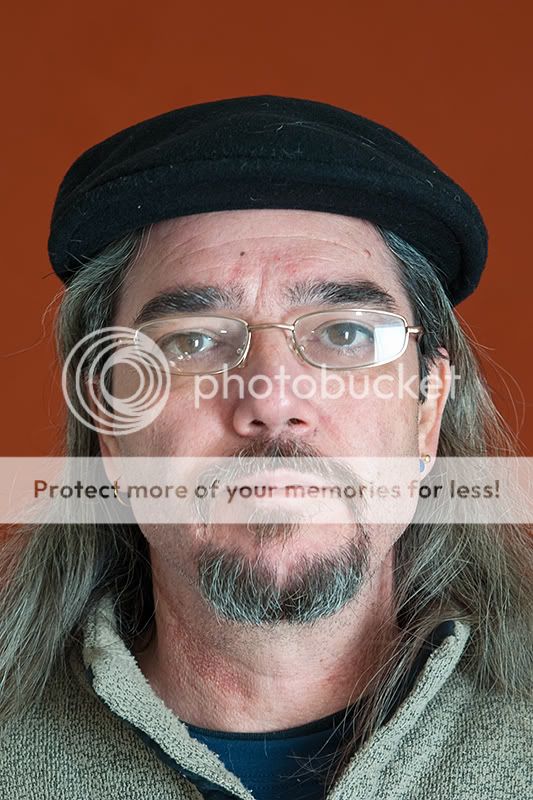
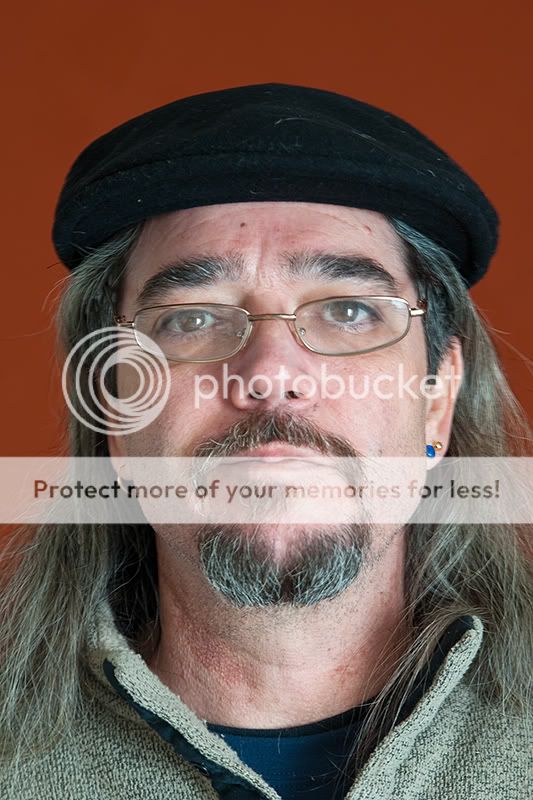
Below you'll find one of my better shots (staight out of the camera - the only thing I did was reduce the resolution to 1024x768) I know, its horrible! Quit laughing at me...LoL. I'm trying gosh darn it!! Quit it! I know you're laughing at me!! I can here you...

Anyway, I just can't seem to figure out what equipment needs to go where, whether or not to even use the wireless flash and how many bulbs should be lit in my softbox(es). At the very bottom of this post, I've attached a rough PhotoShop sketch of my layout for this shot. Here is a list of the equipment I used and the specs.

Equipment Used
Camera : Olympus E3
Flash : FL-50R (wireless)
Softbox : 20" wide x 28" tall 1000W with 5 daylight bulbs (Temp = 5500K)
Softbox : 28" wide x 20" tall 1000W with 5 daylight bulbs (Temp = 5500K)
Muslin : 10'x20' black/red acid wash

Camera Settings
Lens : Zuiko 40-150mm
Focal Length : 68mm
ƒ-Stop : ƒ/3.9
ISO : 320
Exposure Time : 1/10 sec.


In the photo below, the subject is rather yellowish (correct?)...Or is it reddish (I can't tell)? I assume that there is some reflection from the red background disturbing the colors here (correct?). Furthermore, I tried everything to limit the light reflections on the eyeglasses but as you can tell, I couldn't. Is there an easy way to Photoshop the reflections out? I would assume it best to avoid the reflections all together before getting to post production (correct?). Please...Don't make fun of the model, he's not very photogenic...Besides, I didn't have anyone else willing to burn up the entire day doing this stuff...LoL.

WoW! All day...Seems like a fruitless one at that! I suppose, if nothing else, I can say that I finally got all of my equipment together in one room and made my initial attempt at getting the studio lighting correct. Oh...Its such a long road ahead...LoL...Baby steps...Baby steps...

Please! Please!! Help!!?! .... LoL

MyMugReduced.jpg


PortraitLights.jpg
 
Last edited:
Your image looks fine, in terms of lighting, a bit on the flat side though.
Colors: your WB is off.
overall exposure is nice.

Here's a nice place to start Portrait Lighting

good luck and happy new year
 
Your image looks fine, in terms of lighting, a bit on the flat side though.
Colors: your WB is off.
overall exposure is nice.

Here's a nice place to start Portrait Lighting

good luck and happy new year


Thanks! WB...That's the ticket!! By the lighting being on the "flat side" as you say, what exactly do you mean? Should there be some shadowing on the face or something in order to indicate "depth"?

I'm off to do some reading! Thanks you!!
 
solid photo, great lighting and colors.


i only see 1 flaw ... my eyes keep focusing on the crease on the backdrop :greenpbl:

good job!
 
By the lighting being on the "flat side" as you say, what exactly do you mean? Should there be some shadowing on the face or something in order to indicate "depth"?
Yes. You answered your own Q :).
flat lighting is safe and easier. No need to move lights with different pose, just move your subject up down and all around and lighting won't change. When you use light ratios, that, in my opinion, is where the fun, art, creativity is.
Link I gave you is one source. I also like David Ziser's blog, as he often discusses lighting Digital ProTalk.
If you want a good book, on Amazon, look up Steve Sint. I don't remember the name of his last book but it is pretty good (from what people, and Steve him self :D ) says.
Holla back if you'd like to know more. PM if you want to...
 
First of all I don't think it's bad. That said, your lighting is very flat which means I don't see any shadows on the subjects face which would help give it shape and depth. You might want to try bringing the second light closer to the camera and dimming it. Raising the second light (camera left light, or fill light if it's dimmer) would help with glasses reflections. Since the reflections are not in front of the iris/pupil and relatively small I don't find them too objectionable. Another trick with glasses is to raise the ear pieces a little which tilts the lenses down causing the light reflections to fall below the camera. This trick can be noticeable on some subjects as it might be on the photo you've submitted. Also since your subject is facing a little camera right, the right light could be moved further around (more camera right and more beside the subject) another help with reflections. This will put the main light on the side where the ear does not show which is called "short lighting" which is more common than putting the main light on the side where the ear shows which is usually called "broad lighting". Short lighting tends to thin faces and broad lighting adds weight to them.
Book recommendation: Light Science & Magic by, Hunter, Biver, & Fuqua
 
i really dont know the first thing on this subject as im just starting out but somebody reccomended this book to me and i picked it up, was by steve sint and was called digital portrait photography. i havent picked it up to read it yet as im reading a beginner book lol but i think it may be the book emt was talking about. :D
 
solid photo, great lighting and colors. i only see 1 flaw ... my eyes keep focusing on the crease on the backdrop :greenpbl: good job!

Thanks! The muslins I ordered just arrived. I have this one and a green one in the same style. Of course they were folded and they have some creases from this. To be honest, I was working towards lighting more than composition. My gut tells me that lighting is what makes or breaks a good photograph. So my self appointed assignment today was lighting... Ta da!


Link I gave you is one source. I also like David Ziser's blog, as he often discusses lighting Digital ProTalk.
If you want a good book, on Amazon, look up Steve Sint.

Holla back if you'd like to know more. PM if you want to...

Thanks! I'll be sure to look into those sources. I realize that I'm very inexperienced so every single nugget of information is worth something to me! Especially if its written down (since I have such a horrible memory). I learn my doing things OVER and OVER again. I'm not one of those "Read it once" sort of guys. Cheers!!


You might want to try bringing the second light closer to the camera and dimming it. Raising the second light (camera left light, or fill light if it's dimmer) would help with glasses reflections. Since the reflections are not in front of the iris/pupil and relatively small I don't find them too objectionable. Another trick with glasses is to raise the ear pieces a little which tilts the lenses down causing the light reflections to fall below the camera. This trick can be noticeable on some subjects as it might be on the photo you've submitted. Also since your subject is facing a little camera right, the right light could be moved further around (more camera right and more beside the subject) another help with reflections. This will put the main light on the side where the ear does not show which is called "short lighting" which is more common than putting the main light on the side where the ear shows which is usually called "broad lighting". Short lighting tends to thin faces and broad lighting adds weight to them.
Book recommendation: Light Science & Magic by, Hunter, Biver, & Fuqua

I like these suggestions. If I have the time tomorrow, I think I may give them a go! Cheers to the book suggestion!!


...somebody reccomended this book to me and i picked it up, was by steve sint and was called digital portrait photography...:D

I betcha this is the book that IgsEMT was speaking of. Great!! Thank you!!


Thanks for the help everyone. Thanks even more for not laughing too hard at my ugly mug. Now, I have a place to start and grow from. Cheers!

- Dan
 
Just curious...My eyes are tired (been at this all day) and the last few rum & cokes probably aren't helping much but could I get another opinion on this. Does this post processed version look much better? I want to say yes...But I'll let those with more experience chime in. Thanks for the C&C...

BEFORE POST PROCESSING
MyMugReduced.jpg


AFTER POST PROCESSING
MyMug2.jpg
 
I have no experience with still photography lighting, but if this was video, I'd say you might try using a backlight to add some depth?
 
<snip>..... Furthermore, I tried everything to limit the light reflections on the eyeglasses but as you can tell, I couldn't. Is there an easy way to Photoshop the reflections out? I would assume it best to avoid the reflections all together before getting to post production (correct?). ...<snip>
Here's a little trick I picked up for eyeglasses.
Taken with glasses taken in normal wearing position. Notice I have a large bright window to camera right and I also set up a flash camera right... double whammy.

LightingEyeglasses-normalrestweb.jpg


Have the subject raise their glasses slightly above their ears. Normally, you will never notice the change. (I did exaggerate a little :blushing:)

LightingEyeglasses-raisedweb.jpg


Hope that helps.​

A dandy little trick indeed!
 
Olympus... yes it would be behind the subject. Typically behind and below. This will give you a bit of a rim light on the top of the head etc.

Kundalini, I love that little trick. As you said I think you over did it a bit, but glasses tend to give me a bit of trouble.
 
Okay, so I looked at your post again at the broarder questions. But, I also have a couple.

From your equip list:
Flash : FL-50R (wireless) Is this a bare flash 28" off the floor?
Softbox : 20" wide x 28" tall 1000W with 5 daylight bulbs (Temp = 5500K) \
Softbox : 28" wide x 20" tall 1000W with 5 daylight bulbs (Temp = 5500K) Are these continuous lights? Cool or Hot?

From your setting:
&#402;-Stop : &#402;/3.9 If shooting behind a backdrop such as this and unless you're going for a particular style, IMO, an aperture of f/8 may have worked better to make sure the entire depth of your model is in focus. The shallow DoF works well with head shots, but again IMO, 3/4 shots don't work as well with blurred effect.
ISO : 320 Is this your max synch speed?
Exposure Time : 1/10 sec
A bit long to ask a model to stand still. I would think a shutter speed of 1/125 up to synch speed would be better suited with your lighting gear.


Okay, out of the red... Looking at your diagram, I would suggest to try another approach. Instead of having your softboxes 10' away from the subject (geesh, you must have a warehouse to shoot in :lol:) move them to just out of frame... literally, when you see the soft box in the view finder, back off an inch. Getting the light source closer to the subject gives a more evenly spread and softer light. It also drops the power settings, which in turn increases recharge time (for battery powered lighting). You'll need to decide which is main and which is fill. Set them to a ~2:1 ratio so that the fill is one stop less than the main. Try the main light at 45°/45° (45° off camera axis, 45° above model)....... crap, you've got a third light.... Hmmm, right so, take the third light, put it on a stand and place it behind the model. You can try facing it towards the model for the rim light effect or pound the background for the halo effect.

Another option would be to place one of the soft boxes as a main placed above the model ~12" in front and have a reflector below him to bounce some light to fill in the shadows.
 

Most reactions

Back
Top