Merging parts of two images

gossamer

TPF Noob!
Joined
Dec 24, 2013
Messages
234
Reaction score
23
Location
New Jersey
Can others edit my Photos
Photos OK to edit
Hi,

I suppose this may be more of a photoshop question, but I was taking pictures with my D500 on a tripod the other day, and have one picture that I like with a random woman who walked into the frame, and another picture where my shutter remote is clearly showing in the picture.

I'd like to be able to remove the random woman from the picture where the shutter remote isn't showing by taking that portion of the picture from the other picture and overlaying it, or somehow merging it, with the other picture.

Are the pictures similar enough to be able to do this? I've tried to cut a portion from the one and paste it onto the other, but even after merging the layers in photoshop, the blur tool was having no effect.

I'd really appreciate if someone could take a look and provide some guidance, or take a shot at making the changes in photoshop directly...

Dropbox - DSC_0389.NEF
Dropbox - DSC_0399.NEF

Thank you so much!
 
I would do two images as one layer each, then lay the one you want to be the main image as the base, with the other over top. Reduce the transparency on the top one so that you can clearly see the bottom one and line them up, because they are probably all out of whack with each other. Then, use a large eraser tool with a giant feather for its edge to erase out all all the top image you don't want, than increase the transparency back up when finished.
 
Hi there,
I gave it a try ;).
Here is what I did:
  1. made some lightroom adjustments
  2. opened the two as layers in photoshop (select both in lightroom rightclick open in - photoshop as layers)
  3. in photoshop: edit - auto align layers (you can do that as suggested above if you don´t have photoshop)
  4. drag the image you want to keep more of on top
  5. create a mask - down in the layers palette, there is a rectangle with a circle in the middle - click that.
  6. Take the brush tool, make it big (I used 550px), set the hardness to 0% and set the foreground color to black
  7. paint with black on the parts of the image you want to be erased (the big advantage of masking compared to the eraser is, that you can reverse the foreground color to white and paint over it again to reveal the portions you do like - that way you can finetune the image easily). On a mask btw: everything that is black will be hidden, everything that is white will be revealed (at 100% opacity). But you can also paint with 50% gray, and it will show the portions of the image with 50% transparency,...
  8. cropped the image slightly because the auto-align left a bit of a transparent background.

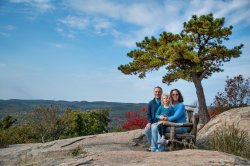
DSC_0389Retouched.jpg

Here is the jpg in lower quality. I uploaded a tif to our server, because the forum only accepts smaller image sizes.
http://www.photo1x1.com/thePhotoForum/DSC_0389Retouched.zip

And finally please let me humbly recommend to do a little learning on exposure. The shot was made at 1/8000th, f5.6 ISO 720. That doesn´t really make sense and if you chose the automatic mode, it is one more proof that cameras hardly ever know what they are doing. ISO 100 would have given you a shutter speed of 1/800th, more than enogh for a shot from a tripod ;). The image quality and detail would have been far better.
 
And finally please let me humbly recommend to do a little learning on exposure. The shot was made at 1/8000th, f5.6 ISO 720. That doesn´t really make sense and if you chose the automatic mode, it is one more proof that cameras hardly ever know what they are doing. ISO 100 would have given you a shutter speed of 1/800th, more than enogh for a shot from a tripod ;). The image quality and detail would have been far better.

Great advice. Really appreciate it. It comes from inexperience, mostly, but also never really having the time to properly set up the shoot - trying to get 5yo to sit still, other people rushing in to take the same shot, lack of time to practice, and the hour-long drive that preceded this shot to get there.

This was aperture priority. I believe ISO may have also been auto, which I know to be a mistake, but can't rely on my experience to get it right in all environments.

I can't even tell you how much I appreciate the work you've done for me. I will put the time you spent on this to go use, and make sure I learn from what you've written.
 
Can you also upload the PSD file so I can see more specifically what you've done?
 
And finally please let me humbly recommend to do a little learning on exposure. The shot was made at 1/8000th, f5.6 ISO 720. That doesn´t really make sense and if you chose the automatic mode, it is one more proof that cameras hardly ever know what they are doing. ISO 100 would have given you a shutter speed of 1/800th, more than enogh for a shot from a tripod ;). The image quality and detail would have been far better.

Great advice. Really appreciate it. It comes from inexperience, mostly, but also never really having the time to properly set up the shoot - trying to get 5yo to sit still, other people rushing in to take the same shot, lack of time to practice, and the hour-long drive that preceded this shot to get there.

This was aperture priority. I believe ISO may have also been auto, which I know to be a mistake, but can't rely on my experience to get it right in all environments.

I can't even tell you how much I appreciate the work you've done for me. I will put the time you spent on this to go use, and make sure I learn from what you've written.

Glad you liked it ;). I'll check tomorrow. But I think the more important part happened in lightroom - do you use Lightroom?
 
Glad you liked it ;). I'll check tomorrow. But I think the more important part happened in lightroom - do you use Lightroom?

Yes, I do (and photoshop), and wanted to ask you about that as well. Can you outline the changes you made? Specifically, on how to produce that effect?

The immediate problem I had was that, while I thankfully used a tripod, the lighting changed from one pic to the next, so I couldn't figure out how to merge them with such great contrasts.
 
OK, so here we go.
In regard to your ISO setting: Auto is not necessarily bad, but usually I´d leave it at 100 - you then see if the shutter speed and/or aperture are not where you want them and can increase it easily.

First, I prefer tif to psd because it is smaller if you save it under LZW compression (which is lossless). In this example it is 165MB vs 180MB - not too much, but sometimes it is much more. You can save the layers within the tif file too.
Here´s the open file, along with a separate lightroom catalog: www.photo1x1.com/thePhotoForum/gossamer.zip

In lightroom take a look at the local adjustments (graduated filter, radial filter, adjustment brush, right under the histogram top right corner). Click the small buttons that appear to see where they are and what I did with them (if they don´t, press "H" once you selected either of the tools).

Well, and then I have a surprise for you ;). I wanted to create a video like that for quite some time to have an idea how long it takes to create it and if I can work with the tools I have or need something else.
This is an approach for a total photoshop beginner, forgive me if you are not - you can of course use shortcuts, and there are other methods to reach a similar goal.


Glad you liked it ;). I'll check tomorrow. But I think the more important part happened in lightroom - do you use Lightroom?

Yes, I do (and photoshop), and wanted to ask you about that as well. Can you outline the changes you made? Specifically, on how to produce that effect?

The immediate problem I had was that, while I thankfully used a tripod, the lighting changed from one pic to the next, so I couldn't figure out how to merge them with such great contrasts.

Lighting changes are sometimes critical, but this wasn´t bad - it was subdued sun in both, so a simple raise in exposure in one and lowering it in the other brought me pretty close. Using a big, soft brush when masking the images is key to hiding differences in exposure.
 
OK, so here we go.
In regard to your ISO setting: Auto is not necessarily bad, but usually I´d leave it at 100 - you then see if the shutter speed and/or aperture are not where you want them and can increase it easily.
Yes, I usually shoot in full Manual when I have the time to set the shot.

First, I prefer tif to psd because it is smaller if you save it under LZW compression (which is lossless). In this example it is 165MB vs 180MB - not too much, but sometimes it is much more. You can save the layers within the tif file too.
Here´s the open file, along with a separate lightroom catalog: www.photo1x1.com/thePhotoForum/gossamer.zip
Awesome, thanks. I was interested in the PSD so I could evaluate and understand the different layers and their effects.

In lightroom take a look at the local adjustments (graduated filter, radial filter, adjustment brush, right under the histogram top right corner). Click the small buttons that appear to see where they are and what I did with them (if they don´t, press "H" once you selected either of the tools).
Awesome, thanks again.

Well, and then I have a surprise for you ;). I wanted to create a video like that for quite some time to have an idea how long it takes to create it and if I can work with the tools I have or need something else.
This is an approach for a total photoshop beginner, forgive me if you are not - you can of course use shortcuts, and there are other methods to reach a similar goal.
It says the video can't be viewed because of privacy settings. Perhaps post a link to vimeo?

Glad you liked it ;). I'll check tomorrow. But I think the more important part happened in lightroom - do you use Lightroom?

Yes, I do (and photoshop), and wanted to ask you about that as well. Can you outline the changes you made? Specifically, on how to produce that effect?

The immediate problem I had was that, while I thankfully used a tripod, the lighting changed from one pic to the next, so I couldn't figure out how to merge them with such great contrasts.

Lighting changes are sometimes critical, but this wasn´t bad - it was subdued sun in both, so a simple raise in exposure in one and lowering it in the other brought me pretty close. Using a big, soft brush when masking the images is key to hiding differences in exposure.[/QUOTE]

And how did you account for the cloud difference in each shot? If it's in your notes, you don't have to answer, but this is another issue that puzzled me.

Thanks, and started to review the video tutorials on your site as well!
 
OK, so here we go.
In regard to your ISO setting: Auto is not necessarily bad, but usually I´d leave it at 100 - you then see if the shutter speed and/or aperture are not where you want them and can increase it easily.
Yes, I usually shoot in full Manual when I have the time to set the shot.

First, I prefer tif to psd because it is smaller if you save it under LZW compression (which is lossless). In this example it is 165MB vs 180MB - not too much, but sometimes it is much more. You can save the layers within the tif file too.
Here´s the open file, along with a separate lightroom catalog: www.photo1x1.com/thePhotoForum/gossamer.zip
Awesome, thanks. I was interested in the PSD so I could evaluate and understand the different layers and their effects.

In lightroom take a look at the local adjustments (graduated filter, radial filter, adjustment brush, right under the histogram top right corner). Click the small buttons that appear to see where they are and what I did with them (if they don´t, press "H" once you selected either of the tools).
Awesome, thanks again.

Well, and then I have a surprise for you ;). I wanted to create a video like that for quite some time to have an idea how long it takes to create it and if I can work with the tools I have or need something else.
This is an approach for a total photoshop beginner, forgive me if you are not - you can of course use shortcuts, and there are other methods to reach a similar goal.
It says the video can't be viewed because of privacy settings. Perhaps post a link to vimeo?


Glad you liked it ;). I'll check tomorrow. But I think the more important part happened in lightroom - do you use Lightroom?

Yes, I do (and photoshop), and wanted to ask you about that as well. Can you outline the changes you made? Specifically, on how to produce that effect?

The immediate problem I had was that, while I thankfully used a tripod, the lighting changed from one pic to the next, so I couldn't figure out how to merge them with such great contrasts.

Lighting changes are sometimes critical, but this wasn´t bad - it was subdued sun in both, so a simple raise in exposure in one and lowering it in the other brought me pretty close. Using a big, soft brush when masking the images is key to hiding differences in exposure.

And how did you account for the cloud difference in each shot? If it's in your notes, you don't have to answer, but this is another issue that puzzled me.

Thanks, and started to review the video tutorials on your site as well![/QUOTE]

That´s strange. I set it to hide from vimeo, but I set thephotoforum.com as the only site I chose for publishing (I don´t want your images to appear everywhere ;) ). I just tried in on various computers and in various browsers where I am not logged in to vimeo, and it works everywhere. Did you click on the play button, or the vimeo link?

I didn´t have to take care about that, the womans silhouette was not in the clouds. If I had to, I´d probably use the clone stamp.

Cool, I hope you can make use of my videos. For the moment, they are beginners only, but I plan on diving very deep in. I try to make them as straight forward and quick as possible, because there are so many courses out there with people talking too much ;). If you like them, and you have a youtube account, please feel free to leave a comment. Youtube likes comments and ranks the videos with comments higher than those without.
 
That´s strange. I set it to hide from vimeo, but I set thephotoforum.com as the only site I chose for publishing (I don´t want your images to appear everywhere ;) ). I just tried in on various computers and in various browsers where I am not logged in to vimeo, and it works everywhere. Did you click on the play button, or the vimeo link?

No, it just displayed a black screen with, "Sorry, the privacy settings are preventing this video from being viewed."

I didn´t have to take care about that, the womans silhouette was not in the clouds. If I had to, I´d probably use the clone stamp.
No, I meant specifically that the clouds were different in both images, and how combining the images wouldn't mean combining both sets of clouds.

Cool, I hope you can make use of my videos. For the moment, they are beginners only, but I plan on diving very deep in. I try to make them as straight forward and quick as possible, because there are so many courses out there with people talking too much ;). If you like them, and you have a youtube account, please feel free to leave a comment. Youtube likes comments and ranks the videos with comments higher than those without.

I sure will. I also follow snapchick, tony & chelsea, and not the fro loudmouth.

What do you recommend for my links to the dropbox pics? Should I now remove them from this post, or remove the pics from dropbox? I'd also like them to not be distributed around the Internet...
 
I am curious why you just didn't crop a bit closer, removing the intruder and the extra sky then just close her shadow away?
 
That´s strange. I set it to hide from vimeo, but I set thephotoforum.com as the only site I chose for publishing (I don´t want your images to appear everywhere ;) ). I just tried in on various computers and in various browsers where I am not logged in to vimeo, and it works everywhere. Did you click on the play button, or the vimeo link?

No, it just displayed a black screen with, "Sorry, the privacy settings are preventing this video from being viewed."

I didn´t have to take care about that, the womans silhouette was not in the clouds. If I had to, I´d probably use the clone stamp.
No, I meant specifically that the clouds were different in both images, and how combining the images wouldn't mean combining both sets of clouds.

Cool, I hope you can make use of my videos. For the moment, they are beginners only, but I plan on diving very deep in. I try to make them as straight forward and quick as possible, because there are so many courses out there with people talking too much ;). If you like them, and you have a youtube account, please feel free to leave a comment. Youtube likes comments and ranks the videos with comments higher than those without.

I sure will. I also follow snapchick, tony & chelsea, and not the fro loudmouth.

What do you recommend for my links to the dropbox pics? Should I now remove them from this post, or remove the pics from dropbox? I'd also like them to not be distributed around the Internet...
That is really weird. It shouldn´t happen. I´ll try to write you a pm with a link to the video on our server.
Regarding the clouds - open the tif file in Photoshop, and take a look at the layers. I didn´t do anything to the clouds in photoshop, promised ;) . I just enhanced them a bit in lightroom, but that didn´t have anything to do with the merging.
Regarding the images: you could delete the RAW files, I can delete the tifs too if you´d like. I usually don´t worry too much though. Running a business, pics and videos of me can be seen on several sources in the net. If people want to do something bad, they´ll find a way, no matter if I deleted my images or not. Just tell me your decision and I´ll do as you´d like.

Thanks for checking out my videos. To be honest I don´t really look too much at what others do. I had a look when I decided to do my own videos because I wanted to see whether these are covered just as I had them in mind. I am no copycat so if there would have been something already there, I wouldn´t have done it. I just felt that photography is usually explained way too complicated and people always ask me to do workshops which I usually refused (except for friends). So I thought: let´s do something for those people (and maybe earn a little with ads to be honest ;) ). In the end it is way more work than intended, but I enjoy it.
 
I am curious why you just didn't crop a bit closer, removing the intruder and the extra sky then just close her shadow away?
I´m just like that too. I like to have landscape in the shot. I don´t like it when people show me their travelshots and all you see is people. They could have done that at home too :D . The more landscape, the more I love it.
And on the other hand, cropping as you suggest and still keeping the same aspect ratio would have meant cropping the top of the tree. Plus, there are still the two girls in the back.
 
I am curious why you just didn't crop a bit closer, removing the intruder and the extra sky then just close her shadow away?
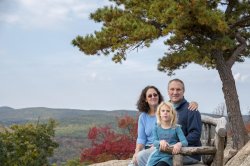
I took a number of shots with different perspectives. I thought the more expansive/wider one was the best. Here's another. Is this a better composition?
 

Attachments

  • DSC0373_Family-lowres.jpg
    DSC0373_Family-lowres.jpg
    1 MB · Views: 140

Most reactions

Back
Top