Motocross test photo

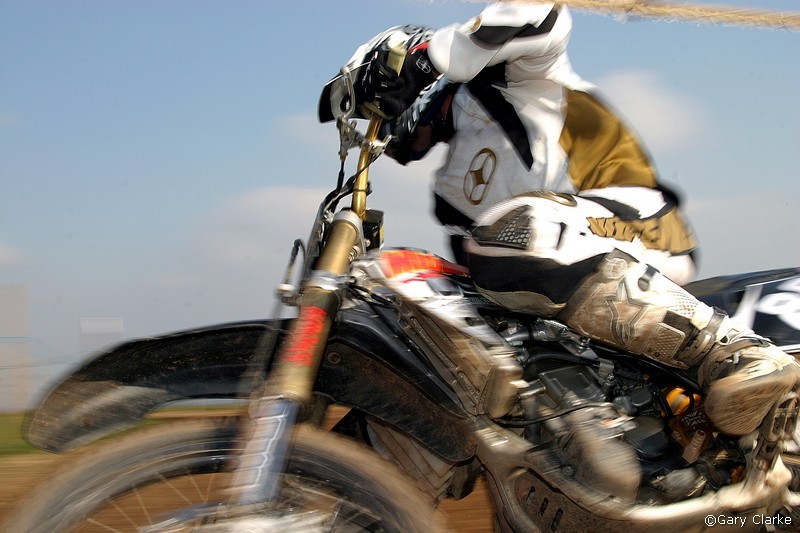
The reason why the guy on the right is blurry, is because you didn't "follow him" with the camera. You have the panning effect a little bit with the guy on the left, so you are on the right tracks :) If you want to get a sharp rider and a blurry background, try with about 1/160 sec or even 1/200 to start with, and a suitable ISO and F to give a good exposure. Once you have got the hang of following them so they are in focus, you can test with a slightly slower shutter speed. If you test enough, hopefully you'll get some usable shots :)
 
Thanks polymoog, this sounds dumb, but I mis-read what his shutter speed was. I saw 1/250 and 1/80, boy was I way off. Now it makes better sense. Boy am I glad this is digital. I have take almost a thousand pics since I started practicing with this....do you know how much money I would have wasted in film? My wife is way happier too, because she was the one paying for the film. I will try more shots this weekend and see where it goes. 2 questions.....I am using auto focus during the panning bursts. Is that ok or should I try to use the manual focus? How do I set the f setting if I'm busy trying to get the riders focused, centered and snapped?
 
1. Use auto focus. You won't have time to focus manually, unless you want to focus in advance as I mentioned earlier, and then lock the focus, but that would probably be a real hassle and impractical for this kind of event.

2. Decide on your F stop (aperture setting) and ISO in advance. To start with, the best thing is probably to have the camera in Shutter Priority mode, and auto ISO because then the camera will take care of the F stop and the ISO to get you a correct exposure, with the shutter speed you choose. Some cameras can be a little off, for example many Nikons tend to overexpose, if that's the case, turn on EV compensation to -0.3 or something.

3. What camera (and lens for that matter) are using?

4. Turn off burst mode for the moment, it will just give you more pics of the same (possibly unsuccessful) result at the moment. You don't need to use it for motorsports, just because you have it. I've been taking motorsports for over 2 years and I hardly ever use burst mode. It depends on your camera, and the event/circumstances, but unless you have a reasonable frame rate, and more importantly, a reasonable buffer size and throughput, it will be more of a hinder than a help. E.g. you have to wait several secs for the buffer to empty before you can take the next pic. Buying fast memory cards will alleviate this to some extent but if the camera can't anyway keep up, it does't help.

5. Take a bunch of test pics before anything happens, so that you are more or less set up, at least exposure wise, before the race starts.

6. Try to get around the track and take pics from more than one angle, if you can.

Hope this helps :)
 
Wow, thanks for the quick reply. You set yourself up though, because I'm gonna drive you crazy with questions.....

1. ok to autofocus
2. Already on shutter priority and iso was 400.
3. Canon Eos Rebel XS, with the 18-55 mm stock lens.
4. ok to the burst mode
5. as of right now, every pic I take is a test pic. If I get lucky, then I keep it after downloading, otherwise, I just trash the rest.
6. both pics were from same spot, but I was able to use 4 different locations. I am trying to get the track crew to let me inside the track so I can get on the inside of the turns, now that they see I am a regular, they are starting to let me closer and closer.
Thanks, I will shoot more at practice this weekend and post a few for suggestions.....
 
im shootin some motocross this weekend too! lol
 
Thanks for posting results, I was curious as to how your weekend went. Firstly, I only see 2 images, thats ok, there's is more than enough info to comment on. I will comment on both your images first, then I will attempt to go back over my own technique (seems like you got confused with my description). Another handy thing to let people know is the metadata (the information about the shot). Like I put down in my original reply. You can get this from your image handling software, (I use Bridge) like Lightroom, Apeture or even from your camera itself (as long as the images are still on the card). Ok, here goes my comments
Yellow bike
Please correct me if I am wrong!
You have achieved "Motion Blur", which is another effect altogether, but not panning. You would achieve Motion Blur when photographing a train going past you, or light trails from a vehicle at night (set a long exposure, and let your subject blur by while your backgorund is sharp). The camera does not move to achieve this effect.
To pan, you have to actually follow the subject from (in your case), left to right; to streak your background and have a sharp subject, the camera must move on a level plain from left to right, keeping the same speed with your subject. If you happen to go up and down (while panning left to right), you will achieve motion blur again. Even if it is ever so slightly, you will not get a clean subject, that's why it is so important to pan on a level plain (horizon if that term is easier to understand).
The further away from your subject you are, the easier it is (but less effective).
#48
This image is a much better effort, but your shutter speed is obviously too fast. 1/250 would be an educated guess you used. You have consistent blur right though your image, which tells me (from this distance from your subject), you weren't fast enough to freeze everything (wheel motion blur), and you were too fast to seperate your subject from your backgound.
This is the better shot to advance off. You need to slow your shutter speed down.
Technique

You can practice at home. Sit on your front yard grass and practice with cars going by.
  • Your subject should remain at roughly the same distance from you while you pan. To explain the pan I posted above, the guy on #279 was about 100' away from me over a distance he travelled of about 60'. I followed him with my camera's viewfinder over the entire distance. I took about 4 or 5 pictures over that distance (I will explain this further shortly). If possible, do this same set up at home with traffic. Making sure, any subject will be at the roughly the same distance over a travelled distance. Follow them from Point A to Point B rotating your upper body.
Settings
As I stated in my original reply, these are my own settings I am comfortable with. Other people may see it differently. You dont have to agree with me, but I will post examples and explain my logic.

ISO - 100. This setting will control the amount of light that hits the sensor. The only time I will consider a higher ISO is when the natural light is fading. When you increase the ISO, you are compensating for fading light to keep your shutter speeds where you want them. In the middle of the day, even mild cloud, 100 is fine.

The #279 example is shown already, middle of the day.

Both posted examples were shot with a Canon 20-70mm f2.8. No flash on either.

This shot was around 7pm, daylight savings, so obviously light is fading, but there is still a little around.

ISO 1600, f2.8, 1/100

IMG_9579.jpg


This next shot was taken around 9pm. Obviously dark.
ISO 3200, f2.8, 1/40

IMG_2265.jpg


My point of both these examples is, ISO is for light sensitivity only. As you'll notice, my lens was stopped down to it's widest setting (letting in maximum light possible, if I had of stayed at ISO 100, my shutter speed would have been too slow (even to pan), that is why I had to increase my ISO to bring my shutter speed up to what it was when I captured the image. I know that wasnt explained exactly right, but I have been on this for about 2 hours. If your shooting with sunny skies, stick with 100. Only change, if the conditions naturally darken, or your in the shade.
Shutter Speed
As someone else said, set to Tv (shutter priority), wind your wheel until the shutter is 1/80. Your apeture will automatically adjust. No point in confusing you with manual settings yet!
AF Mode
A1 Servo. Your camera will continue to refocus while your finger is on the shutter release.
AF Point
Of all your little focus squares you see in the viewfinder, you can highlight any 1 in particular or all of them. My #279 example was the center top AF point I selected. At very minimum, I like to keep the helmet in focus, therefore, thats the focus point I track with.
Drive Mode
I completely disagree with Polymoog and here is the reason why. You should keep your drive in (at minimum), Low Speed Continuous. If you are advanced enough in your technique to capture the pan with single shot, well this whole reply is a waste of my time. You need variety in your shots to understand a hit and a miss. If you run a 2, 3, or even 4 shot sequence (burst), you will see very quickly how important tracking with your AF point is. Secondly (this may not relate to you), when I have a customer who has specified a shot, I want to give myself every chance of capturing it). Yes, cache will take a second to catch up, if your run your maximum fps (frames per second) your body can handle, but it isn't that big a deal. Wait till they come round again for whoever you missed. For the record, I always shoot motorsports in continuous mode (like I said, I am comfortable with my settings, and others are comfortable with theirs).
Location
Pick a spot where your subject will straight line past you.
Talk to the organizers, dont worry with track hands or marshalls, they aren't going to grant you permission to inside.

Well, I think I'm done. I have probably missed some things, but I'm running on empty. So, feel free to add, or disagree! Bottom line is, practice (you dont need to wait until the weekend, roll a ball along a table and shoot that).

If all else fails, find a local pro and have him/her show you physically.

Good Luck
 
here it goes.

from my 2 previous photos......
tv mode
iso 400

rider in blue 1/40 f36 panning
rider in yellow 1/250 f14 forgot to pan


I understand what you are saying about using slower speeds, but my results are still the opposite of yours. But my faster shutter speeds 1/1000 to 1/2000 are clearer while panning and the slower 1/40 to 1/100 are all blury while panning...

now on to a couple more with info this time.....all iso 400, all panning shots, all in tv mode.. See how my faster speed on the pic with 2 bikes is 1/1000 and clear but the other two pics are slower speed and blurry. So why is my stuff coming out opposite of what you guys are saying should happen? is it possible that because I was using burst mode that the camera was lagging. It is in servo mode and all the other stuff you said, so not I'm confused... Thanks again for taking the time to work with me......

below 1/40 f32

cody.jpg

below 1/40 f32
willie2-1.jpg

below 1/1000 f9

willie1.jpg


IMG%5D
 
Getting better!

I dont see shot 4. 1 and 2 are misses. What this means is, your AF point is not on your subject. I assume you understand your AF points in your viewfinder? This is the practice part. You can have your settings constant all day long, tracking your subject is the golden part. For the panning shots you want, do NOT increase your shutter past 1/250 (maximum). 1/80 or 1/100 should be ideal from how far you are from the subject.

Shot 3 is just freezing the moment with a high shutter speed, nothing special. I found 2 examples of mine to help you again.

Same rider, same day, same corner (not the exact spot, within 25' of eachother though), same ISO, I dont consider the pan all that great, the shutter speed though is what I'm trying to explain. I had my settings on Tv, my apeture changed automatically with my shutter settings.

ISO 100, i set my shutter to 1/1000 and my apeture automatically set to f3.2. As you can see, everything is relatively frozen, spokes, clear tread and background detail.

IMG_4552.jpg


ISO 100, i set my shutter to 1/80, and my apeture automatically set to f10. I have lost spoke, tread and background detail.

IMG_4570.jpg


Both shots were intentionally set, (although my pan i missed a little in my opinion). Both shots required me to follow the rider, the only difference, the pan shot required me to be left to right smooth while that 1/80th of a second passed.

As you can also see from the metadata, the differences in my settings were a fast and slow shutter speed, and because I had shutter priority as my mode, the apeture adjusted automatically.

This is about as simple as it gets for explanation. I am anxious to see your next set. I have no problem helping out where I can.
 
Bit by bit, things are starting to add up and make sense. When I said 2 previous photos I meant the ones from the previous post. I will try to practice on traffic tomorrow while at my regular job as a professional firefighter. I can sit in front of the station and shoot traffic going by all day long.

I didn't realize how important it was to have my AF points on my rider during the panning process. I will work on that. Is it better put my setting to the center AF point or to use the automatic mode? As far as your photos go, which do you like better, your top photo or bottom photo? When you said you had to follow the rider in both photos, how did you follow the rider in the top photo without panning, I assume you focused on a spot and shot as the rider was coming through the field of view is that correct? When I started using this new DSLR, that was my intention, was just to shoot at a spot as the riders were cruising through. then the whole panning thing started coming around and now it so interesting to see how much more advanced I am looking to become. I have already shot a thousand pics and my wife is loving the fact that we don't have to develop complete roll after roll of film with no good pics....:lol:
 
Last edited:
Bit by bit, things are starting to add up and make sense.
Good!
When I said 2 previous photos I meant the ones from the previous post.
I understood.
I will try to practice on traffic tomorrow while at my regular job as a professional firefighter. I can sit in front of the station and shoot traffic going by all day long.
Best practice you'll get.
I didn't realize how important it was to have my AF points on my rider during the panning process.
AF point is the only part of the image you want sharp. You can select any 1 of those little squares. I'm not familiar with an Xsi
Is it better put my setting to the center AF point or to use the automatic mode?
Have another Xsi user explain how to select AF points.
As far as your photos go, which do you like better, your top photo or bottom photo?
I think a great pan beats a still in sporting shots, but frozen moment has a place too. Once you fully understand how to achieve both results, you shoot more for reason than for effect. It's a visual perception for the client. I get kids thinking they were doing 50 mile an hour, when in reality they were putting around at about 15 mph. They smile and think they are James Stewart and I walk away with a check. It's all good! Actually, the slower they go, the slower I can set my shutter speed and really drag the background.
When you said you had to follow the rider in both photos, how did you follow the rider in the top photo without panning,
When you are following a moving subject, you are effectively panning. Panning as a technique though, is differentiating your subject from your background. Distort your b/g with streaks, while maintaining a sharp subject. The smoother your are at following your subject and keeping the exact spot and speed with them, and the slower the shutter speed you can do this, the more drastic your b/g will be.
I assume you focused on a spot and shot as the rider was coming through the field of view is that correct?
No. Forget the whole spot and wait for the subject thing. Your lens has to physically follow them from start to finish.
When I started using this new DSLR, that was my intention, was just to shoot at a spot as the riders were cruising through.
Not at all. If your a hunt, do you point the rifle at a spot and wait for the game to pass, or do you track with your rifle and pull the trigger on the fly?
then the whole panning thing started coming around and now it so interesting to see how much more advanced I am looking to become.
There's a whole world of stuff out the and a whole buch of effects you can create.
I have already shot a thousand pics and my wife is loving the fact that we don't have to develop complete roll after roll of film with no good pics
Rock on!
 
Panning is like a golf swing nice and smooth try not to move up and down keep your elbow tight to your side, have a few practises before the riders come and don't stop as soon as you press the shutter follow through, then when you get the hang of that get in close
138512747_NJd6o-L.jpg
 
Here are 3 practice shots.
-approx 65-75 feet from subject.
-I tired a couple super zoom to be able to focus on lettering and logos
--All shutter priority
-set my af points to center point only
-All iso 100
-All 1/100
--using burst mode all the time, because at least one of them usually turns out half decent.
#1 f16 55 zoom on the 18 55 mm lens
#2 f13 300 zoom on the 70-300
#3 f11 300 zoom
much better than what have tried so far....
cop.jpg
lawest.jpg
rideon.jpg
 
You hit the nail on the head with the police car
icon_thumright.gif


You just need to zoom out a little for the compositions sake, so he has "somewhere to go", but you are getting there :)
 
Seems like forever since I was on here last. Here are 2 from this past weekend. These are the only good ones. Tons of crappy panning, these closeups from about 15 feet turned out ok, but the ones from 25-50 feet were still blurry. I am working really hard at keeping the center focal point on the target. That's tough, because I find myself forgetting and watching the image in the eyepiece. But thank you guys, because I would not be this far without the input.....Pat....

Photo 1. 1/100, f13 iso 100
photo 2 1/100 f/14 iso 100
Taygoodphoto.jpg

Receipt095.jpg
 

Most reactions

New Topics

Back
Top