Need advice on shooting a Skateboard deck.

Fletch

TPF Noob!
Joined
Jan 10, 2007
Messages
3
Reaction score
0
Location
Sydney Australia
Can others edit my Photos
Photos OK to edit
Just wondering if someone could offer me advice on shooting a skateboard deck. I will be using the images for product catalogues and resizing them for shopping cart images.
They need to be taken in such a way that I can easily remove the background around the skateboard and apply a slight drop shadow on the bottom in photoshop.

Im shooting with a Canon EOS 30D.
And the stock Canon Zoom Lens EF-S 17-85mm.

The skateboards are roughly 85 x 25 cm.
They have a high gloss finish, so i am trying to avoid reflection.
It is just a standard double kick skateboard with a kicked up front and back end.
I will be shooting the skateboard portrait (veritcal).
And any tips which will help me get a little definition as in the curves and shape of the board, particularly on the nose(front) and tail(back) would be tops.

Any recomendations as far as equipment is concerned would be much appreaciated.

Cheers
 
I've heard that using a large sheet of white paper, and having it slant in a hyperbola type shape (kind of like this, with the carot being the direction of the shot > ) is a good way to make a seamless background, that'd probably be easy to erase.

One thing that I'd try to avoid which would complicate extracting the board would be creating shadows that appear directly around the board, which would lower the contrast, and make things difficult.

To avoid harsh reflections, try finding something to diffuse the light, tissue paper would probably work. Just use something that allows light through but is hard to see through, if that makes sense.
 
I have to photograph about 100 skateboard decks ( skateboard deck is the wooden part of the skateboard ).
Plus i have to shoot an extra 100 decks every month.
I want good results and dont mind busting out on equipment ie lighting, diffuses, lenses etc as its something I will be doing regularly.

What sort of equipment would i be looking at?
 
I just had a lash at taking a few in the carpark,

I just some flat white timber, laid it straight on the ground and set up my tripod just above it, placed the deck ontop of the white board.
( After trying this techiques I have decided that hanging the board vertically against a flat white background could work well, any opinions?

trying to utilize the natural light. Ive decided that natural light although good in some instances, not so great for what im trying to do. The light isnt consistent enough, and im getting problems with shadowing.

The boards came out very dull in colour, guess the light just wasnt bright enough, although if It had been any brighter, I would have copped alot of reflection.
I want to look at some lighting and some sort of diffussion.
I have heard that tungsten lighting is the ticket for product photography, can anyone either confirm or deny?
If this is the case, what setup would do the trick, any reputable brands etc?

Thanks again.
 
Hi "Fletch" I just noticed you are in Sydney, so I am more than happy to help you, even to the extent of having you come to my Studio in Crows Nest and I can explain the best way to do the shoot. It was going to be hard to describe how to do it otherwise. Contact me either through my website or give me a ring on my studio number. [02] 9439 3674 Philip Weir
www.philipweirphotography.com
 
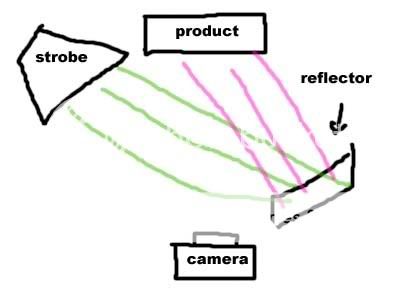
get a decent strobe, and try using backlighting. when i took photography, we had to do all our product shots like this

and i made a little diagram to help out

backlighting4.jpg


its a bit confusing, but the green lines are the light coming from the strobe to the reflector and the pink arrows show the light reflecting onto the product. the light isnt actually supposed to hit the product directly. the light is diffused by the reflector so there shouldnt be too many glare spots..unless its vinyl or something

edit: you dont need a nice reflector. a large piece of white cardboard should do alright


hope this helps and
have fun with your decks
 
May 2cents.
I use material as It's cheap and easy to work with.
I have long strips of different materials.
I have a bright white, which isn't shiny, but looks good when the lights reflects of it like it's glowing.
I iron it first to remove creases.
Tack on end to the wall, quite high up.
The pull the other end out s that it curves nicely until flat on the floor and tape that end down.
Then I have a great seamless and perfectley graduated white surface to shoot on.
Then it's a choice of lighting and the likes..... but thats a good way for a back drop thats cheap, effective and easy to pack away.
 
Sounds like a great gig. I would hang the boards on the wall. Cover the shooting area with white seamless to avoid any background texture. I trust the trucks and wheels will be on. This will come in handy for hanging and keeping the product a couple of inches from the background. Try lighting the deal with a light source bouncing off a piece of foamcore. Position it high and at a 45º angle to start. You will have to wiggle it around to avoid reflection etc. Bounce another light off the ceiling to open the shadow areas. You will have to make sure that both light sources are the same colour temp. Set the exposure and colour temp so that you have an open shadow and a white within white background. Also shoot one full size and one resisized. With this many shots keeping your photoshop time at a minimum will be important.

Equipment needed: Digi cam. Generally any will do. Seamless paper to cover the are around the product. Check the local print shops and newspapers. They have tons of huge white within white pieces of paper. Two pieces of foamcore (white board). A bunch of lightstands or ways to stand the foamcore etc. Two light sources. Depends on how serious you are; again any will do. One torpedo level to level the camera and board. One brother, girlfriend or any one who is willing to work for free. An extra set of hands really moves things along.
 

Most reactions

New Topics

Back
Top