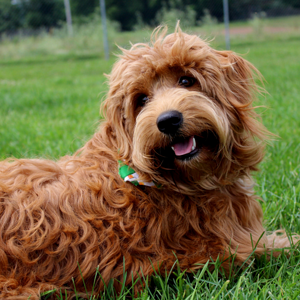
i knew when i took it they'd be blown, but liked the comp anyways.
O.T.E. this: anyone versed well in PS can try their hand at it...i can't do it. i may try Wally's suggestion later. i'd love to see what you come up with. (if it looks good, i'll bug ya to tell me what ya did )
I flipped it horizontally (not sure about this.) and added some noise (5%). I think it would be better with Wally grain technique but as yet I don't have a sample of film grain!
Nice shot JonMikal, this is one of those shots that shooting in RAW would have helped a lot.
Anyway the problem with the birds being a bit blown out, is that you lost all the details of the feathers, so just burning down the breasts of the birds did not really help much (I tried) so to get texture back I used the select color range tool in PS CS2, and then selected the blown out areas. Then I created a new blank layer, and ran Alien Skin Eye Candy 5 "textures" to render some textures. I actually used "giraffe fur" and selected custom colors of white and medium grey. It would have looked a bit better if I were working off a high res image, but I think this looks ok. What do you think?
JonMikal, when you are faced with very high dynamic range images (like this one) the trick is to shoot in raw and expose for the brightest areas. In this case my guess would have been to under expose by 1.5 stops. Then make two conversions from the RAW file to jpeg/tiff (which ever you use) On the first conversion adjust for the highlight areas so they are not blown out, and on the second adjust for the shadows. Then in PS place one on top of the other and use the eraser tool (or layer masks) to blend the two layers.
Also I would not use Nikon Capture or PS to do your raw conversions. Try Rawshooter instead. There are two versions both a "pro" and free one. The free one works very well. http://www.pixmantec.com/