One last try at Black and White

mooimeisie

TPF Noob!
Joined
Feb 17, 2009
Messages
711
Reaction score
12
Location
Edmonton, Alberta, Canada
Can others edit my Photos
Photos OK to edit
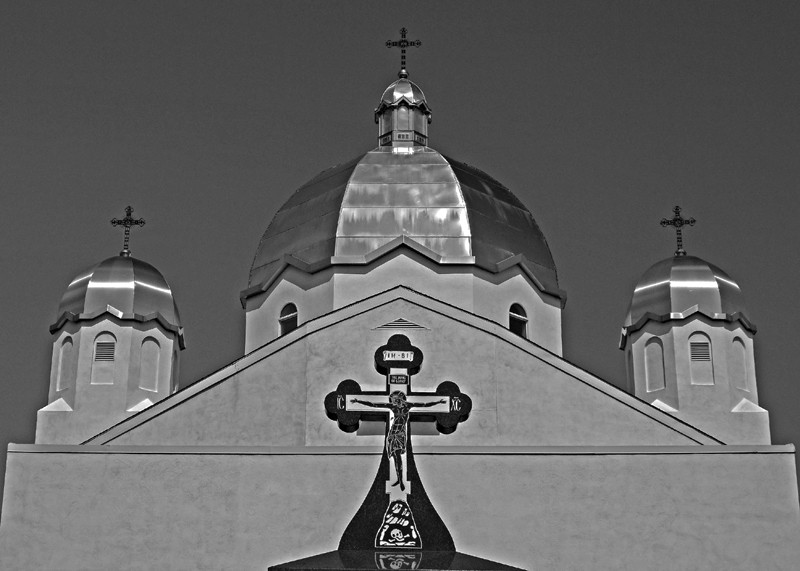
The granite monument in the front is not part of the church but about 50-60 feet in front of the church. I thought it would be interesting to get both in the photo. Your comments are greatly appreciated.

3805941759_570009e961_o.jpg
 
As far as a B&W conversion goes, I think it could be a lot better.

The sky needs to be seperated from everything else more...
 
I agree, but don't know how to. Can anyone post some guideline on how I might fix this picture.
 
Can you post the color version (to know what there is to work with)?
 
Here's the original, untouched, uncropped and unstraightened. Please don't laugh too hard, but I was laying down in front of the church trying to center the monument on the church. Not a position I wanted to stay in too long on the sidewalk.

Thanks for your help

DSC06351.jpg
 
My attempt.
DSC06351-2.jpg


Not sure what you'll think.

Later (don't really have time to take all the screen shots), I will show you what I did.

...May have done it differently with the RAW.
 
Last edited:
"One last try" - hopefully this doesn't mean you are giving up on black and white.

This is a nice picture, the symmetry is good.

The main problem is that the black and white is very flat, and full of mid-tones.

In O|||||||O's edit you see that the high contrast brings more dimension to the photo. It makes it more interesting to look at as a whole. I am not sure what process he went through to get his results.

Most photo editing softwares will let you adjust the "levels", bringing in the sliders on the levels will help get rid of some of the mid-tones. That is what I did with the below image. (Along with bumping up the brightness just a bit) How far you want to go with the contrast is personal taste.

DSC063511copy-1.jpg
 
I definitely agree that the other B&W's look so much better than mine. The one small thing I don't like about them is that the detail in the crosses on top of the domes are lost in the dark sky. I can understand why this must be the way it is. Next weekend we're making a trip with alot of opportunity for photographing this type of church. Is there a special way of metering and exposing photos when I'm taking them to better prepare for B&W? Or is the best way to get really good B&W's to use the film cameras?

Thanks for all the help.
 
The one small thing I don't like about them is that the detail in the crosses on top of the domes are lost in the dark sky. I can understand why this must be the way it is.

I agree, but - it doesn't nessecarily have to be that way.

I chose to darken the sky, lightening it would have been just as easy.

...I'll show you in a sec.
 
You could dodge the crosses in photoshop to bring them out more, I was to lazy to take the time to do it.

Taking black and whites the exposure isn't really different, you still want to get the correct exposure. It is good to be able to picture in your head what it is going to look like in black and white. Some pictures naturally make better black and whites.

I am not really going to get into the argument of film vs. digital - since I know many people swear that film black and whites are the only way to go...and I know hardly anything about film.
 
Here's what I did to the first one:

Capture-mooimeisie-bw-exposure.jpg

Capture-mooimeisie-bw-tonecurve.jpg

Capture-mooimeisie-bw-mix.jpg


With these simple adjustments to that:
Capture-mooimeisie-bw2-mix.jpg

You get this:

DSC06351-3.jpg


...Ignore the JPG artifacts and all that stuff..that's only from working on a web sized image. I guarantee you that it would look a lot better with a RAW to work with - this is just to give you an idea of what is possible.

I did all of this in Lightroom, but even GIMP should have no problems doing it. The buttons just aren't as pretty.
 
Last edited:
Taking black and whites the exposure isn't really different, you still want to get the correct exposure. It is good to be able to picture in your head what it is going to look like in black and white. Some pictures naturally make better black and whites.

Agreed. Having an idea what the finished product will look like before you take the picture helps a lot.

Sometimes I will expose differently that I normally would if I know I'm going to convert it to B&W.

The "Greyscale Mix" panel is the most important part of the conversion process. There, you can basically control the tone of each color.
You could make the whole thing flat and pretty much all 18% grey, or you can emphasize some colors more than others.
 
Thank you all, for putting so much work into this for me. I am using Elements 7 and it seems I do not have as many options available to me with the Greyscale. I have CS2 available to me, so I think I should install it. Also, a lesson learned here is to shoot in RAW.

Thanks again and I've mapped my churches for next weekend, so I'll give it another try.
 
Using Photoshop Elements 4 Mac version (old version)
1. Turn on Grids, View > Grids, then rotate and Level the photo, Image > Rotate > Free Rotate Layer
2. To straighten the vertical lines, skew the image, Image > Transform > Skew.
3. Crop to desired size
4. Create a layer for Levels, don't change anything click OK
5. Create a layer for Hue/Saturation, desaturate the the image, -100
6. Double click the Levels layer bring in from the right the white triangle. Bring in from the left Black triangle. Do both to your liking. You'll now have a nice B&W photo.
7. Clear the image of a hazy appearance, Filters > Sharpen, Unsharp Mask, set to 20-60-0

You're finished, your image will be outstanding. See, you don't need a raw file (it is raw not RAW), GIMP, Lightroom, Aperture, Photoshop. Photoshop Elements will do just fine.
 
Last edited:

Most reactions

New Topics

Back
Top