Post Process Skin Brushing, please review...

Crimsonandwhite

TPF Noob!
Joined
Jun 22, 2008
Messages
268
Reaction score
0
Location
Tuscaloosa, AL
Can others edit my Photos
Photos NOT OK to edit
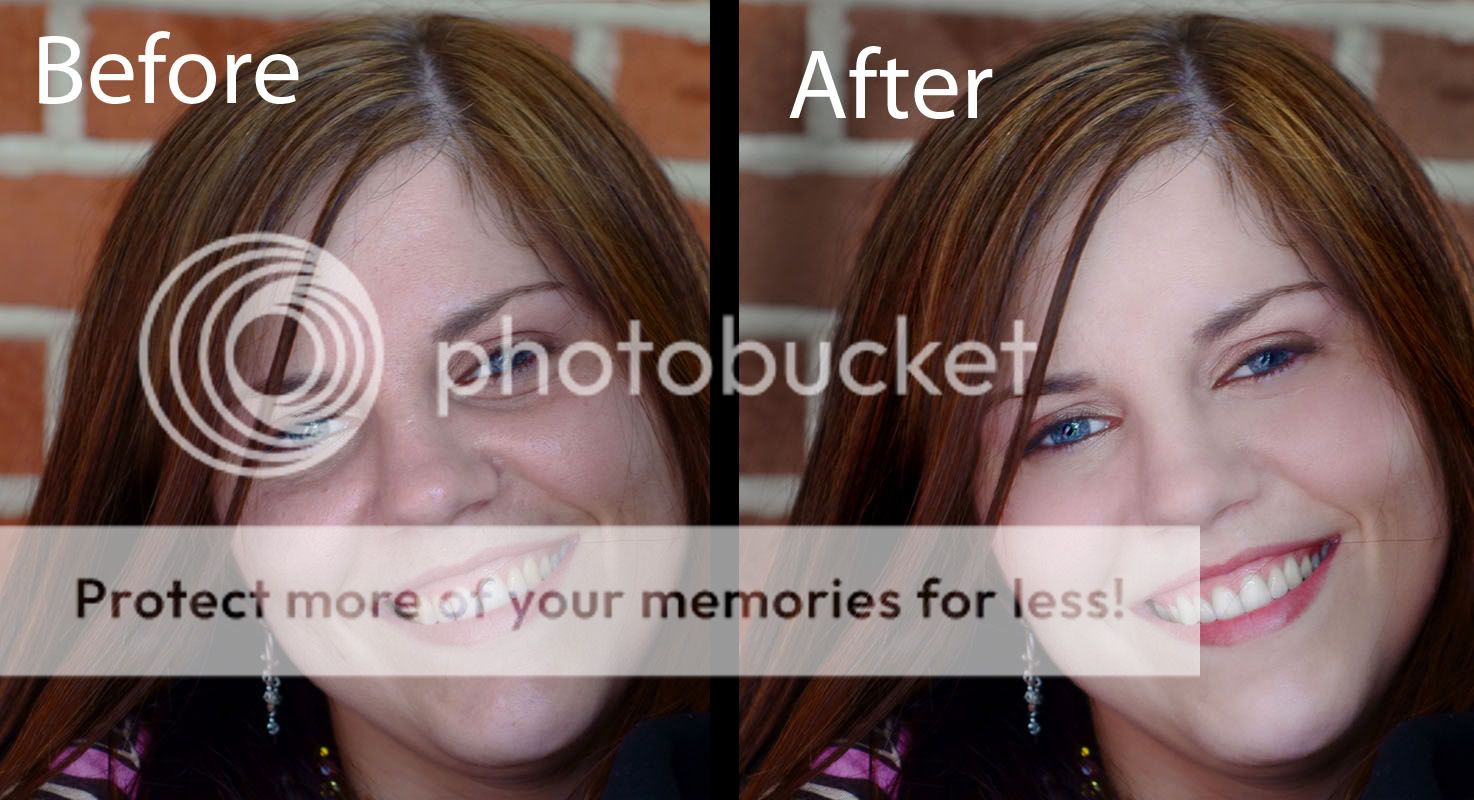
Here is my first attempt at airbrushing skin. Let me know where I can make better decisions...thanks

Little2.jpg
Little1.jpg
 
Awesome, small flaw near upper left of image, her right eye brow, looks like you smudged it a little more than it already is
 
The hard thing with airbrushing is not crossing that fine line of looking unrealistic. With your everyday model, it wont be that hard, because part of being a model is having good skin. But for your average human being, sweaty pores, wrinkles, imperfections become your worst nightmare.

That technique looks good...what did you use?

Only thing is that you need to use a mask because you only want it to affect some portions because then it will look fake and obvious. You def. dont want to lose that great sharpness you had in the eyes.
 
To me, it seems quite over done. However, that may be my taste. I prefer to see a few pores, and a little texture - I would only remove blemishes and stuff...
 
JennandSteve6.jpg
JennandSteve6h.jpg


I agree K8... unless you're going for something like that, it is vital to see normal aspects of the person that are untouched. Even the quick one I did...is overdone. P.S. has millions of ways of reaching a goal. So the only way is by playing around and trying different things.
 
Yup. You want it to be subtle enough that people seeing the image believe it to be real, and not an obious PS job. It's different for models and commercial images, IMHO.

Here's a quick edit I did.
BA-2.jpg
 
K8-90 what technique did u use?
 
I used the healing, dodge, burn and sponge tools.

First I played with the curves, adding contrast and brightening it up. Then I went over it and removed blemishes. Then I used the dodge tool and lightened areas such as the wrinkles under her eyes, and the red areas around her nose. I burned out the highlights one her cheeks (the king of greasy ones). Using the sponge I saturated her eyes, hair and a little on her cheeks (to make them rosy), and then desaturated her teeth and the wall.

It seems kind of complicated, but it took me more time typing this than doing all that :p
 
No I understand perfectly. Sweet. Never used that technique before. Gonna give it a try.
 
Oh, great! Hope it helps :)
 
The king of greasy ones...haha. classic. :lol:
 
Sorry, but huh? King of greasy ones? :confused:
A little confused... :blushing:
 
For me its way to much - i tend to use the surface blur option where i need it- i think it gives a more natural feel :)
 
I think you took it a bit too far (and may have used a pretty hard process to boot.) I also think your starting source image was a little tough to begin with... either she has weird makeup on, or the exposure was off or... something not sure.


When doing this, don't "airbrush" the following:
  1. Lips
  2. Teeth
  3. Hard dividing lines (such as smile lines)
  4. Immediate areas around eyes
  5. Areas where there is hair
Also try to get rid of obvious skin issues- she has a spot on her lip there on the right.

It's also good to leave some flaws in. In my process I actually add back in a bit of noise. (we'll get to my process in a sec)

These are not hard-fast rules, but in my experience it's a good way to avoid anything unnatural looking. The idea is you want it to look like her skin is smooth, but not like she's an alibaster copy of herself.

So, as I mentioned the image itself is a bit tough, but here is what I did...

  1. Open image in Photoshop.
  2. Copy entire image and past as a second layer (L2).
  3. Make L2 invisible and select layer 1 (L1).
  4. Filter->Noise->Dust and Scratches.
  5. Horse around with this until you get even but not overly blurred skin tones. I did Radius:5, Threshold: 2.
  6. Use healing brush to take out the spot on the lip. (do any manual healing before the next step)
  7. Filter->Noise->Add Noise...
  8. Again, horse around but a very light touch here. I did .50% noise, Uniform. This step is to make sure the skin has a few basic imperfections.
  9. Make L2 visible and select it to make it active.
  10. Grab the eraser, make sure the cursor is visible as a circle (if it looks like a crosshair, hit caps lock), make the cursor relatively large so you can erase the larger sections of her face.
  11. (again, remember on L2 here)... erase her face. Remember to stick to the rules I mentioned about about what not to airbrush... get the larger areas of her face first without hitting edges and whatnot, then gradually shrink the size of the cursor to get areas around the mouth and such. DONT WORRY about getting in-between strands of hair and stuff... no one is going to notice. If it's easy to do without bumping the hairs themselves, then fine... but don't kill yourself. Keep in mind this is somewhat impacted by how big the picture will ultimately be. If viewed larger, you'll need to do a bit more work on detail.
  12. Remember it's not supposed to look absolutely perfect as that will look odd, so missing here and there is fine.
Here is what I came up with doing this relatively quickly...
(EDIT: BTW, looking at this a second time I think I would do more around her eyes and at the nose... I don't like my results, but it's the right general idea.)

JennandSteve6.jpg


BTW, here is another thread where I did this. I was much happier with the overall result, but the initial image was a better starting point as well. Of course I realize now I should have just linked you to this rather than re-typing my process, but I'm, bored anyway. :lol:

Oh, I have to mention I also turned up the saturation a tiny bit on this picture to try to bring a bit of red into the skintones.
 

Most reactions

New Topics

Back
Top