PS education

Raymond J Barlow

TPF Noob!
Joined
Jan 28, 2005
Messages
5,136
Reaction score
150
Location
Grimsby, Ontario Canada
Website
www.raymondbarlow.com
Can others edit my Photos
Photos OK to edit
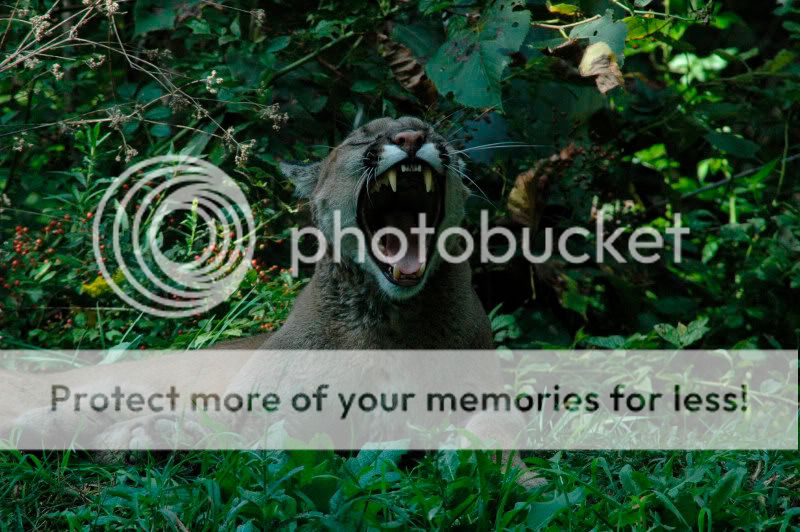
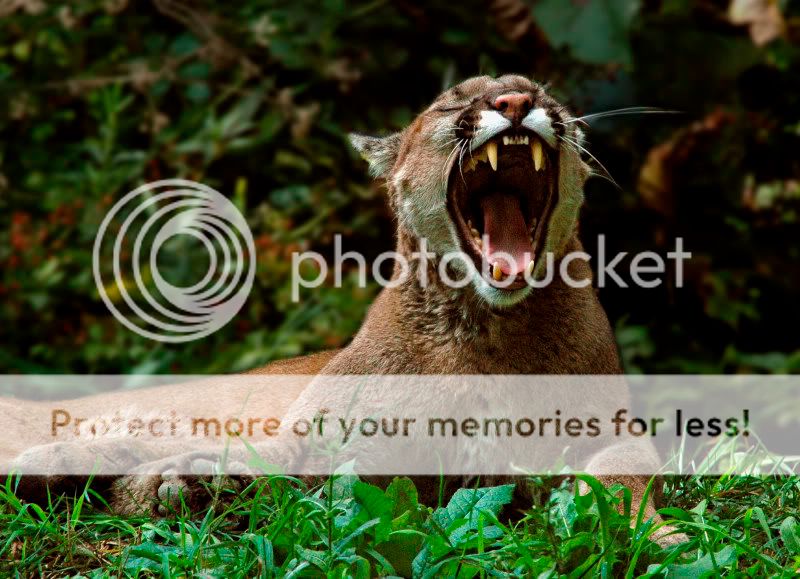
I have recieved a cool lesson from a friend from Austrailia, MozzMan, who is a very cool guy, and an excellent photog. I gave him a short tour of TPF and he is now a participating member. He taught me a bit about layers, and tweaking pics, so I thought everyone here might be willing to toss their 2 cents in.. all comments welcome. posting both the original and the edited..

Nikon D70
2005/09/19 02:52:04.1
JPEG (8-bit) Fine
Image Size: Large (3008 x 2000)
Lens: 70-300mm F/4-5.6 D
Focal Length: 300mm
Exposure Mode: Manual
Metering Mode: Center-Weighted
1/160 sec - F/5.6
Exposure Comp.: 0 EV
Sensitivity: ISO 400
Optimize Image: Sharp
White Balance: Auto
AF Mode: Manual
Flash Sync Mode: Front Curtain
Auto Flash Mode: Built-in M
Auto Flash Comp: 0 EV
Color Mode: Mode Ia (sRGB)
Tone Comp.: Auto
Hue Adjustment: 0°
Saturation: Normal
Sharpening: High
Image Comment:
Long Exposure NR: Off

websize001DSC_7682.jpg


websize002DSC_7682edit.jpg


thanks for looking!
 
I'm not sure what you've done but I don't like the effect on the top of the body. It looks like its been embossed or something. The tiger's colouring and how you've lightened it doesn't correspond to the background so i think it's very noticable that its been PSed.
 
well the ps'd version doesn't really have much better except for the eyes which i thik look much better, but besides that the editing just offers nothing more. the more lightened body draws attention, which is not good, attention should be mainly on the face and eyes and it appears to me like you've used a bit of sharpening too which looks kinda, well, unnatural... it's too sharp compared to the background (which has a normal blur and a contour little blur:D)

anyway, the photo is beautiful, where did you make it?
 
You only lightened one part of it, but the entire photo is under exposed, with low contrast, and the color balance is a bit too green, not to mention, unsaturated.

I spent a few seconds on it here at work, and here you go.

websize001DSC_7682.jpg


I fixed the color by editing the color balance with an adjustment layer, I boosted the saturation with selective color, and I brightened it up with levels by dragging the hightlights (right slider) left until it reached the edge of the histogram. By holding alt, I can see when it starts to clip.

After that, I duplicated the background layer, ran a gaussian blur at 6 pixels, layer opacity to 50%, and blend mode to soft light. This added a nice warm contrast. I topped it off with some unsharp mask at 120%, 0.3, 0, and again at 300%, 0.2, 0.
 
umm, the first word that ran through my head was: "plastic"... well, ignoring the big green blob and the fact that one ear is very dark blue unlike the rest which is black and the ghastly usm, it's a nice try but i prefer the original. honestly. this just seems like a half processed piece of stone, it has beauty but most of the defects are showing. so i'll stick to the pic that came first, the real one...:D
 
thanks so much everyone for your comments, and Matt, you really are brilliant! You have taken a peice of Junk, and made a photo out of it.. I am thrilled.. Now, if only I can sort out what you did... I am in awe.

And a huge thanks for typing up all your editing moves too., wow., ty Matt!
 
Ok, with some of Matt's lesson (Idid't quite catch everything he did), here is what i have., I took another shot I liked, and one which needed much attention, and here is the product of this evenings efforts.

Nikon D70
2005/09/18 03:24:34.8
JPEG (8-bit) Fine
Image Size: Large (3008 x 2000)
Lens: 70-300mm F/4-5.6 D
Focal Length: 300mm
Exposure Mode: Manual
Metering Mode: Center-Weighted
1/250 sec - F/11
Exposure Comp.: 0 EV
Sensitivity: ISO 1250
Optimize Image: Sharp
White Balance: Auto
AF Mode: Manual
Flash Sync Mode: Not Attached
Auto Flash Comp: 0 EV
Color Mode: Mode Ia (sRGB)
Tone Comp.: Auto
Hue Adjustment: 0°
Saturation: Normal
Sharpening: High
Image Comment:
Long Exposure NR: Off

websize001DSC_7200b.jpg


websize001DSC_7200bedit.jpg


thanks again Matt for your help., I will keep trying!
 
in the last submittal, which photo represents the cat's actual color?
 
JonMikal said:
in the last submittal, which photo represents the cat's actual color?

not 100% sure Jon, I think the original is closer to the cats real colour, and I may have taken its flat grey tone away. The lighting in the shade of these heavy trees didn't allow for much colour in the original shot.. and I increased the lighting using levels, this is what came up.

I am not sure what I did with the actual colour settings, I went back and forth with everything so many times, I got dizzy!! lol
 
I would try and get the image closer out of the camera. I have the D1H. knowing Nikon I am sure that the cameras at least resemble each other.

So... I would have set the exposure value to at least +1.0. I generally leave the metering at pattern. This provides a low contrast image with lots of detail. Try and keep the ISO at 200. Auto white balance has rarely worked for me. Investigate all the white balance modes and their steps. For example I shoot daylight work at Cloudy +2 WB. I would also stay away from the sharpening on high. Sharpening is better left to post processing. Basically you want an image that contains as much information as possible. Raw has a lot of capabilities, so try some shots in that format.
 
craig said:
I would try and get the image closer out of the camera. I have the D1H. knowing Nikon I am sure that the cameras at least resemble each other.

So... I would have set the exposure value to at least +1.0. I generally leave the metering at pattern. This provides a low contrast image with lots of detail. Try and keep the ISO at 200. Auto white balance has rarely worked for me. Investigate all the white balance modes and their steps. For example I shoot daylight work at Cloudy +2 WB. I would also stay away from the sharpening on high. Sharpening is better left to post processing. Basically you want an image that contains as much information as possible. Raw has a lot of capabilities, so try some shots in that format.

Ya, I was hoping someone would advse me on these settings.. i am so green!
thanks a ton Craig., i will definately take your advice...
 
Ray in both images you've gone just a bit far I think and Matt is right you need to be aware of what you need to raise the Sat and what not to, in the second you've applied the Gausian blur to lift the subject from the background BUT you feathered it too much and I think the wrong way also IMHO blurred a bit much.

Which Race League was it again PM me OK we'll get on TS
 
Digital Matt, I really like your PS effort on the Tiger. You've created an illusion of a 3rd-Dimension from a 2-Dimensional image. In your edition, the tiger really pops. It leaves no doubt as to the main point of focus. Excellent work.

Raymond J Barlow, I think the edited version of your cougar is a much better rendition of a cougar's actual colors. Your edit transformed a snapshot into a very nice photograph. You did real good.
 
MozzMann said:
Ray in both images you've gone just a bit far I think and Matt is right you need to be aware of what you need to raise the Sat and what not to, in the second you've applied the Gausian blur to lift the subject from the background BUT you feathered it too much and I think the wrong way also IMHO blurred a bit much.

Which Race League was it again PM me OK we'll get on TS

Hi Mozz , I will see you on CRT TS sometime.,

and Thanks Canonrebel!
 

Most reactions

New Topics

Back
Top