Pushing film and creativity

jcdeboever

Been spending a lot of time on here!
Joined
Sep 5, 2015
Messages
19,868
Reaction score
16,081
Location
Michigan
Can others edit my Photos
Photos OK to edit
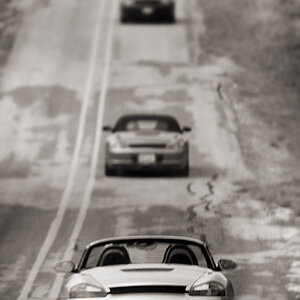
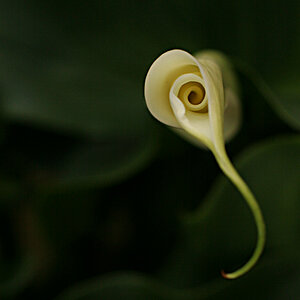
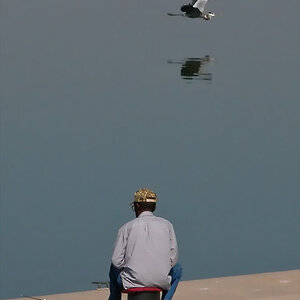
I am inspired somewhat by @terri work. She is very inspiring and I don't or will never try to copy her. My goal is to eventually separate myself as a painter with a camera. I have embarked on this journey, finally, after almost two years into photography. I have studied and tested many methods from emulsion lifts to silver gelatin printing with mainly failure. So here is a sample of a base photograph that I can destruct.

I want to remove layers in a physical but gradual manner. Any suggestions?

Nikon FM, 50mm f/2, hp5+

31990026-01.jpeg
 
Thank you for the kind words, jc. It is humbling to be referred to as inspiring.

I'm reading your post, trying to understand what you want to do with this print. You are saying, you have a physical print here, and you want to basically peel away layers from it?

Next question: what substrate is this image on? Emulsion coated (silver gelatin) paper? An inkjet?
 
An inkjet to start on photopaper. Basically, I want to remove the image a little at a time until satisfied.
 
Try dabbing it with silly putty; it worked on old newspaper ink. If not, maybe a kneaded gum eraser.
 
One way I've "removed" parts of prints is by cutting the image into "ribbons", and then cutting those into smaller chunks...making am 8x10 inch priunt into half-inch tall ribbons, then cutting those into half-inch wide chunks...makes LOTS of little blocks. Dry-mount those onto matteboard, but omit sections...

I've also had some accidental removals on resin-coated paper, where the dry-mount press's ferrotype sheet (that polished-metal plate thingy) melted the RC paper, and left the print with segments of the emulsion layer and top-coating peeled away and stuck to the ferrotyping tin as it was often called. Unpredictable as he((, but, a possibility if you have a hot enough source to melt the RC laytewr and get it to stick...
 
What do you mean by remove/removal? With layers you can change the opacity of the entire image or specific areas of the image making them lighter. Again with layers, you can mask specific areas of the image. I think for what you want ... it can all be done in Photoshop with layers.
 
An inkjet to start on photopaper. Basically, I want to remove the image a little at a time until satisfied.
I'd suggest an inkjet image transfer, using plain old copypaper.

Here's a quick and easy method. Assemble these tools (disregard the pieces of other final product here, of course):

.png


Using a photocopied image of your inkjet, simply apply a cut piece of clear contact paper over it. Cut it to fit over the image by about 1/4" all the way around. Use the brayer and burnishing tools to get it to stick well. No air bubbles. After a soak in water, the paper backing rubs off - leaving the image on the clear film of the contact paper. This shows up well on other substrates: canvas, watercolor or any artist paper, wood or ceramic - anything that contact paper would stick to.
 
Last edited:
What do you mean by remove/removal? With layers you can change the opacity of the entire image or specific areas of the image making them lighter. Again with layers, you can mask specific areas of the image. I think for what you want ... it can all be done in Photoshop with layers.

I think the key word here is "physical":
I want to remove layers in a physical but gradual manner.
 
The main issue with the above technique, of course, is that you end up with a piece of contact paper holding your image. There are a couple other easy things to try with copy paper, though. You can try using a gel medium. In this technique, a simple photocopy of your image is taped down to a piece of glass, and then painted over with layers of artist’s acrylic gel medium. Use a sponge brush and apply several layers, allowing to dry completely in between coats, and of course changing directions with each coat.

When dried, you again soak the whole thing in water and rub off the paper back, leaving a thin acrylic skin holding your image. I found it too opaque for my intentions, but it definitely works. Having that skin holding an image is a pretty close approximation to the old Polaroid emulsion lifts.

You can also use solvents over a photocopied image, and get pretty good results. Youtube is full of tutorials on this (and other) techniques. The key is to watch them all, listen carefully to each method's strengths and caveats, and figure out which one gives you the best likelihood of success for what YOU want to walk away with at the end. :)
 
Thanks @terri, you understand what I want to do. When I was painting in my last few years, I would do a fairly if not complete painting, then carefully, and methodically remove it's layers while applying transparent washes of white, or pastel color. I used solvents, sandpapers, scrapers, etc. In the end, the original image was a mere but recognizable render. Almost white, gray, or some earthy pastel canvas close up. Move back and the image would appear.
 
Thanks @terri, you understand what I want to do. When I was painting in my last few years, I would do a fairly if not complete painting, then carefully, and methodically remove it's layers while applying transparent washes of white, or pastel color. I used solvents, sandpapers, scrapers, etc. In the end, the original image was a mere but recognizable render. Almost white, gray, or some earthy pastel canvas close up. Move back and the image would appear.
JC: You're an alternative process artist at heart - who knew??!? :icon_cheers: What you're describing above sounds like a bromoil matrix, ready to be inked up. You'd like a lot of photographic alt processes, I bet.

Do you think you might try some kind of transfer, or is there something else you're exploring?
I'll try transfer. I'm also considering using pigmented beeswax over the gesso lift. I'm also considering pulling as opposed to pushing. You got me thinking a lot.
 
Whatever you conjure up, be sure to post it over in the Alternative Process forum. This kind of experimentation is exactly what it's for! :)
 
A few things I've done over the years.

I've used rubber cement on RC prints in the darkroom to "erase" part of the image. Develop and peal.
I've also used a paint brush in the darkroom to "paint" the developer on the RC paper. Very cool effects.
I've pushed film like Ilford 3200 to 25000 ISO
 

Most reactions

Back
Top