Questions about setting white balance in LR2

Jon_Are

TPF Noob!
Joined
May 12, 2007
Messages
655
Reaction score
13
Can others edit my Photos
Photos NOT OK to edit
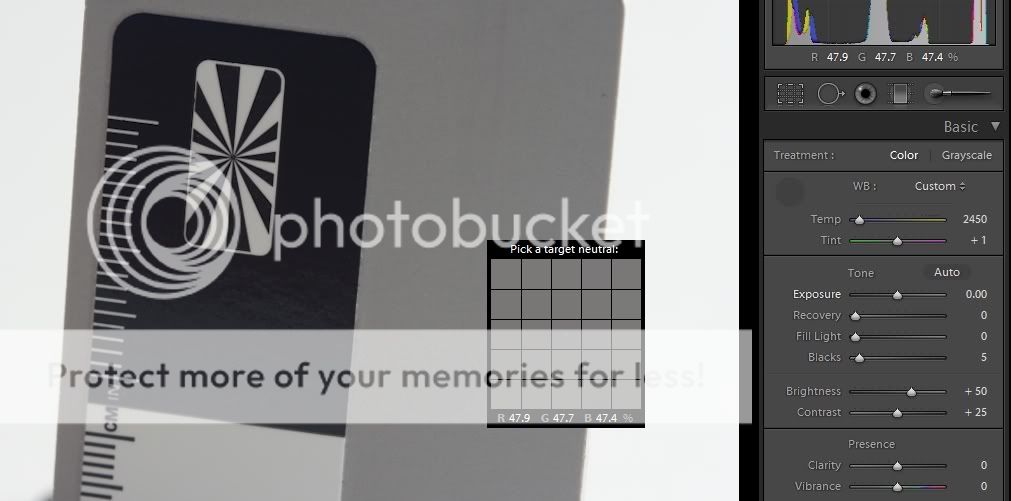
When setting quite balance in LR, is the 'as shot' option considered pretty accurate? Do most of you just leave it at that?

Also, when using the dropper tool, I know you should select a white/gray area, but this give varying results. Is there a way to set the WB with the dropper tool utilizing the RBG percentages near the bottom of the dropper window? Should you aim for them to be as close together as possible, and would that necessarily indicate a correct WB?

Thanks,

Jon
 
Personally, I leave LR in "as shot" and my camera set to Auto-WB. If a shot needs the WB adjusted, I adjust it in LR (either auto, one of the presets or manually with the slider/value). I should note that I shoot in RAW.
 
Accurate to what?

Accurate to the camera's guess of what white balance should be? Because it really is just that.
How about accurate to the camera's setting of "Daylight"? Do you know the lighting on your subject is exactly 5500k? It may well be outside with no trees on a clear blue sky in the middle of the day, but that's a stretch.

If you're asking if it is at all accurate to whatever the camera recorded white balance is then the answer is no. RAW files are reverse engineered thanks to no open spec being utilised by the main companies. During this process there is usually some form of calibration done, but there's always a slight difference between the camera settings and the Lightroom rendering of the image. If you need this to be accurate (and I can't think of why you would) then you would want to use CaptureNX to convert Nikon RAW files.


But really the solution to the problem has been known for a long time. This is exactly what grey cards are for. They may be a bit expensive for what amounts to ... a coloured card (or more accurately an uncoloured card), but this is the way to indicate the correct white balance. Hold your grey card to the subject, take a picture, then remove and take another picture. Use the dropper tool on the grey card, then do a happy dance.
 
Generally,
My WB is set to daylight or 5560K. In LR if from JPG, I might adjust it here/there, in RAWs, just put in the values - IF needs be.
 
Use the dropper tool on the grey card, then do a happy dance

Would it be OK if I skip the dance step, or is that highly recommended? :D

Should you aim for them to be as close together as possible
Yes, I think so.

Anyone else have a thought on this? Should I be satisfied if the three numbers are nearly identical, regardless of what the numbers actually are?

Jon
 
is the 'as shot' option considered pretty accurate?
As shot is just that - the way it came out of the camera.
Anyone else have a thought on this? Should I be satisfied if the three numbers are nearly identical, regardless of what the numbers actually are?
Even on a grey card or a WhiBal, they're not usually going to be identical (damn close though). If for whatever reason, I didn't take a WhiBal shot and I have to fix the WB later - I use the dropper on something neutral. Neutral does not necessarily mean white (many people assume that you have to use something white to white balance...).

I try to pick a spot where the RGB values are relatively close - within a few points of each other.
A WhiBal is hard to beat though... ;)
WB.jpg


What the numbers say shouldn't be a factor in your satisfaction - base that on what the photo looks like. ;)

"Right" isn't always right.
 
For finding neutral gray in an image:
  • Open the image in the photoshop workspace.
  • Click on the 'Create a New Layer' icon at the bottom of the Layers panel to create a new blank layer.
  • Go into the Edit menu and click on 'Fill'.
  • In the Fill dialog box's 'Content' section click on the down arrow button and select 50% gray
  • Make sure the 'Preserve Transparency' box is not checked and click ok.
  • Layer 1 is now filled with 50% gray
  • Make sure layer 1 is selected (highlighted)
  • Change the Layer pallette blending mode to 'difference'.
  • Click on the 'Create new fill or adjustment icon at the bottom of the Layers panel.
  • In the pop-up select 'threshold'.
  • You're now looking at a totally black image.
  • In the Threshold adjustment panel move the slider under the histogram panel all the way to the left
  • Now your image is most or completely white.
  • Any areas that are not white are neutral gray.
  • If it's all white move the slider back to the left slowly until some areas begin to show. Those are also neutral gray.
  • Note where at least one of those areas are in the image. I usually just use my finger and turn off Layer 1 and the Threshold layer.
It sounds like a drawn out process, but after you've done it a couple of times it just takes a few seconds to do and you now know where to sample for white balance and neutral gray for color corrections.

This method was developed by Dave Cross, one of the experts at the National Association of Photoshop Professionals (NAPP). Consider becoming a member. It's well worth the $99 a year membership. There is a referral link in my siggy.
 
For finding neutral gray in an image:
  • Open the image in the photoshop workspace.
  • Click on the 'Create a New Layer' icon at the bottom of the Layers panel to create a new blank layer.
  • Go into the Edit menu and click on 'Fill'.
  • In the Fill dialog box's 'Content' section click on the down arrow button and select 50% gray
  • Make sure the 'Preserve Transparency' box is not checked and click ok.
  • Layer 1 is now filled with 50% gray
  • Make sure Layer 1 is selected (highlighted)
  • Change the Layer pallette blending mode to 'difference'.
  • Click on the 'Create new fill or adjustment icon at the bottom of the Layers panel.
  • In the pop-up select 'threshold'.
  • You're now looking at a totally black image.
  • In the Threshold adjustment panel move the slider under the histogram panel all the way to the left
  • Now your image is most or completely white.
  • Any areas that are not white are neutral gray.
  • If it's all white move the slider back to the left slowly till some areas begin to show. Those are also neutral gray.
  • Note where at least one of those areas are in the image. I usually just use my finger and turn off Layer 1 and the Threshold layer.
It sounds like a drawn out process, but after you've done it a couple of times it just takes a few seconds to do and you now know where to sample for white balance and neutral gray for color corrections.

This method was developed by Dave Cross, one of the experts at the National Association of Photoshop Professionals (NAPP). Consider becoming a member. It's well worth the $99 a year membership. There is a referral link in my siggy.
 
Wait how does this work? This assumes the image is already grey doesn't it? You wouldn't need to white balance after the fact in that case, or am I missing something?
 

Most reactions

Back
Top