Retouching crit

kkamin

TPF Noob!
Joined
Aug 25, 2009
Messages
515
Reaction score
17
Location
Minneapolis
Website
www.kevinkaminphoto.com
Can others edit my Photos
Photos OK to edit
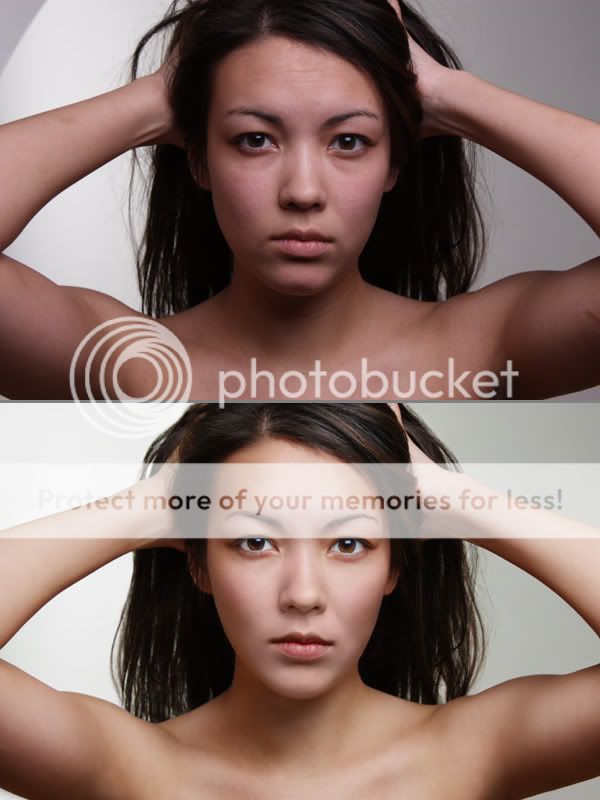
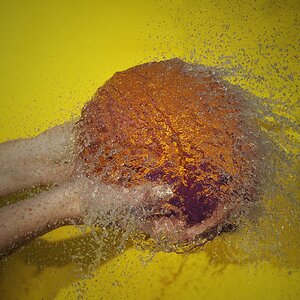
I think I might have gone a little too far? Let me know what's working and what looks weird. I think the skin tone is still an issue, there are patches of yellow and then patches of pink/red. Does anyone have any good ideas how to resolve it? Ideally I would like a uniform muted bronze tone with a nice sheen.

Thanks!

retouch.jpg
 
You could try a 100px-250px feathered selection around each pink/yellow area, then adjust the hue/saturation of the colour channel accordingly. The pink tinge on the cheeks works fine, but would suggest looking at the yellowish forehead area and the shoulders.

I don't think you've taken the retouching too far, but it depends on your brief and how commercial this image needs to be.
 
I think it looks great and pretty natural actually, what a difference!
 
I think it looks really nice :) I can see the color differences a little bit, but wouldn't have noticed it if you didn't mention it. Maybe at a larger size it is more obvious, but I think it looks good.
 
You took 10lbs. off of her... looks great.
 
tut please.
 
You could try a 100px-250px feathered selection around each pink/yellow area, then adjust the hue/saturation of the colour channel accordingly. The pink tinge on the cheeks works fine, but would suggest looking at the yellowish forehead area and the shoulders.

I don't think you've taken the retouching too far, but it depends on your brief and how commercial this image needs to be.

Thanks a lot, sounds like a plan. :thumbup:
 
This! Great job! I would think that starting with a stronger photo would require less work, though, right?

Definitely. I'm working on expanding my work into glamour and fashion, so I grabbed a pretty friend for this shoot sans a hair stylist and MUA and tried my best to make up for that deficiency with extensive retouching. I'm looking to build a small work sample with what limited resources I have, before I start approaching models for test shoots.

If I could do it again I wouldn't have shot her after she worked a double shift, and I would have properly exposed her and white balanced better:drool:.
 
tut please.

What doesn 'tut' mean?

Tutorial. Take us through your retouching process!

Ok, I haven't done that before. I had a little time, so here it is.

*I create separate layers for healing brush, cloning, dodging/burning, blurring, etc. I usually go too far with my corrections and dial it down with the opacity.

Picture1-2.png


I made some notes

Picture3-1.png


Removed the softbox from the left side of the background

Set down eye dropper points to color balance image. Had hard time sampling from face since she had makeup on in a lot of places. Still had a hard time with the CMYK recipe on the image, not 100% happy with tones.

used spot healing brush and healing brush to remove large blemishes on skin.

I removed the bags from under her eyes

I did work on her neck lines

Picture4.png


I duplicated and flipped her hair from the right side for the left. I tried to make it look a little different so it wouldn't look like a blatant duplication. I duplicated from the top right side for the top left side, and I moved around that clumped strand to the outside to help hide the duplication.

Picture5-1.png


softened mouth lines

copied lower part of her right arm to a new layer and moved it up to shrink her arm. Had to copy it twice to cover the new length. Used the same piece on the left arm too.

Picture6.png


cleaned up heavy lines and blemishes in underarms

Lightened shadows in face and veins on wrists by creating a soft light layer filled with 50% gray, then using the dodge tool at a very low strength. I don't have a Wacom, so I work very light and build things up slowly. Then blur things to help melt the brush strokes together.

worked on small lines under eyes

Picture7-1.png


Removed some yellow from around her mouth by creating a new layer with a 'color' blending mode. I sampled a better tone from another part of her face and painted with a brush at a low opacity around her mouth.

sharpened eyes by making a new layer of all the underlying layers merged-applying a sharpening filter and masking out everything but the eyes.

Brightened the eyes by making another merged layer and assigning it a 'screen' blending mode. Adjusted the effect by controlling the opacity. Masked out everything else.

Cleaned up the whites of the eyes. Used clone/healing brush to remove specular highlights in the inner corners of her eyes. Blurred the edges of the highlight in the eye.

Copied just her eyes to a new layer. Applied a curves adjustment to darken them. Masked out this layer then just brought back in an outline around the retinas.

Picture8.png


Shaped the eyebrows by making a new layer and using the clone stamp tool in 'lighten mode'. Sampled skin on forehead and trimmed hair with small size brush. Used patch tool and healing brush to blend in cleaned up areas and bring some texture back.

Darkened/thickened eyebrows by duplicating eyebrows to new layer in 'multiply' blend mode. Masked out layer completely and masked in a little bit of the newly darkened eye brow. Then added some hairs to gaps in eyebrows with clone tool.

Picture9.png


Added density to lips by painting them black in soft light mode. Used opacity to find good amount. Had to go back in to get the bottom lip's bottom line connected; it falls off in the middle for some reason.

Removed chin shadow and lightened around jaw further

Used Liquify to slim left side of face. Had to duplicate part of neck to fill in gap created.

Picture10.png


Used Liquify to slim arms. She isn't that buff, but she is flexing a little and compound that with the angle, her arms looked way too big before imo. Reduced lines around bicept.

Did some facial contouring by creating a new layer in 'softlight' mode, filled with 50% grey. Painted black on face shadows and white on face highlights. Did trhe same on rest of skin. Made sure to bring out collar bones.

Picture11.png


Lightened hair in a few highlight areas by using a luminosity blend mode and a curved adjustment. Colored select areas by using just a curves adjustment.

Cleaned up some uneven spots of tone on face.

Cleaned up upper lip.

Reduced wrist veins further.

Did final spot treatment to areas.

Added a vibrance adjustment layer to image

----

-K
 
OMG, awesome and VERY thorough tutorial. Great work! BTW, I don't think you went too far with the editing. Like Lynnca, I didn't notice any varying color until you pointed it out.
 

Most reactions

New Topics

Back
Top