Siblings ~ From a session last week

No. Hehe. I meant calibration for your monitor.

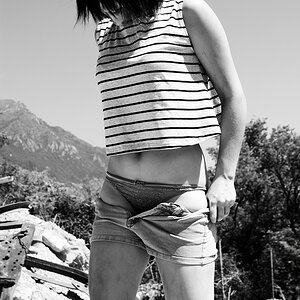
What Mike said is totally right. Your lights need to be more powerful than the sunlight. That way, the sun, or lack of it, doesn't factor into the equation.
I love natural light, but it's a tricky little bear.
lmbo! I was thinking... I have no idea how to calibrate my camera! :lmao:

Yes, the monitor is calibrated. I have no idea why that didn't click for me!
So, getting the light system will help alleviate this? I'll have enough $$ for it next month. I'm a budget freak. I'm still working on them in ps...
 
Elsa, I just looked at your blog and realized you're in Dallas. I'll be in Dallas in July for a get together with friends. I go every summer. Two of my friends are also photographers. It would be so cool to get to meet you, all though, I'm sure it will be a busy time for you with weddings.
 
The problem was not neceserily with your lights, or the window lighting...the problem was that you mixed the different types/colors. Since, the image can only be set to one white balance, the other light will cause a color shift.

So if you are using window light, use a reflector rather than flash. If you are using flash, don't try to incorporate window light.

Even a set of studio lights won't solve this problem automatically (as I learned on a shoot last year :er: )

As Cindy mentioned, if you have a lot of flash power, you can 'overpower' the ambient (window) light by using a small aperture and a faster shutter speed.

Another option would be to 'gel' your flash to match the ambient...see HERE.
 
July IS kinda a nuts month for me, but I'm sure I can break away and hook up with you guys. Sounds like a blast. I'd love to meet ya! Let's get together for dinner or something. :)
 
The problem was not neceserily with your lights, or the window lighting...the problem was that you mixed the different types/colors. Since, the image can only be set to one white balance, the other light will cause a color shift.

So if you are using window light, use a reflector rather than flash. If you are using flash, don't try to incorporate window light.

Even a set of studio lights won't solve this problem automatically (as I learned on a shoot last year :er: )

As Cindy mentioned, if you have a lot of flash power, you can 'overpower' the ambient (window) light by using a small aperture and a faster shutter speed.

Another option would be to 'gel' your flash to match the ambient...see HERE.
Thanks! This is great info for me!
 
July IS kinda a nuts month for me, but I'm sure I can break away and hook up with you guys. Sounds like a blast. I'd love to meet ya! Let's get together for dinner or something. :)
That would be awesome! I've been dragging my husband to the computer every time you post photos saying, "Look at this woman's work! She's amazing!" lol! I'd love to get the chance to meet you. I'll be there the 17th - 21st.
 
Ok, here ya go:

Couldn't fix it with a simple wb, because as Mike mentions, the WB was all over the place, even in the same photo.

Here is the original again:
DSC_0044-1.jpg


What I did to fix the issue was two separate Hue/Sat adjustment masks. The first one, I desaturated the Red and Blue Channels slightly until it looked right to me.

Then, after studying the photo for a moment, I also found some pesky yellow chanel aspects. So I did a second adjustment Hue/Sat on a layer mask, and painted everything back except for the facial area, and lightened the whole thing at 44% on the yellow chanel.
Here is what it looked like:
DSC_0044-1colorbalancejpg.jpg


That right there really would have been plenty, but I went a few steps further, and put some "Cindy Processing" on it. Warning! May be way over the top in terms of PS, but this is exactly what I would do with this particular photo:

I used Kevin Kabota's "Doll Face" at 75% opacity on skin tones only.
I patched out the under eye on a duplicate layer at 75%.
I removed the nose boo boo and inner eye circles at 100% on the original layer.
I did the first curves layer adjustment on the background only, and painted the sweet little girl back in.
Then I did a patch/clone, on the background.
I did a second curves adjustment lift for the little girl and painted the background back in.
I made the eyes bluer on a dupe layer at 11% opacity.
I did a 3rd adjustment curve layer , and then hit ctr/delete so that I only needed to paint back the shirt.
I burned the lashes on midrange at 23%
And then sharpened at 25%

Here is how it turned out, in my little way of doing things:
DSC_0044-1colorcindytreat.jpg


I know that this seems like a ton of stuff, but actually it all took under 4 minutes.
Hope you like, and thank you for letting me work on your photograph.
You are simply amazing. The last one looks awesome! Maybe I should move Dallas and follow you around! lol!
The 20th it is! That's perfect actually!
 
You are simply amazing. The last one looks awesome! Maybe I should move Dallas and follow you around! lol!
The 20th it is! That's perfect actually!

Can't wait to meet you.
It's really not that hard when you start learning to work in layer masks. They are a blessing!

Try it out for yourself, and if you have any questions, just give me a shout.

Happy Shooting!
 

Most reactions

New Topics

Back
Top