Why do my pictures come out so grey?

Flaman

TPF Noob!
Joined
Aug 18, 2011
Messages
3
Reaction score
0
Location
Sask, Canada
Can others edit my Photos
Photos OK to edit
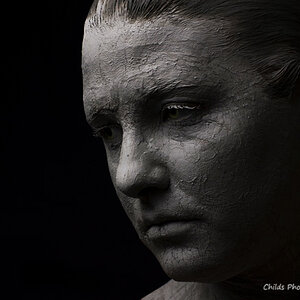
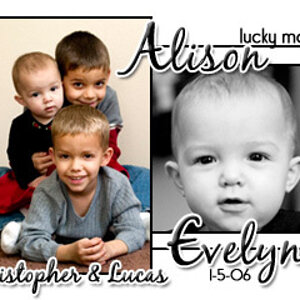
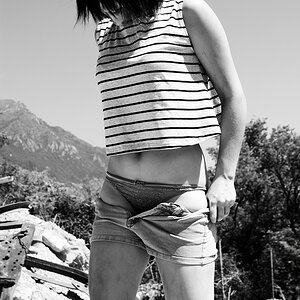
Lately, a lot of the photos I have been taking have been coming out quite grey (as seen below). I am able to deal with this in lightroom, but I was wondering what I should be trying to change or focusing on to try to get them coming out better straight from the camera.

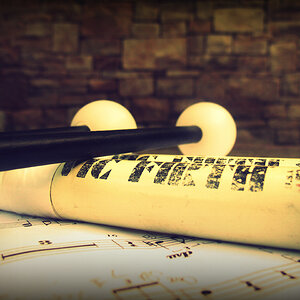
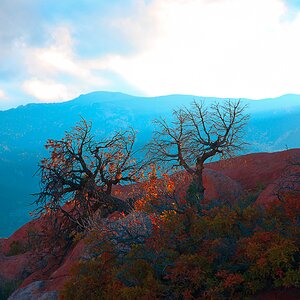
This picture was taken with a Canon XSi, EF28-135, ISO 400, f5.6,1/100sec


I can get it to look like this after editing, but I would like it to come out of the camera cleaner if possible.


Thanks in advance,
Brent
 
You maybe slightly over exposing. If this happens on nearly every image ... check your Exposure Compensation and make sure it is set to Zero. If your Exposure Compensation is at zero ... then your meter could be on 'Spot Metering', but then your exposures wouldn't have any consistency.
 
Last edited:
It's rather impossible to set the white & black points, or change the levels, in-camera. The scene you show does not have enough dynamic range to 'fill in' the ability of the camera. So this must be done in post.

You can increase the contrast in the camera, but that may work fine for this image and fail miserably in the next.
 
Are you shooting raw or jpg format? Your original doesn't look all that bad if it's a straight raw to jpg conversion. If you're shooting .jpg, what are your in-camera settings at (saturation, hue, etc)?
 
Are you shooting raw or jpg format? Your original doesn't look all that bad if it's a straight raw to jpg conversion. If you're shooting .jpg, what are your in-camera settings at (saturation, hue, etc)?

I am shooting raw and that is the straight conversion from lightroom.
 
Then I don't think there's an issue. Are you viewing on a calibrated monitor? Your edit seems a bit over-saturated to me.
 
Then I don't think there's an issue. Are you viewing on a calibrated monitor? Your edit seems a bit over-saturated to me.
No, my monitor wasn't calibrated. I went though the process and would tend to agree with you. Thanks for the heads up!
 
It's a combination of your white balance, your exposure, and shooting in raw.

You're not going to get it looking like your LR edit out of camera (which *is* a tad over-saturated, btw), but you can get it less washed out than what you have.

For the kind of contrast that you want, you *are* a hair over-exposed. In-camera you could have also pushed the white balance a bit warmer.

Raw files are always going to be flat when you import them, compared to the back of your camera. The back of your camera will apply .jpg settings to the preview image, that aren't actually on the raw file.
 
I am shooting raw and that is the straight conversion from lightroom.
that's the problem--you need to process raw files.

Make ligthroom perform actions to all your imports that applies the same base prcoessing that the camera itself would if you shot in jpg.

or

shoot in jpg.
 
The image has a rather short dynamic range so the auto-exposure places it right in the center.

tigerorig.jpg


Once the black point and white point are changed to give it more dynamic range, without any further editing, it looks 'better' (I think.)

Cameras aren't totally omniscient.

tigerlevels adjust.jpg
 
Better yes, but IMHO still a bit too pale.
 
I am shooting raw and that is the straight conversion from lightroom.

RAW files always look flat before processing. Your image looks completely normal for a unprocessed RAW.
 
Light quality and direction are usually what separate so-so photos from very appealing photos.

The light in the scene is flat (narrow dynamic range), probably from an overcast sky. It looks like the sun is high, at about 60° or so, and camera right.

As Lew illustrated setting the white and black points can broaden the dynamic range some.
Boosting the mid-tone contrast and the vibrance are 2 other edits I do to almost every digital photo I make.

I Camera Raw and LR Develop module you can boost mid-tone contrast with the Clarity slider in the Presence section of the Basic panel.
You can also boost mid-tone contrast using a Curves or a Levels adjustment.

You might also consider doing more in the way of local edits rather than global edits.
 
Last edited:
I am shooting raw and that is the straight conversion from lightroom.
Then it's simply a matter of false expectations. When a Raw file is as flat as yours, it's a good thing - it's means that the entire scene is captured within the sensor's dynamic range, and you can really edit as you want to. After all, Raw is used specifically to get as flat an image to start with as possible. If you want it to look nice straight out of the memory card, use JPEG instead.
 

Most reactions

New Topics

Back
Top