
Gavjenks
TPF Noob!
- Joined
- May 9, 2013
- Messages
- 2,976
- Reaction score
- 588
- Location
- Iowa City, IA
- Can others edit my Photos
- Photos OK to edit
Making a thread for a variety of tests I am starting to do with X-ray film. I've been playing it way too fast and loose with this stuff, and need to crack down and do serious comparisons and dial in the best methods. I figure some people out there may be interested in sharing the wealth of my findings.
For this first post, I am using Fuji RX-U Half speed blue 8x10 X-ray film, cut down to 4x5 pieces. It is available for sale here:
8x10 in. Fuji X-Ray Film for $0.00 in Fuji X-Ray Film - X-Ray Film - Analog X-Ray Supplies
A single 4x5 sheet costs about 8 cents.
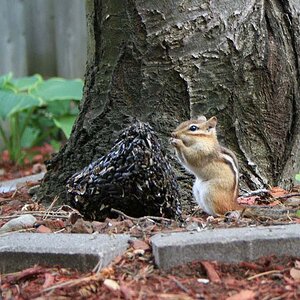
I didn't want to have to rely on weather and sunlight, etc. and wanted to be able to do standard tests for a few days, so I set up a little still life scene, with representatives of every color, and some high contrasts. The white black gradient is obviously handmade with india ink. It should roughly represent 1-stop increments (mixed ink and water with pipettes), but you know, obviously just an approximation. Sadly I got it off frame in this first film test, but whatever. Plenty of high and low value stuff in the shot.
Here is the scene in digital color:

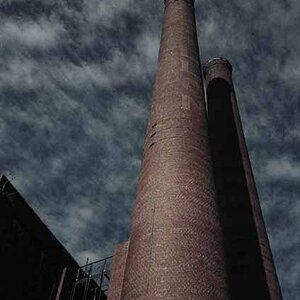
And the 4x5:

4x5 was processed with the best setup I have currently found for half speed blue Fuji film,
Which is 200 ISO, full stand development with D-76, agitate 1 minute, stand 40. (I know it's not made for that, but it works a lot better than standard, see further down this post. I am getting in chemicals tomorrow for actual stand developers, which should be better still).
Pretty damn good tonality, I think. Much reduced glowing of the highlights like I am used to from earlier processing methods. And you can still make out the gleam and writing on the lightbulb, as well as some details inside the shell and in the depths of the plant. Meaning this is nearly at the level of my 6D at ISO 200 (11-12 stops of dynamic range. Both of these are compressed tonally to fit a jpeg).
I turned various channels on and off and blended them, and figured out that the color sensitivity of the "half speed blue" seems to be most similar to an almost 1:1 mixture of the digital camera's blue and green channels, here, so it's similar to normal ortho film:

Why am I doing bizarre D-76 stand development? Well I ran out of the HC-110 I had that would have been the obvious choice, and my only other option on hand is ilford-DDX, and I was impatient. Tomorrow in the mail I'll be getting stuff to make obsidian aqua (an amateur designed pyro type developer) and will extensively test that. In the meantime though, I did the following tests with just D-76, prior to having set up my standardized still life:
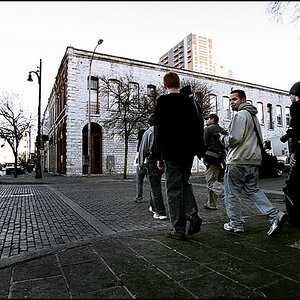
D-76 agitated normally and shot at ISO 50 (6 minutes dev), 100(6.5), 200(7.5), and 400(9):
No processing done on these digitally


Clearly, either 100 or 200 is best. But neither is great. One blocks shadows still, and one blows out highlights quite a bit still. The light leaks are probably because I was using a flimsy jacket instead of my proper darkhood that I left at home, and/or had the film in an outside pocket of my camera bag, and/or loaded them lazily with a safelight =P
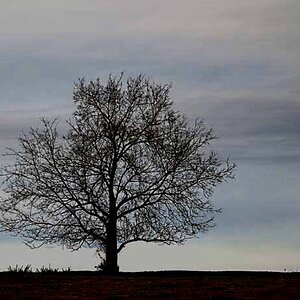
Since I was only planning on these, I didn't bring 4 more shots of film, but I did have two more, and decided on a whim to expose them at 50 and 400 for stand development. Here are sheets exposed at 50 and 400 both for 30 minutes semi-stand (one inversion at 15 minutes) D-76:


The 400 was great, better than the standard developments, but a little bit unnecessary on the contrast and a teensy bit too blocked up. So I just guessed 200 stand would be ideal + removing the inversion at 15 minutes. And the first shot I've done since then was with the still life you saw above, which turned out awesomely.
Disregard the dark strips on the left side. That was me not measuring my developer correctly and having to top it off (so the bit at the top of the tube developed a bit less at the start)
Next: The obsidian aqua tests, and I'm also getting in the mail some "HR-U Medium Speed Green." I'm hoping that if blue is actually ortho, then "green" might be damn near panchromatic. We shall see.
For this first post, I am using Fuji RX-U Half speed blue 8x10 X-ray film, cut down to 4x5 pieces. It is available for sale here:
8x10 in. Fuji X-Ray Film for $0.00 in Fuji X-Ray Film - X-Ray Film - Analog X-Ray Supplies
A single 4x5 sheet costs about 8 cents.
I didn't want to have to rely on weather and sunlight, etc. and wanted to be able to do standard tests for a few days, so I set up a little still life scene, with representatives of every color, and some high contrasts. The white black gradient is obviously handmade with india ink. It should roughly represent 1-stop increments (mixed ink and water with pipettes), but you know, obviously just an approximation. Sadly I got it off frame in this first film test, but whatever. Plenty of high and low value stuff in the shot.
Here is the scene in digital color:
And the 4x5:
4x5 was processed with the best setup I have currently found for half speed blue Fuji film,
Which is 200 ISO, full stand development with D-76, agitate 1 minute, stand 40. (I know it's not made for that, but it works a lot better than standard, see further down this post. I am getting in chemicals tomorrow for actual stand developers, which should be better still).
Pretty damn good tonality, I think. Much reduced glowing of the highlights like I am used to from earlier processing methods. And you can still make out the gleam and writing on the lightbulb, as well as some details inside the shell and in the depths of the plant. Meaning this is nearly at the level of my 6D at ISO 200 (11-12 stops of dynamic range. Both of these are compressed tonally to fit a jpeg).
I turned various channels on and off and blended them, and figured out that the color sensitivity of the "half speed blue" seems to be most similar to an almost 1:1 mixture of the digital camera's blue and green channels, here, so it's similar to normal ortho film:
Why am I doing bizarre D-76 stand development? Well I ran out of the HC-110 I had that would have been the obvious choice, and my only other option on hand is ilford-DDX, and I was impatient. Tomorrow in the mail I'll be getting stuff to make obsidian aqua (an amateur designed pyro type developer) and will extensively test that. In the meantime though, I did the following tests with just D-76, prior to having set up my standardized still life:
D-76 agitated normally and shot at ISO 50 (6 minutes dev), 100(6.5), 200(7.5), and 400(9):
No processing done on these digitally
Clearly, either 100 or 200 is best. But neither is great. One blocks shadows still, and one blows out highlights quite a bit still. The light leaks are probably because I was using a flimsy jacket instead of my proper darkhood that I left at home, and/or had the film in an outside pocket of my camera bag, and/or loaded them lazily with a safelight =P
Since I was only planning on these, I didn't bring 4 more shots of film, but I did have two more, and decided on a whim to expose them at 50 and 400 for stand development. Here are sheets exposed at 50 and 400 both for 30 minutes semi-stand (one inversion at 15 minutes) D-76:
The 400 was great, better than the standard developments, but a little bit unnecessary on the contrast and a teensy bit too blocked up. So I just guessed 200 stand would be ideal + removing the inversion at 15 minutes. And the first shot I've done since then was with the still life you saw above, which turned out awesomely.
Disregard the dark strips on the left side. That was me not measuring my developer correctly and having to top it off (so the bit at the top of the tube developed a bit less at the start)
Next: The obsidian aqua tests, and I'm also getting in the mail some "HR-U Medium Speed Green." I'm hoping that if blue is actually ortho, then "green" might be damn near panchromatic. We shall see.
Last edited:


![[No title]](/data/xfmg/thumbnail/32/32631-60d0db057ee085953a0921e337396654.jpg?1619735552)


![[No title]](/data/xfmg/thumbnail/32/32630-d78de94d84be2acf57d5e0923482b4da.jpg?1619735552)