gary_hendricks
TPF Noob!
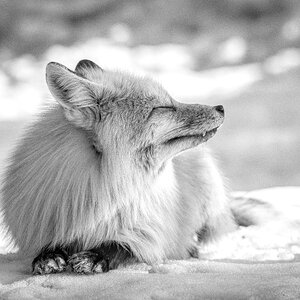
When editing digital photos, it helps to have a standard workflow. Knowing the right order to apply your editing tools helps you get the best results.
1. Edit in Lossless Format
Some file formats, such as JPEG, lose quality every time you save an edit. This is called a "lossy" format. If you are performing a long series of edits, you may actually make things worse despite your efforts. The opposite type of format is "lossless." With a lossless format, such as TIFF, no quality is lost when you make edits.
2. The Initial Clean-Up
Some edits, such as cleaning up noise and correcting lens distortions, are best performed at the beginning so you do not exaggerate them during later steps. There was no noise in the above example, so this step was not necessary.
3. Adjust the Color
This involves adjusting the RGB (Red, Green and Blue) or CMYK (Cyan, Magenta, Yellow and Black) values. Until you learn the theory of color adjustments, it is best to make very small changes and see how they look. Often, these adjustments lighten the image and reveal additional noise, so a bit more clean-up may be required.
4. Saturation and Hue Adjustment
Saturation and hue affect the appearance and richness of the colors in your photo. You will usually want to increase color richness. Again, the best results are normally had by making small adjustments. After this step, re-evaluate your color adjustments to ensure they still look right.
5. Editing
You can now perform any final edits such as removing blemishes from skin, whitening teeth, smoothing wrinkles and so on. Often, the image areas that need editing are quite small relative to the whole picture. For best results, zoom in and work on the picture close up. This way, you will be less likely to make unseemly blotches instead of fixes. If major edits are made at this stage, some additional color and saturation tweaks may be needed.
6. Scaling
You can now try to apply any final cropping and resizing. Remember not to crop too close to important subject matter. If you leave plenty of space around them, your photo will look more balanced and you will be less likely to cover things up when framing. Also, remember to consider pixel depth and the rules of thumb for printing before making your photo too big. Minimum print quality requires 150 PPI (pixels per inch). Maximum quality, which is recommended for enlargements, requires 300 PPI.
7. Sharpening
Sharpening is the final step in the process. You can sharpen any areas that might benefit from looking crisper. The reason this step is left to last is that sharpening can exaggerate other problems. Because of the potential side effects of sharpening, it is usually best to select only specific areas for sharpening, usually the main subjects.
 . The sites of course just serve as hangers for his many affiliation links.

![[No title]](/data/xfmg/thumbnail/39/39460-55f4d48e22a9710f377f2a3dee45992e.jpg?1619739039)
![[No title]](/data/xfmg/thumbnail/37/37602-1ef8dbb1c2d0e4ff347ee65d328c3603.jpg?1619738147)