A few shots around the ship

EllaElla

TPF Noob!
Joined
May 19, 2012
Messages
95
Reaction score
2
Location
Virginia
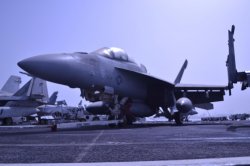
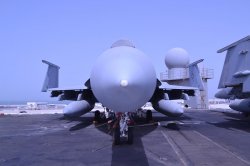
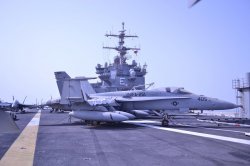
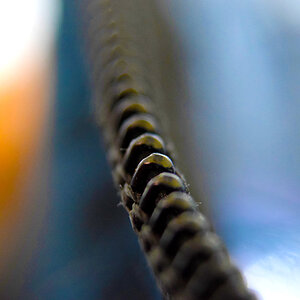
I've only been a member for about two weeks, and I have learned A LOT! Here are a few shots from around the ship. I have no way of editing or processing photos. All I can do is shrink the photo in Paint so I can upload it. A few I like, a few I dislike. Still learning. After viewing these, I am going to try to re-shoot most of them. Anyway, I am more than open to your thoughts and advice. Thanks for looking.

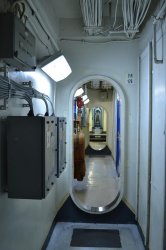
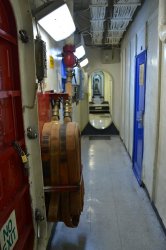
In the two photos of the passageway I was trying to capture the length of the p-way because it runs almost the entire length of the ship. In the second one, I tried to focus on the fire hoses to create DoF...the photo is not level, I know, but any suggestions?
 

Attachments

  • $cc1post.JPG
    $cc1post.JPG
    117.6 KB · Views: 124
  • $cc2post.JPG
    $cc2post.JPG
    118.5 KB · Views: 122
  • $cc3post.JPG
    $cc3post.JPG
    113.2 KB · Views: 115
  • $cc4post.JPG
    $cc4post.JPG
    122.8 KB · Views: 145
  • $cc5post.JPG
    $cc5post.JPG
    139.3 KB · Views: 120
  • $cc6post.JPG
    $cc6post.JPG
    103.8 KB · Views: 100
  • $cc7post.JPG
    $cc7post.JPG
    107.8 KB · Views: 122
Are you able to download software on the ship? I assume you have t'interwebs?

If you can, try downloading the FREE software, GIMP. A great and quite powerful editor and totally free.

I can see you have a lot of great subject matter, and the ideas you have (e.g. the corridors) will make some great images, I am sure. :)
 
Most of the times, you'll get better feedback if you upload no more than 2-3 pics in the same thread. But anyway, maybe it's not easy for you to spend much time in the internet, so here it goes...

Overall I like them, probably being such a rare view for me :)

- There's something wrong with the white balance in all the 'outside' photos... too blue...
- From the shadows, I can tell you're shooting at noon... AVOID that... do it early in the morning or late in the afternoon if possible. Light at noon is too harsh. Won't get good results at that time.
- I know you're working with big subjects in busy places, but try to isolate a bit your subject... Try to be clever and use higher or lower perspectives, maybe even only focusing in one part of the plane while the rest is in a nice but recognizable OOF.

I'm nothing but another beginner here, but you've asked for suggestions so here they're :)
 
Hi there and welcome :D
My choice among the lot is the second one.... #1 and #4 are not bad either; #3 and #5 are not strong subjects to be selective upon , i feel
Among the two walkways, i liked the first; in the second you stood on the left side where objects are there to block the view... i also wonder would it have been better you take the camera more down to give a low level perspective...

By the way why so much of blue tint in most of the images?

Regards :D
 
Are you able to download software on the ship? I assume you have t'interwebs?

If you can, try downloading the FREE software, GIMP. A great and quite powerful editor and totally free.

I can see you have a lot of great subject matter, and the ideas you have (e.g. the corridors) will make some great images, I am sure. :)


We cannot download anything on the Gov. computers, and I don't have my own laptop onboard. For me right now, I'm only beginning to learn how to shoot. Perhaps I'll dive into editing once I get home in a few months.

I do also agree with what everyone said...some of the subjects are big, and yes, they were tough to shoot. The close-up of the noes of the aircraft was intended to show the symmetry of the aircraft, but like someone said, it needs to be isolated. That was definitely one of the photos I was going to re-shoot. Actually...I'm going to re-shoot all of them. yes, the sun was very bright. I was having a hard time. I am going to try to shoot this evening at sunset.

I also need to learn about white balance. That's something I haven't read about yet. The may be why there appears to be a lot of blue in the photos.

I appreciate the feedback. Keep it coming.
 
Welcome back. I saw your first post some time back, and I'm happy you've taken the advice to shoot what's around you. Believe it or not, most of us never will get the opportunity to see up close the floating city that is an aircraft carrier, and almost any photograph of such a ship will be interesting. Aside from that novelty, however, the images will have to stand up on their own to be appreciated by a larger audience, and this is helped when the images are good both technically and artistically. There are a number of ways to achieve that.

The most common, is to have your image tell a story. As in writing, there are some conventions to follow. Just as most stories have a beginning, a middle, and an end, most storytelling images will have a visual entry point, which will then direct or invite the eye to explore, and finish with an exit. Typically, the entry point is either the brightest or the sharpest part of the image, or if it includes humans, the eyes. Then, depending on the placement of the entry point in the image, we tend to move our eyes towards the center, or along any lines that join the entry point to the rest of the image. Next, we start to depart from our initial visual scan, and we quickly examine the rest of the image. We finish either by letting our gaze drift off the perimeter, or we return to the original entry point. All this typically takes only a few seconds.

Therefore, the usual guideline of using the rule-of-thirds (place your main subject about one third from the edge, with the "power points" being the intersections of the 1/3 lines from the horizontal and vertical edges), allows the eye to drift naturally into the center of the image. Centering the image works less well partly because at that point your eye starts at the center, and in effect, doesn't know where to go next (unless it is a symmetry play, in which case other guidelines apply).

Another concept to keep in mind when developing your story, is that simpler is better. Some of the best images have a clear subject and use the background and foreground to provide context, but do not allow the supporting elements crowd out or overwhelm the main subject. This is why "busy" images with background or foreground in sharp detail, are confusing in that the supporting elements are competing with the main subject for our attention.

Photographers have two tools to direct the viewer's attention: brightness and sharpness. Since the eye tends to look at the bright parts first, the photographer tries hard to ensure that the bright spots are connected to the main subject, and not with the supporting elements. By using your exposure control and arrangement of elements in the frame of the image, you try to have the main subject "own" the brightness high ground. The other tool is sharpness - which is determined by focus and aperture (which affects depth-of-field). Usually, the main subject should be the sharpest, so the focus should be placed on the bright parts of the main subject. Then, apeture is chosen to determine how much of the foreground and background appear distinct (if context is important) or blurred (if otherwise causes distraction).

OK, enough for now... The above is only one way to make images, but in the "story-telling" method, it works well.
 
White balance is determined by the proportions of red and blue in the light. Different light sources have different ratios, and the camera has been programmed with some "standard" ratios. For instance direct sunlight has a certain balance. If you have a subject that is lit by blue sky (ie, in shade), then that light will have much more blue than red. Tungsten light will have much more red than blue. By adjusting your WB on the camera to the type of light source you are using, you will get colours that are more "natural". You could tell your camera to go to auto-WB, and that will work reasonably well, except when your scene has more of one colour than the other and then the camera will be fooled.
 
The reason you are getting a lot of blue in your shots is that your white balance is set to "Cool White Fluorescent". Change it to "Daylight" and a lot of that blue tint will go away, but then remember to set it back to fluorescent for the inside shots. You can also set it to "Auto" and let the camera decide.

I knew you could find some subjects to shoot. There is just way too much going on aboard a carrier not to find something. Great start, keep working at it.
 
Thank you again for all the feedback! I went out at sunset this evening to re-shoot these and get some other photos. They moved everything around on the flight deck, but I still got a few shots. Will try to post them soon.
 

Most reactions

New Topics

Back
Top