i was describing the process to Kara last night in irc and i put her to sleep, so i'll keep it short and sweet.
- heavy cold pressed watercolor paper (don't need to size the heavy stuff if you mount it when finished processing)
- liquid emulsion
- sponge brush
- thin piece of cardboard
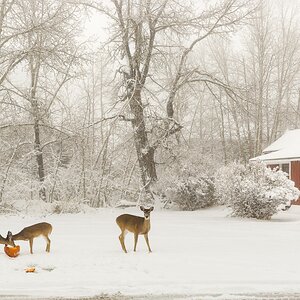
turn on enlarger and adjust it and the easel accordingly. lay cardboard in the area of exposure. scribble a rough outline around the area of focus. cut out this area (don't need to be precise). following emulsion instructions (heat,shake,etc.) lay cutout on watercolor paper. lightly soak the sponge brush and work from the center towards the edges of the cutout so that the emulsion nearly depletes itself as you get to the edge. don't be perfect about the edges. expose and process as normal.
after it is dry, dampen a sponge brush and apply a quarter of an inch or so from the edges of the print (this keeps the flame from taking over everything). with a flame, burn each side until you get your desired effect. the smell is horrible, so don't lean over it.
i probably forgot to make mention of something....let me know if i made sense (i'm only half way through my first coffee).
It took me a couple of seconds to spot what what going on in the photo. It was a nice suprise. Great work motcon. I'm going to have to buy an enlarger soon.
I forgot to mention how lovely I found it, too.... :love: Will proudly displays his mushiness on his sleeve....it gets a little messy in the darkroom sometimes, I'm sure.
yes, it's very much like liquid light. there are other brands or one can make his own. to your query about processing, a cut from my post above:
motcon said:
....lightly soak the sponge brush and work from the center towards the edges of the cutout so that the emulsion nearly depletes itself as you get to the edge. don't be perfect about the edges. expose and process as normal....
The edges are actually burned, that's totally cool. What's the size of the final piece (just for visualizing purposes...)? I definitely want to try some liquid emulsion someday soon...


![[No title]](/data/xfmg/thumbnail/30/30989-2ed4e52fa80fcd0ba553c515ffc589cd.jpg?1619734553)