Beyond Beginner....need help comparing photographs

gioberg11

TPF Noob!
Joined
Oct 12, 2012
Messages
3
Reaction score
0
Hello Photo Forum,

Saying I'm a beginner is an understatement. I build high end homes and would like to try to take photos of them for my website.

I never used a manual setting on a camera until I recently purchased a Nikon D3100, 12 days ago.

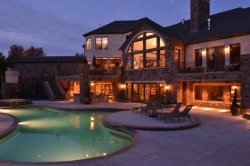
Could anyone tell me what I have to do to get my picture like the one below???

My photo is on the left, the photo I would like to try and mimic is on the right (click on link).
My settings were f-8, exposure 1/3 sec, ISO 1250, 18mm, no flash
White Balance setting was Fluorescent, Mercury Vapor lamps.

I'm so excited for real photographers to look at my photo, critique it, and tell me what I have to do to make it better.
Thank you for looking and your feedback.

Brian
$DSC_0225 Compressed for web forum.jpg http://hendelhomes.com/christmas-lake/
 
Last edited by a moderator:
Welcome the site Brian.

First up we do have a general policy that images which users don't own the copyrights/distribution rights to shouldn't be uploaded and displayed on the site as an embedded image and that they should be linked to from their original source.


That out of the way there area few factors which are likely causing the difference between the two photos, some ideas:

1) the photo on the right looks to have been taken on a wide angle lens with a (circular) polarizer fitted. This helps to counter reflections in the photo from reflective surfaces (excluding metals) and also generally gives a more contrasty/saturated look to the photo. With a wide angle lens on the sky it can also give you that dark band near the top of the photo that you can see.
Note also that most of those effects (barring the reflection countering) can quite easily be done in editing so this could also be the result of some editing as well (note you can remove reflections in editing with the clone and heal tools, but its a more complex process and can take a long time to get right - so in general its far easier to fit and user the circular polarizer).

2) Warmth of the light - the right shot has a much warmer hue to the light which is most likely the result of shooting in the right lighting conditions to best present the property. Your shot has a more cooler light and (at a total guess) I would say is taken a little later in the evening (or on a more heavily overcast day). Shooting in the right light is a big part of photography and you'd do well to look up the theory of "the golden hours" for shooting.

3) HDR/Tonemapping - without getting bogged down in the differences between the two this is a big topic area that you would be well worth investing time researching into. I'm not sure if you used it for your shot that you took or if it was used in the shot on the right - but it is a well used process and for a complex scene with multiple varying light sources and strengths you might well find that you need to use one or both processes to get a final photo that suits your needs. Note that you can do this manually or there is software out there which can merge the photos for you (or tonemap them). Again you'll want to do some research and if you ask around I'm sure some can point you to more in-depth articles or books on the topic.

4) Sharpening, contrast - general editing aspects. These are all important and don't always involve a lot of work, but they do require some adjustment and are important things to read up on.

5) RAW shooting. This is very beneficial for this area of photography because of the desire for quality photos and where you might often need the HDR/Tonemapping aspects. Shooting RAW is a topic unto itself and whilst it can be a bit daunting the first few times it is something you can very easily get into. Again its not about big editing, but it is about having the most light data from the camera and being able to use it the the best possible manner.

Also note that you might want to look at the legal aspects. I'm aware that some countries do have legal restrictions or criteria for photography of properties for sale. Many of these are about trying to ensure that the photographer isn't using photos to miss-represent the property. It is something you want to be aware of since you don't want to accidentally break the rules and end up having troubles over that (and you could easily break them without meaning to).
 
Overread really hit on it with the HDR/Tonemapping.
You will also find benefit to using a tripod and a longer exposure as well as noise removal software.
For buying the camera 12 days ago? You did a good job.
If you want to produce professional quality images like the one you gave as an example it's not as easy as just buying a camera. There is a reason that real estate photographers get paid what they do... You are going to need quite an education in photography as well as a bit of a software investment and probably even some equipment besides a low end DSLR. Now if you want to produce just good images you can get away without the extra camera equipment, but the education and software is still going to be a need.
 
Welcome aboard.
First of all, are you shooting with a tripod? I would assume that you are, because 1/3 would normally be quite blurry if shooting handheld.
(if not, then go buy a tripod right now).
So if you are on a tripod, then you don't need to be at ISO 1250, you could dial that down to 100 or 200. You would then end up using a much longer shutter speed, but that won't be an issue on a tripod....and you will get cleaner images.

As for your image vs the other one...I think the other one has more exposure...the house lights are brighter and the exterior of the house is a big brighter. You could easily do that in your situation but it might make the sky too bright (for what you want). So you could shoot later in the evening, or just darken the sky in post processing (should be fairly easy with the right software).

A big difference is that you have included a lot more outdoor foreground which isn't really lit. The whole area around the pool is quite dark and isn't lit by anything...so it's dark in the photo. The other photo cropped out any foreground patio which might have been dark.

For your shot, as a night time photo, I'd look for a different angle that shows maybe more pool and less patio as the foreground, so that you cut out the dark areas. I'd probably want a daytime shot as well, which can really showoff the pool and patio area. Hard to get pool, patio and house all nicely together in a photo at night.

Another option would be to try HDR and/or tone mapping. This would involve taking several photos at different exposures and combining them in software. The result is that you get a photo with more good tones than you could get in a single photo...but beware, it's easy to go overboard and make it look weird.

I never used a manual setting on a camera until I recently purchased a Nikon D3100, 12 days ago.
You're doing pretty well for just starting. It takes time and practice to get good. I'm sure your first project wasn't as good as the last house you built ;).
 
The first thing I noticed about the photo on the right (before I realized it wasn't your photo) is that it was shot with a wide-angle lens, the building is "leaning" back and that needed to be corrected, but was not (a very easy fix in Photoshop... and a tilt-shift lens (using "shift") would have fixed it as well.) I also noticed that they show the extreme left corner of the building, but then nip it off in a slightly uncomfortable crop.
 
Can't thank everyone enough for the good feedback.

As much as I appreciate what the site moderator said, it might as well have been in Chinese. As I sit here smiling, I can honestly say I've never heard of 95% of that photography jargon.

With that said, Big Mike, I did not use a tripod. I read that my iso should be at 100 which I set my Nikon D3100 to, but it automatically adjusts it if there is not enough light. So my next question may be stupid to some but, how do I get the iso to stay at 100? Open the f stop? Lower the exposure?

I do plan on investing in a 10-24mm wide angle lens.

And I definitely need education. Anyone know any good real estate photography books? Found some good online sites but they don't usually get into to many specifics about what settings where used.

Thanks again for the great feedback. I will be reading up on Tonemapping tonight.

Brian

Welcome aboard.
First of all, are you shooting with a tripod? I would assume that you are, because 1/3 would normally be quite blurry if shooting handheld.
(if not, then go buy a tripod right now).
So if you are on a tripod, then you don't need to be at ISO 1250, you could dial that down to 100 or 200. You would then end up using a much longer shutter speed, but that won't be an issue on a tripod....and you will get cleaner images.

As for your image vs the other one...I think the other one has more exposure...the house lights are brighter and the exterior of the house is a big brighter. You could easily do that in your situation but it might make the sky too bright (for what you want). So you could shoot later in the evening, or just darken the sky in post processing (should be fairly easy with the right software).

A big difference is that you have included a lot more outdoor foreground which isn't really lit. The whole area around the pool is quite dark and isn't lit by anything...so it's dark in the photo. The other photo cropped out any foreground patio which might have been dark.

For your shot, as a night time photo, I'd look for a different angle that shows maybe more pool and less patio as the foreground, so that you cut out the dark areas. I'd probably want a daytime shot as well, which can really showoff the pool and patio area. Hard to get pool, patio and house all nicely together in a photo at night.

Another option would be to try HDR and/or tone mapping. This would involve taking several photos at different exposures and combining them in software. The result is that you get a photo with more good tones than you could get in a single photo...but beware, it's easy to go overboard and make it look weird.

I never used a manual setting on a camera until I recently purchased a Nikon D3100, 12 days ago.
You're doing pretty well for just starting. It takes time and practice to get good. I'm sure your first project wasn't as good as the last house you built ;).
 
A few resources that might help you out:

Cambridge in Colour - Photography Tutorials & Learning Community (check under the tutorials tab)
Ron Bigelow Photography Articles

You might also want to look up the books:
The Digital Photography Book series (1-4) by Scot Kelby
Understanding Exposure by Bryan Peterson


The first Scot Kelby book is ideal for people who just picked up the camera and have no idea; it provides simple guides and ideas to use as well as suggested settings. Its the kind of book you can grow out of fast though and you might get more milage out of the rest of that series. The understanding Exposure book is one of the most recommended as good starting point as well as it gives you a good guide on exposure control.

The tutorials and guide websites are a great follow on from that, esp with editing advice. I would suggest reading up on:
Exposure articles
Expose to the right
Histograms (very very useful - simple and useful)
Sharpening and Noise removal (important steps
HDR/Tonemapping - a big one for your area of interest.


Also with Tripods get a good one. The cheap $15 sort are, well they work but are very limited in the angles you can shoot and in their stability. A good Manfrotto 190 or 055 series tripod with a good 3 way head should suit you (an ideal tripod head for landscape/architecture is either a good solid 3 way head or a manfrotto junior geared head - however the latter is very much more specialist in how it operates and is a bit more limited in versatility outside of slow moving/no moving subject shots.


PS - no worries about all the jargon :) It's often very easy to forget how confusing all that can appear when its just "basic" stuff to those who've been into the hobby/skill for more time. Honestly the fact that you're honest about it is a good thing. Read up and more of the points should start to become clear. :) And if not don't be afraid to ask questions.
 
I read that my iso should be at 100 which I set my Nikon D3100 to, but it automatically adjusts it if there is not enough light. So my next question may be stupid to some but, how do I get the iso to stay at 100? Open the f stop? Lower the exposure?

you need to take your camera off 'auto iso'. then it will stay on what you set it at ;)
 
Tripod... read the manual... use the timer or a remote to fire the shutter... read the manual... shoot in RAW... read the manual.... bracket the exposures.... read the manual.... read the manual some more. Although the comparison photo is no longer visible, I'm betting the guy that took the shot did not just recently pick up a camera.

For a shot handheld at 1/3 second you were pretty steady, but a tripod is going to dramtically sharpen that image up. Really nice house.
 
Without meaning to sound too full of myself.. why not hire a professional? What advice would you give me, were I to say, "I have a hammer, how should I go about building my new house?". Obviously, you're into high-dollar structures, It seems to me that would justify the [relatively low] cost of retaining a professional photographer who already has the equipment, skill and knowledge to do the job right, the first time.
 
Yup. I've been in the framing business as well as real estate. I know the skill that goes into these houses. I also know the value of good pictures in marketing a property. You aren't far from me, but it's a different market. Around here, the goto guy for real estate pics will shoot a home and give you 30 pics on a disk for $100-$150. Masons will spend that much in propane per day keeping their tent warm so they can keep working on the front of the house through the winter. It really is a pretty small investment to either sell a home or sell yourself as a builder.
 
If you look at the photos you are comparing you can see that a lot of set up went into shooting those shots. Little tells are when you see extra light or shadows that fall from places where the lighting would not fall that way (i.e. the bar shot with the light coming out the left entrance of the bar). It takes several lights and the ability to control/meter them to get correct exposures..... and then a little photoshop magic afterwards. Not something that is easy for even an experienced photographer to do without lots of practice and equipment.
 
For only owning the camera (and your first DSLR) for 12 days, your shot is absolutely fabolous.
 

Most reactions

New Topics

Back
Top