Bridal...Sort of...

Shades of Blue

No longer a newbie, moving up!
Joined
Dec 16, 2015
Messages
144
Reaction score
37
Can others edit my Photos
Photos OK to edit
I've been taking a lot of the advice I've been getting here the past couple weeks and trying to really up my game. A lot of folks have commented on my under exposure, white balance, and focus issues and I've tried taking that advice to heart and do better with my shots.

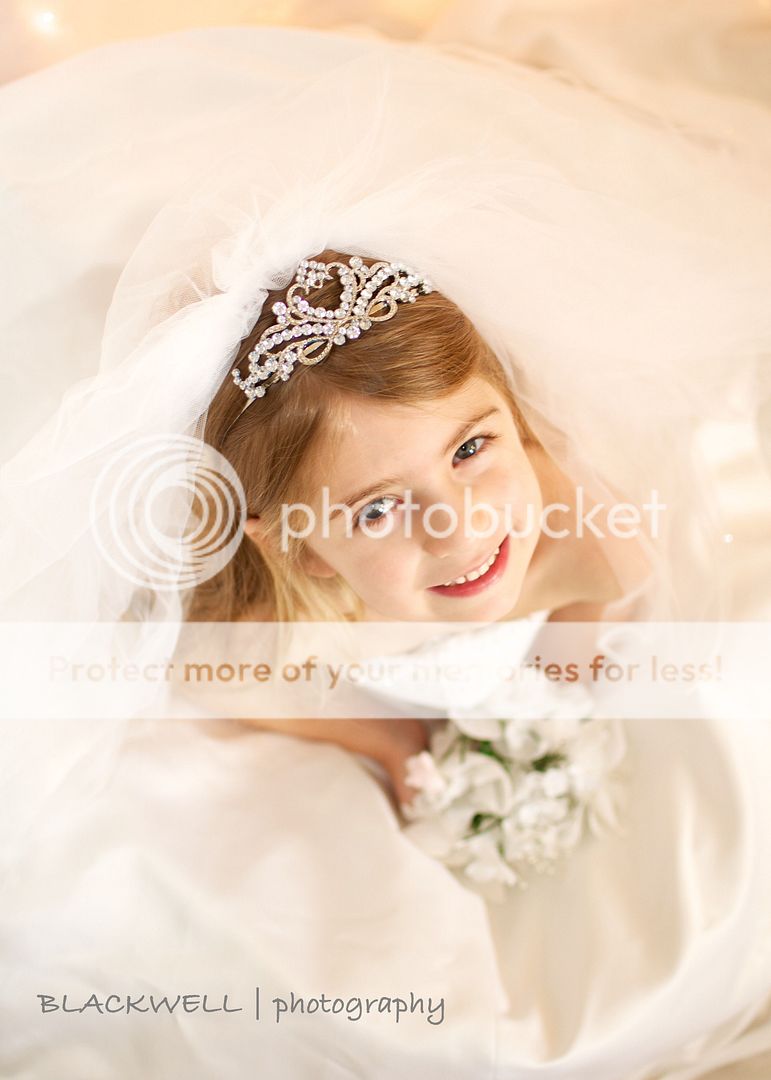
Here is a picture of my daughter wearing her mother's wedding dress. She just ate this up! I shot in aperture priority mode at what seemed to pair with a pretty consistent 1/60 shutter speed. This is using my Nikon 35mm 1.8 lens.

I'd like some more advice as to how these look for a second go around. I'm still having trouble getting tac sharp focus. I'm thinking I should have adjusted the shutter speed, but really wanted to use the 1.8 setting. Also, I shot in RAW and the photos got a little fuzzy when saved to JPEG...I chose the highest quality setting so I have no clue what's up...

I realize there are 5 photos, if that is too much just pick a couple to review. Not looking for individual critiques per photo, just a general consensus on if I'm heading in the right direction...


Overall, these aren't bad. I do see what appears to be missed focus; the tiara seems sharp, but focus seems to fall off around the eyes and face. To solve this, ensure that you use single-point AF and place that point on the nearest eye.

HOWEVER... WHY do you want to use f1.8? Because that's as wide as your lens goes? If I were shooting this, I would have been thinking more in range of f4 - 5.6. At f1.8, your DoF was probably in the area of 6", whereas if you'd gone to 5.6, you'd have had about 15"; plenty to work with, and still give you a soft, OOF background.

Exposure-wise, you're close, but the whites are just a bit hot; I don't think anything's blown, but you are losing detail in the nearest areas of the dress.
 
Overall, these aren't bad. I do see what appears to be missed focus; the tiara seems sharp, but focus seems to fall off around the eyes and face. To solve this, ensure that you use single-point AF and place that point on the nearest eye.

HOWEVER... WHY do you want to use f1.8? Because that's as wide as your lens goes? If I were shooting this, I would have been thinking more in range of f4 - 5.6.

Exposure-wise, you're close, but the whites are just a bit hot; I don't think anything's blown, but you are losing detail in the nearest areas of the dress.

Thanks! I was aiming for 1.8 because my house doesn't have a ton of light, and it was a cloudy day. I used my speed light and got it as bright as I could. That and I wanted to really blur the lights behind the sheet.

I don't really know what's up on the focus. I used spot focus and locked in on an eye and recomposed.
 
You'd like to create beautiful, lovely, amazing close-in portraits of this adorable concept and set-up, right? I will give you some excellent advice : STOP USING f/1.8.

You write, "I don't really know what's up on the focus. I used spot focus and locked in on an eye and recomposed."

f/1.8 is, "What's up with the focus".

You are doing the equivalent of driving 85 miles per hour through a residential neighborhood.

Thanks! I'll move it to 3-4 next time!

Looking back I wish I tried different apertures. I get about 15 minutes of my 4 year olds attention span on shoots so I just set it up and got what I could!
 
Last edited:
I think it's a cute idea, and your model is adorable! I love the different expressions you got out of her. I think #2 and 5 are the strongest, and I think #3 is the weakest...try to avoid the "cheese!"

I'm wondering about your lighting set-up. I'm trying to guess from the reflections...is it a window on camera right and a speedlight on camera left? If so, I think the speedlight was just a tad too low for my taste, especially in #3. It looks to me like it's hitting her chin and cheeks before her forehead. I always prefer to see light falling down a person's face.

There also seems to be just the tiniest touch of mixed lighting....I can't even quite put my finger on it, but I feel like there's a yellowish light mixed in somewhere. On her hair, maybe? Or maybe there's a yellow wall causing a color cast?

The aperture issue has been pretty well covered. Generally, I don't have an issue with wide open apertures in portraits, but with kids, it's just not going to happen. If you want to experiment, try it with an adult who will stay perfectly still. Also, in my opinion, I wouldn't do the focus/recompose method at 1.8. I would use flexible spot and keep the camera dead still on a tripod. As long as the lights are far enough back, they'll still be blurry enough even if you stop down.

You really are growing and developing by leaps and bounds. You're doing fantastic!!


You nailed it on the lighting. The windows are on the right of the camera and the speed light is on the left. It wasn't quite enough so I added a lamp by the window which even though it introduced the yellow light, it was all I had at home. I'm saving for a flash kit and some umbrellas but right now I don't have much.

I agree with everyone on the aperture setting and will try to not go so wide open next time.
 
You are doing the equivalent of driving 85 miles per hour through a residential neighborhood.
Or drinking water from a garden hose on full blast.
 
Spot focus Aiming at f/1.8 and then recomposing normally doesn't work unless the spot you focused on AND the spot you want in focus are in the EXACT same focus plane.

Also, to get better sharp photos you need to have a faster shutter speed.

Learn to shoot in Manual where you can select the Aperture AND Shutter speed that you need for the shot rather than hoping the camera can figure out what you really want.
Set your ISO to AUTO with a max that you are comfortable with. And shoot away. If there are issues then compensate your settings to get the shot.

I know a lot of people swear by Aperture or Shutter Priority but I prefer Manual so that I know the correct Aperture and the correct Shutter are being used.

Btw, I hope you have already printed those photos, framed them and hung them up in your house .. they're adorable.

Thanks!

I actually started in manual mode and then decided against it simply because I knew I wasn't going to have a lot of time to adjust everything once we started. I did a family shoot over the Holidays with my parents and used manual mode and they turned out pretty good.

But, I'm agreeing with you that once I'm more comfortable with manual mode I will be using strictly that.
 
Looking back I wish I tried different apertures.
You don't have to guess a lot or try many different apertures. If you know the pose you want, the distance, and how much you want to be out of focus (personally I wouldn't want any to be OOF on purpose) you can run the numbers in a DOF calculator. I put one on my iPhone to have handy.
 
^^ I have to agree there.

You have to test your distance / aperture settings.
use inanimate objects for this testing to familarize yourself with distance to DOF.
==> Understanding Depth of Field in Photography

get the shots right,
then work on background OOF techniques.

It took me experimenting with inanimate objects (the kids stuffed animals, etc) to understand aperture better. Then the DOF calculators really let you understand it well especially when you use it, the inanimate objects and a ruler so that you can see the DOF calculator really is right.

When I was young I always wondered why a photographer we used used a string to determine the distance to the subject.

After you test it and become comfortable you then approach a shot thinking of what Shutter and Aperture would work best, and then work from there.
 
Last edited:
An aperture of f/1.8 and 1/60 second at an ISO level of 320 is what is giving you to exposure for the mini-lights, at whatever white balance you were using that made the lights yellow. If you want the lights to be warm, and yellowish, then Daylight white balance is the WB you would want to use. If you want the mini-lights to appear whiter, then they would need the camera white balance to be set to some point in the Tungsten WB region. The flash that illuminates the dress and the girl needs to be gelled to equalizer/normalize it toward the white balance used for the mini-lights.

Normally, this would be done by setting the camera's white balance to Tungsten, and then taping an orange-colored gel over the flash head, to make the light from the flash "match" the Tungsten WB source's approximate color temperature. But that is not absolutely necessary--it's an artistic decision.

If the subject is lighted by flash, then you can use a slow shutter speed (say 1/15 to 1/6 second most likely) and a smaller aperture, like f/5.6 or so, and get the lights to register however brightly you would like them to be; slowing the shutter down obviously would brighten the lights, faster speeds would make them look darker. If you are lighting the subject with flash, you can use a slow shutter speed to control the brightness of the minilights.

This is not just simply the basic exposure triangle situation--this is actually two, separate exposures, with two different sources of light...the minilights, and their white balance and their exposure, and then the flash's light that exposes the girl and her wardrobe.

Thanks for that! I tried a few of the white balance settings. Throughout the settings I was finding that her dress either looked blue or yellow. I set it to auto and her dress looked white so I went with it. I actually warmed up the white balance in iPhoto because her skin looked a bit white. It added some yellow back into the photos, but I preferred the look overall.

I guess I didn't make things easy on myself by using 3 different types of lighting and a wide open aperture huh? lol
 
Yes, your struggles here are prety well-understood. For example a blue-tinted white dress result is the exact, direct, and totally expected fault of using a tungsten WB setting to get the minilights looking white....to cancel out that unpleasant blue skin tone in the foreground areas lit by the flash, you need a fairly orange-hued filter to correct the flash's light's color temperature value: the cheapest, easiest thing to do is to go to a pawnshop and buy something like an orange, 85B filter in 72mm size, and literally cellophane tape that filter over the speedlight's Fresnel lens.

The issue is made significant by the f/1.8 aperture and the ISO 320 combo...at that high an ISO, and at that wide an aperture, and at a shutter time of 1/60 second, ANY ambient lighting will easily register on the sensor. So, that exposure "triangle" creates a pretty strong, let's call it the base-level exposure....the f/1.8 aperture, at ISO 320, and a moderate speed like 1/60, collects a huge percentage of the ambient light from the mini-lights. That light tends to look warm witht he WB set to 5,000-5,500 Kelvin, and yellowish....so, to correct that, you adjust the White Balance to a lower number value, say 2,900 to 3,200 Kelvin. But thennnnnnnn, if you fire "cooler", 5,500 Degrees Kelvin or "daylight white" electronic flash at her.... she and her dress turn blue...very blue.

This is actually a very common issue whenever mixing artificial lights of many types, with electronic flash or strong daylight.

At wide f/stops, and at elevated ISO levels, and with low-powered flash, the clash of color temps is very obvious. A small flash pop doesn't carry very far, and at f/1.8, you can literally see the way the orange-colored light creeps in at the bottom of the dress, but the face and chest areas show the dress as white-white...

You're kind of right...this is a tricky situation, with multiple light sources, of different color temperatures, and white fabric and a base-level exposure that collects a LOT of light from ambient sources AND which also needs/allows only a very tiny bit of flash!

My experience in this is that the easiest solution is to use a telephoto lens, and to try and separate the background lights from the subject, so there's a physical "gulf" between the two light sources; see how the yellow light creep in, and wraps around the bottom of her dress? That's because that light, that ambient light is actually, physically falling on HER dress!

The issue is that f/1.8 at ISO 320 and 1/60 second causes diffuse ambient light to register easily; the mini-light bulb, the bulbs themselves, shine light on to where she is seated. Tungsten White Balance on-camera, then orange-gelled electronic flash on the subject is the basic strategy here. but there is no one proper, final way to balance these things, as your final image processing shows; you might want a warmer look than what is mathematically "correct", since warm skin and warm whites are associated with sunny, happy feelings. Blue-tinged things are cooler, colder, less-happy, so the blue skin hues you corrected by making adjustments is a really good decision you made!
 

Most reactions

Back
Top