Dark Toned BAND Photography - Can't explain it, but need some advice!

KyleGP

TPF Noob!
Joined
Apr 28, 2010
Messages
1
Reaction score
0
Location
Australia
Can others edit my Photos
Photos NOT OK to edit
Hi guys/girls,

I'm getting into Band photography and one thing (not only for band photography) I've always wanted to learn is this particular technique.

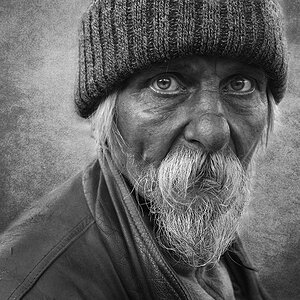
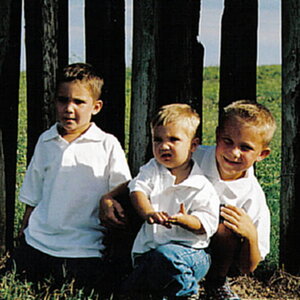
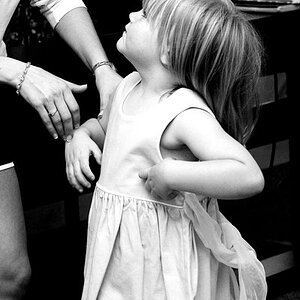
Take a look at this picture:
20giu86.jpg


See how everything is very dark, crisp, well toned, shadowed. Just look at it, and hopefully you'll understand me.

Now no matter what I do, I can take a picture and adjust the curves and it will look great but not to that extent. How do they make it that rich and crisp with nice shadows? It almost doesn't look real, it looks great!

I'd really like some techniques on how to adjust pictures in this manner. I have a shoot on sunday and I'd like to know what I need to do to adjust my photos to look like that.

They also do this on many band posters across the world, but how are they doing this? What is the technique? or is it just special curve adjustment!?

Help on this would be MUCH appreciated!
 
Its really all in the editing, using curves adjustment layers and playing with colour tones and levels.
However if you want a quick dark and grungy effect i would look into obtainling an action called 'Draganizer'. It is probably a bit too much for what you are after, but you could always use it on a duplicate layer and then reduce the effect to get a nice blend of the two.
 
If you use the photoshop unsharpen mask, it does something similar.
 
It looks like the detail is nearly all the way up, in Lightroom, with the shadows and highlights adjusted.

Just a little input...
 
alot of it has to do with the lighting, but in this the contrast was cranked, curves adjusted to make the shadows even more blocked up, and than high-pass was applied to give it that overcooked look.
 
in photoshop you could try adding a hue/saturation adjustment layer, set your saturation to -100. set the blending mode to overlay and then mess around with the layer's opacity... i think that should give you a nice starting point.
let us know how it went

nacho
 
If you use the photoshop unsharpen mask, it does something similar.

A lot of it. It creates the halos around the people as well.

That's not a very good picture, imo.

Yeah. That's what I was going to say. When I saw the photo before reading, I figured that that was going to be your "I'm trying to do something, but this is all I'm coming up with" photo. There a lot of black clipping in a photo of dark clothes people standing in front of a dark object. Basically there is no separation between the people and the train, and it's just a bunch of floating heads and body parts. Having dark photos is one thing, but anything dark in the photos has just been pushed to full on clipped black, and thee no detail in the shadows. And yet the sky is blown out. If the guy wanted a dark photo, at least keep the sky in rather than blow out the sky and then darken everything else in post. I think you can set your goals higher than trying to recreate that photo...
 
I think this is less to do with PP as much as it has to do with the exposure at the time of the shot. You have very dark darks and then you have a very bright sky. If you expose for the darks, the sky gets blown out. If you expose for the lights the darks are very underexposed.

There several ways you can try to correct this:

1. Use center weighted average metering mode to try and even out the exposure or;

2. Use spot metering and find something in the scene that makes for a good midpoint in exposure. Lock that in and recompose or;

3. A graduated filter that can darken the sky a little and allow you to expose for the darks while maintaining detail in the sky.

PP is a major part of digital photography but it is a good rule of thumb to get the best exposure and sharpness possible when shooting to minimize the time spent in PP.

In terms of recovering this image. I would just correct for the darks which will blow out the sky. After you do that, isolate the sky with a mask layer and find a good image that you already have of a well exposed sky and use it to replace the blown out one in your original composition.
 
1) Make duplicate multiply layer.
2) Adjust opacity/erase other parts.
3) Voila.

+ a few other little tricks that I won't get into right now.

I'm telling ya, photoshop books teach more than any video tutorial will as long as you find the right one (read: Kelby).
 

Most reactions

Back
Top