Decoding Woodsac...

theheater

TPF Noob!
Joined
Feb 17, 2007
Messages
72
Reaction score
0
Location
Halifax, Nova Scotia
Can others edit my Photos
Photos OK to edit
Since I have became a member of this forum, I have been extremely impressed with many of the photographers here. However, the one photographer who has stood out the most in my opinion is Woodsac. So, what better way to honour him, then decode his photos in order to see how each of them were created....

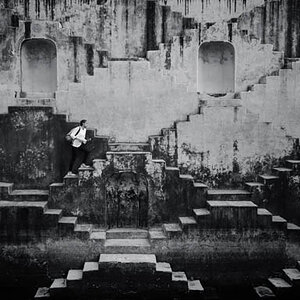
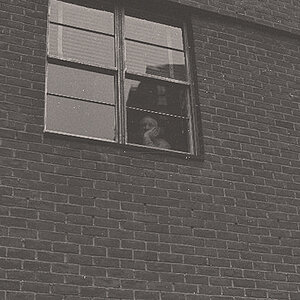
With that being said, lets here everyones opinions, how does he get the clouds to look so evil? I absolutely love it... Also, many of his photos have a real mean cartoon look, how does he achieve this?

140277274-L.jpg


How do I get these clouds??

133792986-L-1.jpg


Again with the trademark clouds, and this looks like it has the addition of a fisheye?

128858216-L.jpg


Anyhow, I am fairly new to the world of photography, and I would love members to decode these photos, and pass along the secrets and knowledge. Thanks Woodsac on the constant creations, and please keep them comming.
 
They are all HDRs with some photoshop post-processing. But what kind of post-proseccing I don't know, and I am also curious what specific post-processing he does.
 
I would like to know as well, his pics have always impressed me too. I don't want to ask the master to reveal all his secrets, but a few hints would be nice:lol:
 
Several exposures of the same scene, then converted to a HDR image using Photoshop, Photomatix, or something similar, then tone mapped to what you see.

The artistry comes from :

1. The original photos themselves. They have to be interesting. Also you have to have a feel for how they will come out when they are tone mapped, otherwise you will be taking pictures of things that look sucky when they are finally processed.

2. The tone mapping process itself. Believe me, this is an ART.

I agree with you, but I think he edits the pictures in photoshop after the tone mapping.
 
First, I think it's great that you guys appreciate what I do. I say it all the time, I really appreciate every comment made by everyone. I say it because I mean it!

I don't have any secrets with my photography. The pictures above and most of my other hdr's are all multiple exposures. I'm not very fond of single converted images. I don't think people should label those hdr's, but rather "Tone Mapped".

A common question is how do I avoid any motion. Well sometimes I don't. I like it. It gives the image life. But for images like the sheep above...you have to spend some time cleaning up any movement in PS.

My workflow is pretty basic, but it's different for every image.

First, I convert my RAW exposures to Tiff.
Next, combine exposures in Photomatix Pro.
Next, Tone mapping.

1. The original photos themselves. They have to be interesting. Also you have to have a feel for how they will come out when they are tone mapped, otherwise you will be taking pictures of things that look sucky when they are finally processed.

2. The tone mapping process itself. Believe me, this is an ART.
I couldn't have said it better! I try to envision what the image will look like with different variations of tone mapping. I want some images to look more surreal than others. But believe me...hdr is not for all images. I wasted a lot of time trying to convert everything to hdr. Most of them went in the trash.

After tone mapping, I go into Photoshop. First thing I always do is some type of levels adjustment. I say some type, because I may not actually be adjusting levels. I am more concerned about "blacks and whites", not grays. One way I adjust these (there are 50 ways to do it)...
duplicate layer
select >>> color range
click on a white portion of the image
adjust to somewhere around 100-150? depends on the image

select >>> feather >>> 15-25 pixels
go to >>> image >>> adjustments >>> levels
now adjust so to push the whites. some portions may get blown out, that's ok. I just erase those images with a low opacity until I get the detail back. Small, soft brush about 20%.

Then I flatten the image and repeat for blacks if I need to. But that's not very often.

Next, I lower the overall saturation about -40. Now I create a new contrast layer. I really like to push the contrast with the hdr's...because they generally don't have any :) HDR's tend to be very flat after tone mapping. The more you increase the contrast, the more saturated the image becomes. If you lose any detail while adjusting the contrast, just paint over it in the layer mask to bring it back.

*do some reading online if you're not familiar with layers and masks!!!

From this point, it's just small tweaking until I get the desired effect I'm going for. I wish I could show you step by step, but like I said, each image is completely different. But my workflow remains basically the same as above.
 
Quite a few of you have asked for this, so I'll do my best. I'm not very technical when it comes to this stuff. I have my own style, and I know what I like to see. That's how I determine the outcome of my shot.

First, HDR = High Dynamic Range

HDR is best used to your advantage when you can not capture the entire tonal range of a scene. For example, a landscape with bright, white clouds, and dark, deep shadows in the fg.

HDR does not have to make your image look painted, fake or cartoonish. It can easily be used to simply help restrain highlights, and open up shadows. Much more effective than basic adjustments in PS.

True HDR images require a minimum of two shots. One for the highlights and one for the shadows. However, you are better off doing a minimum of three. Three to five shots is ideal.

Tip: you do not always have to shoot 0EV, +/-EV in equal stops. For example, if a scene is extremely dark, I may shoot one properly exposed frame, and the next two frames may be +2EV and +3EV. Adapt to the surroundings.

In most cases, a tripod is highly recommended! It's basically a necessity with more than three exposures.

Do Not change your aperture! Shoot in AV Mode, or Manual Mode. If you're shooting Manual, adjust your exposures with the shutter speed only. Most of today's dslr's have an Auto Bracket feature. Very handy for shooting three different, rapid exposures. Consult your user manual if you are unsure if your camera is capable of doing this.

Ok...onto the basic software editing. There are a few different software titles specifically for combining HDR's. You may also use PhotoShop. For my example, I am using Photomatix. I've found that I have much more control with the fine tuning of my image inside Photomatix than I do in PS. PS is very capable, but it requires a few extra steps.

Open Photomatix

Go to HDR>>>Generate

138154873-L.jpg


When the new dialog opens, find the images you wish to merge to HDR. Once inserted, click OK.

The next dialog box that appears will give you some more advanced features. Most are pretty self explanatory. I always check "Align Source Images". This helps to prevent any ghosting.

138154880-L.jpg


Click OK

Photomatix will now convert the selected images and display an HDR. It'll be pretty horrific looking...don't worry.

138154882-L.jpg


Once the image is displayed, Go to HDR>>>Tonemapping

138154885-L.jpg


Now, you're HDR will appear in a new window with all the features to adjust and fine tune your image. This is where you begin to see your HDR come to life.

138154890-L.jpg


Now, as to not confuse anyone, I'm just going to let you run wild! Because each persons taste varies widely, you'll need to just start moving the sliders around. Go from one extreme to the next so you can get a better understanding of how each function affects your photo.

Below are my three sample images and the final HDR image. I tried to keep the photo looking as "real" as possible. By that I mean, the only indication you should have that the image is an HDR, is the complicated exposure blending so nicely. It would not be possible to get the detail in the bg, and also expose for the dark shadows. Using PS would take several layers and extensive work.

Also, you'll notice that I strayed from the traditional 0EV, +2EV, -2EV.


+1.67EV

138155332-L.jpg


-0.33EV

138155326-L.jpg


-2.33EV

138155328-L.jpg


Final Image

136978211-L.jpg


For me, my HDR's never stop at Photomatix. I always take several additional steps in PS. One thing that is inheritant of HDR's, is that they lack contrast. Once inside PS, I usually adjust levels, contrast, and hue/saturation. Lately, I find myself doing more and more selective dodge/burn. I especially do a lot of burning to areas that have a lot of texture. The HDR tends to flatten those areas. Per the example above, anywhere that you see rust, I burned those areas to make the rust stand out from it's surroundings.

If I confused anyone...sorry If not...great!

If I missed anything that you can think of, please add it. I'll do my best to answer any questions you may have. If you read through this entire thing...thanks for the support!!! Even if you don't plan on doing HDR's, I appreciate you taking the time to look.
 
I'm very fond of the antique car shot. Nice work. Good to see someone getting plenty of use from the full frame fisheye. Great tool.
 
woodsac....thank you, once again youve taken the time to show us how its done, ive been having real problems with cs2 with hdr stuff, never even heard of this program...time to download it eh?
 
awesome woodac
i made some triple exposures here in New Zealand. Gonna try and make them look a bit better then my earlier attemps. The URL is in my favourites now
Thanks man
 
Photomatix is a great tool. It really comes in handy, and it does a better job than the CS2(or CS3) HDR tool.
 
First, I convert my RAW exposures to Tiff.
Is there a benefit in converting to tiff first instead of just importing the RAW files straight into photomatix?
 
I don't know how I missed this thread...but thank you to Mr.Woodsac for posting it.

Is there a benefit in converting to tiff first instead of just importing the RAW files straight into photomatix?
I know nothing about Photomatrix, but would it even allow you to import RAW files?
 

Most reactions

Back
Top