mimstrel
TPF Noob!
- Joined
- Jun 27, 2008
- Messages
- 121
- Reaction score
- 1
- Can others edit my Photos
- Photos OK to edit
A few months ago I mentioned that I was planning to make a camera bag for all of my camera gear, so it isn't so much all over the place. Someone requested that I do a tutorial to demonstrate how I go about this.
I'm just starting now but thought I may as well begin posting the how-to in case anyone is interested. Please try to ignore the complete lack of composition and occasional blurriness of the photos - I'm working on this all in my dorm room and space and lighting is at a premium!
As a short disclaimer: This is not a good project for a beginner. It's not that I want to discourage people from trying new things, but do yourself a favor and practice on something simpler first. If you are trying this or trying to design your own bag not based on mine, feel free to pm me if you get stuck.
OK, now to start:
I do want all of my current camera stuff to fit into this backpack, with room to add maybe a dSLR and a couple more lenses, BUT I want it to be modular. Oh, and I want it to be inexpensive. So here's most of what I want to put in at the moment:

That is: my three digital point and shoots and their various accessories, and my grandpa's Nikkormat FTn 35mm SLR plus its flash and lens... plus whatever else I might obtain in the near future.
Now, if you are interested in making your own camera bag, you may be thinking, "But I have different stuff," but I assure you that my directions are generic enough that you should be able to easily adjust to your own situation.
My plan is to create a backpack with a main compartment which is split in half for the larger camera bodies and the SLR lenses, a smaller but still large compartment for batteries, memory cards, cords, and other accessories, and three small pockets for the 2 smaller point and shoots and the waterproof case. As I progress I will mention how you can customize this plan so that you may follow this tutorial and come up with something that looks nothing like mine!
Because I don't have a sewing machine in my dorm right now, I am beginning with the removable pockets. There will be many, and I am attatching them via snaps. Velcro, ties, buttons, and keyrings can all be used. Most people would use velcro, but I don't like that the rough side of velcro snags things.
I am creating two basic styles of pocket: flat and box. Flat works well for batteries, memory cards... things that are flat. Boxes work well for battery chargers and other things that are not flat.
Here is the basic directions for a flat pocket: (Keep in mind that you can do this MUCH faster by machine sewing!)
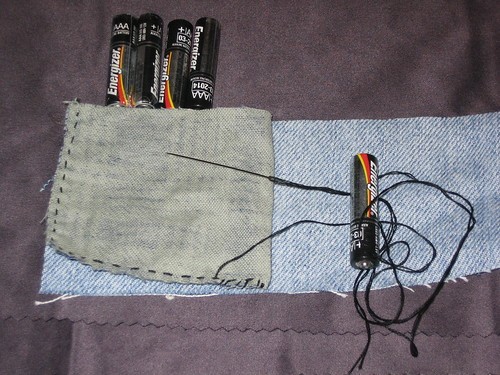
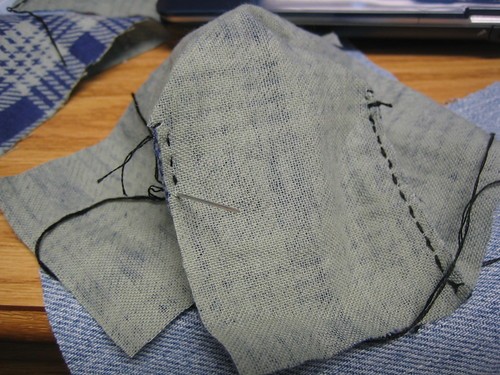
Taking into consideration the size of your object and how many you want to fit in your pocket, cut out a piece of fabric big enough to fold in half and fit the item(s) inside. I am using flannel for the lining of this pocket and denim from old jeans as the exterior. You don't have to do a lining if you don't want to. Fold the fabric in half, right sides together, and sew around so that one side stays open. I usually stitch it twice when handsewing to be sure the seam is sturdy. Do the same for both the lining and exterior fabric if you are lining your pockets. Turn the exterior right-side-out and place the interior into it.

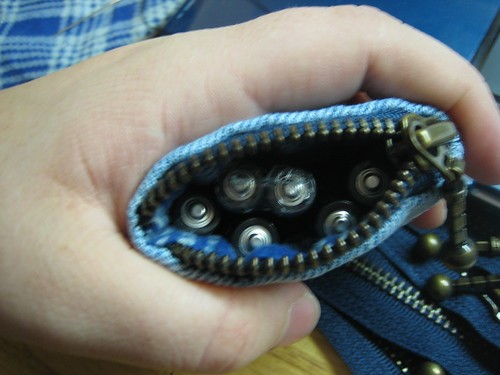
In this case I added a zipper as I was sewing the interior and exterior together. DO NOT USE A ZIPPER ON A POCKET THIS SMALL. It was ridiculously hard to wrestle into position with so little space to maneuvre. To close a pocket of this size, add a flap by sewing a piece of interior to a piece of exterior and seaming it into one side of the pocket. Then you can close it with whatever type of fastener you want!
Here's how to do a box:

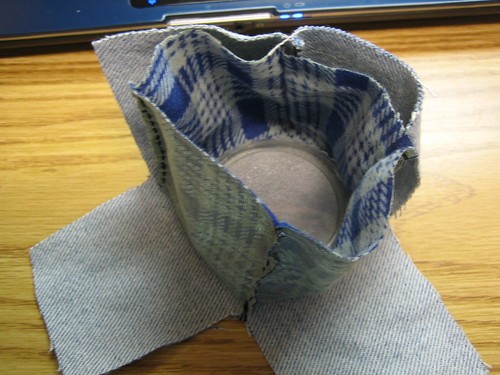
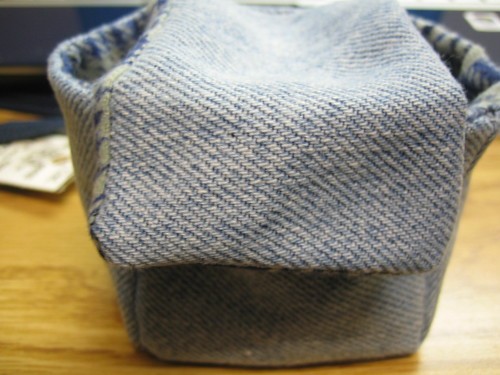
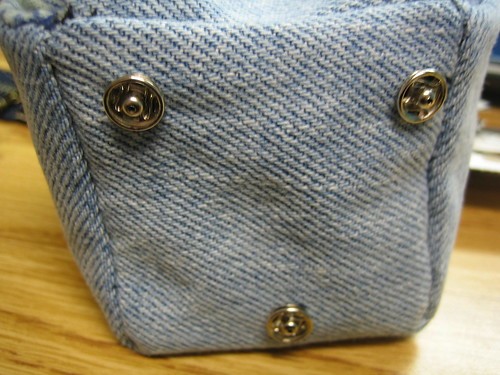
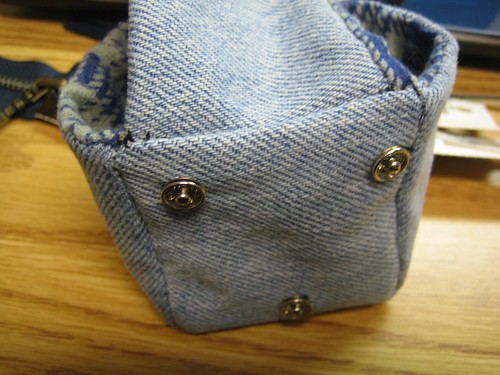
Again, take into consideration the size and number of items to go into the pocket (In this case I am making a box for my current and future filters). Cut out a cross shape. I made this one with all 4 arms the same length - I recommend creating a "lid" by making one arm twice as long. The length of the arms is how deep the box will be. Again, I am lining all my pockets. You can just as easily skip the liner.
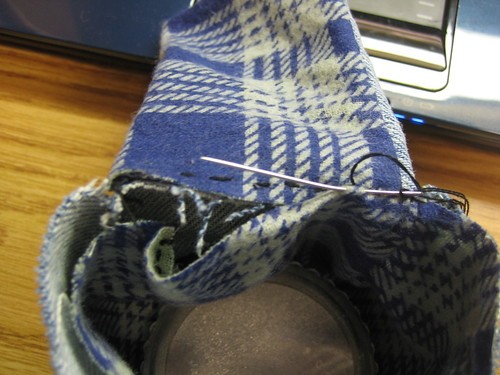
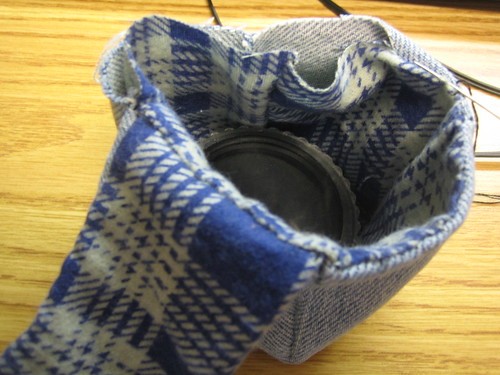
Fold the arms of the cross up to make a box. Then, right sides together, seam each of the corners.
 http://farm4.static.flickr.com/3039/2858343930_4d3038b72f.jpg?v=0
I'm just starting now but thought I may as well begin posting the how-to in case anyone is interested. Please try to ignore the complete lack of composition and occasional blurriness of the photos - I'm working on this all in my dorm room and space and lighting is at a premium!
As a short disclaimer: This is not a good project for a beginner. It's not that I want to discourage people from trying new things, but do yourself a favor and practice on something simpler first. If you are trying this or trying to design your own bag not based on mine, feel free to pm me if you get stuck.
OK, now to start:
I do want all of my current camera stuff to fit into this backpack, with room to add maybe a dSLR and a couple more lenses, BUT I want it to be modular. Oh, and I want it to be inexpensive. So here's most of what I want to put in at the moment:
That is: my three digital point and shoots and their various accessories, and my grandpa's Nikkormat FTn 35mm SLR plus its flash and lens... plus whatever else I might obtain in the near future.
Now, if you are interested in making your own camera bag, you may be thinking, "But I have different stuff," but I assure you that my directions are generic enough that you should be able to easily adjust to your own situation.
My plan is to create a backpack with a main compartment which is split in half for the larger camera bodies and the SLR lenses, a smaller but still large compartment for batteries, memory cards, cords, and other accessories, and three small pockets for the 2 smaller point and shoots and the waterproof case. As I progress I will mention how you can customize this plan so that you may follow this tutorial and come up with something that looks nothing like mine!
Because I don't have a sewing machine in my dorm right now, I am beginning with the removable pockets. There will be many, and I am attatching them via snaps. Velcro, ties, buttons, and keyrings can all be used. Most people would use velcro, but I don't like that the rough side of velcro snags things.
I am creating two basic styles of pocket: flat and box. Flat works well for batteries, memory cards... things that are flat. Boxes work well for battery chargers and other things that are not flat.
Here is the basic directions for a flat pocket: (Keep in mind that you can do this MUCH faster by machine sewing!)
Taking into consideration the size of your object and how many you want to fit in your pocket, cut out a piece of fabric big enough to fold in half and fit the item(s) inside. I am using flannel for the lining of this pocket and denim from old jeans as the exterior. You don't have to do a lining if you don't want to. Fold the fabric in half, right sides together, and sew around so that one side stays open. I usually stitch it twice when handsewing to be sure the seam is sturdy. Do the same for both the lining and exterior fabric if you are lining your pockets. Turn the exterior right-side-out and place the interior into it.
In this case I added a zipper as I was sewing the interior and exterior together. DO NOT USE A ZIPPER ON A POCKET THIS SMALL. It was ridiculously hard to wrestle into position with so little space to maneuvre. To close a pocket of this size, add a flap by sewing a piece of interior to a piece of exterior and seaming it into one side of the pocket. Then you can close it with whatever type of fastener you want!
Here's how to do a box:
Again, take into consideration the size and number of items to go into the pocket (In this case I am making a box for my current and future filters). Cut out a cross shape. I made this one with all 4 arms the same length - I recommend creating a "lid" by making one arm twice as long. The length of the arms is how deep the box will be. Again, I am lining all my pockets. You can just as easily skip the liner.
Fold the arms of the cross up to make a box. Then, right sides together, seam each of the corners.