Fall family portraits - help with post processing

is that this method results in darkening the background. I

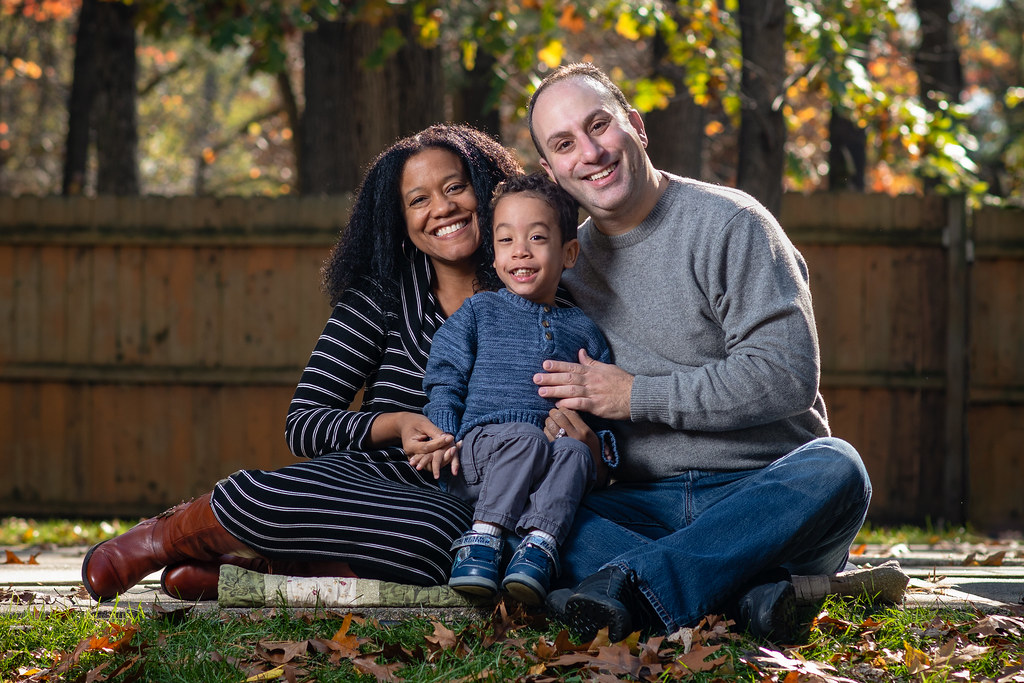
Not necessarily depending on how much power you have for supplemental light, and using a variable ND. Dial in the background to match the over/under on your flash reading on your subjects.

As to processing what exactly is your end goal, because there's several options? In PS you could use the Highlights/Shadow adjustment as a nondestructive layer. How To Use A Shadows Highlights Image Adjustment In Photoshop. I also find the multi use High Pass filter to be helpful. 3 Fantastic Uses of the Photoshop High Pass Filter on either of these you get exceptional flexibility. I'd also recommend converting the layer to a smart object, so you can go back an adjust as needed.
 
As to processing what exactly is your end goal, because there's several options?
Precisely the right question! Taking a look at the original unedited Raw file, the problem is pretty obvious, it was shot in harsh direct sunlight, which means overexposed highlights and dark hard shadows. Looking at my original edit, I think the real issue was that I over-flattened and over-saturated it to try to bring some depth back. Here's another attempt at an edit to address some of those items. I further reduced highlights and boosted shadows to soften the effects of the hard light a little more, used the tone curve to re-introduce some contrast, desaturated it a bit for less over-the-top colors, cropped in tighter as recommended, and added a subtle vignette to draw the eye towards the center.


20181110-DSC_0258b
by adamhiram, on Flickr
 
Here's another attempt at an edit to address some of those item

At least on my tablet this looks good. Sometimes we can get so obsessed with the little things that we miss the fact that it's pretty darn good. I'd leave it for a couple days, then check it and Print it.

You may know this so I apologize in advance if you do, but one feature I've started using a lot in LR is the radial filter. It gives me precise control over certain sections of the image, without affecting the rest of the image. Using the brush tool allows you to subtract or add to the mask, and Invert controls where the changes are applied. The other thing is that it doesn't seem to slow down the processing like the adjustment brushes.
 
one feature I've started using a lot in LR is the radial filter. It gives me precise control over certain sections of the image, without affecting the rest of the image. Using the brush tool allows you to subtract or add to the mask, and Invert controls where the changes are applied. The other thing is that it doesn't seem to slow down the processing like the adjustment brushes.
I haven’t used the radial filter much yet, but I’ve been using the gradient filter quite a bit, particularly when I need to even out an exposure. I actually used it on the re-edit of photo #2 above. I haven’t noticed too much slowdown with the adjustment brush tool, but I also don’t get too heavy handed with it. The spot healing brush on the other hand, brings things to a grinding halt pretty quickly.
 
Last edited:
I haven’t used the radial filter much yet, but I been using the gradient filter quite a bit,

Once I got started with the radial filter and learned how easy it was to modify the mask into irregular shapes, I hardly use the adjustment brushes anymore. The ability to subtract or add to the mask with the brush tool is also available in gradient filter. IE in the image above you could have pulled a gradient from the top all the way to the bottom, then used the brush tool set to (-) to erase the mask coverage over the people forcing the adjustment to only apply to the background/foreground. The brush tool in both the gradient and radial filter, is kinda hard to find (or at least it was for me). After you open the radial or gradient it will be to the right of Mask: on the far right. Once you draw a gradient or radial, it will turn gray for available. Click on it you can adjust the size just like any other brush or shift from adding to (+) or subtacting (-) by pressing and holding the Alt key.
Capture.JPG

Also, I downloaded the image and played with it, the histogram is really pretty good. One thing I noticed on the bigger screen is your face. You said you changed it in PS, and on my big monitor it may be slightly cool for the rest of the image. I haven't profiled the new monitor yet, so didn't do an edit, but just for fun I tried a radial filter over your face, Inverted, and then pushed the color temperature toward warm. I liked the improvement, but that may just be my monitor or me. LOL
 
Here's another attempt at an edit ..
Your sweater in this version is better, but your wife's hair needs more light. I'm not experienced at editing, but see if you can decrease the exposure on your face (I know, it came from another shot) and try to bring out some detail in your wife's hair.

Background and foreground look very good.
 
why do you guys hate warmth? you're outside in autumn in the middle of the day! WARM IT UP.

upload_2018-11-14_13-56-38.png


I may have pushed it a touch too far here, but I still prefer the right. moved the tint towards the green too. You should have LR remove the CA for you as well, lots of purple fringing on your ring.


do you guys all have >7000K LED lights in your house too?
 
Last edited:
Thank you for the great feedback! I made some additional edits to each and although they are pretty subtle, I think they made a big difference. As a quick side note, I'm learning pretty quickly which edits should be made when if I plan to edit in LR, edit in PS, then make final edits in LR again.

Photo #1
  • I recovered the burned out highlights by comping in from another nearly identical shot that still had some highlight detail
  • I warmed it up slightly, per @Braineack's recommendation. I like warmer tones and have a tendency to over-warm my images, and as a result I end up compensating by leaving things too close to actual/neutral.

20181111-DSC_0323c
by adamhiram, on Flickr

Photo #2
  • I decreased the exposure on my face by 1/3 stop. As it turns out, the shot I comped my head from was taken a little earlier before I reduced shutter speed by 1/3 stop to preserve highlights, so it was actually slightly overexposed compared to the rest of the shot. Pretty easy fix.
  • I used the adjustment brush to brighten some shadows in the hair, while dropping the blacks slightly to keep it dark, but with a little more detail.
  • I did my best to remove the purple fringing without affecting other parts of the image. It's not perfect, but definitely better. This is a known issue with the Nikon 85mm f/1.8 when shot wide open.
  • I warmed this up a bit as well

20181110-DSC_0258c
by adamhiram, on Flickr
 
Looks good. Print it.
 

Most reactions

New Topics

Back
Top