Finding Light in Darknes

Murray Bloom

No longer a newbie, moving up!
Joined
Jun 6, 2007
Messages
440
Reaction score
85
Location
Baltimore, MD
Website
www.murraybloomphoto.com
Can others edit my Photos
Photos NOT OK to edit
I recently posted these images to another thread, but I'm thinking that this might be an interesting topic in its own right.

Back in the days of film, we had a maxim: "Expose for the shadows, develop for the highlights." The reason was that silver-based materials (film, photo paper, etc.) don't respond well to low light levels, making it easy to lose shadow detail. Digital photography is exactly the opposite. Highlights are easily blown out, while there is often a lot more detail in the shadows than meets the eye. So, in today's world, exposing for the highlights and processing for the shadows can make a lot of sense.

Doing so will ensure that there is adequate highlight detail, but not at the expense of shadows. I'm thinking of this as an alternative to HDR, for those times where it's just not practical, like with no tripod, very low light levels, kids tugging at your trousers, etc. In essence, I'm talking about deliberate underexposure, on the order of half an f-stop, one, or perhaps more.

The basic principle is to become familiar with your particular camera's tonal sensitivity, in this case, how much underexposure will it tolerate and still allow you to recover clean shadow detail. Each camera is different, and at some point, noise will enter the discussion. But, by using darkness judiciously, and with nothing more than standard Photoshop techniques (or Gimp, or whatever), you can often create images that transcend what a 'normal' exposure is capable of. Needless to say, this idea, like HDR, isn't really for high-volume shooting.

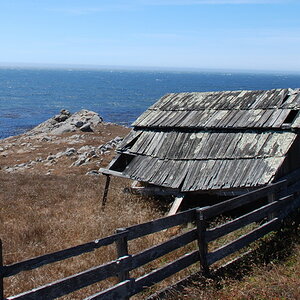
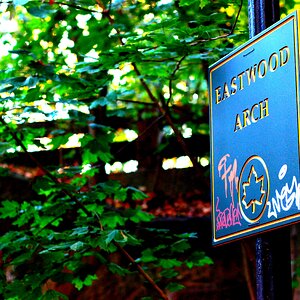
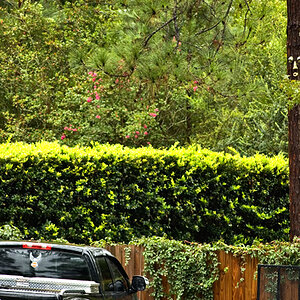
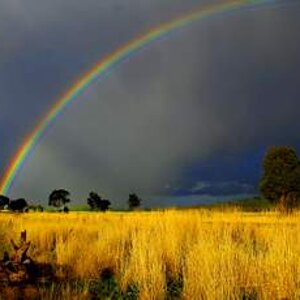
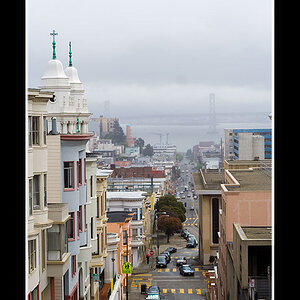
So, as a starting point, here are a pair of images, one as shot, and the other as processed. They were shot at 1/250th, f11, ISO 400 with a 10.5mm Fisheye lens on a 10mp Nikon D200.
 
Last edited:
i watched a little video on youtube about this. guy shot into the sun and so the rest of the picture was underexposed and then took him like 5 minutes to bring out all the shadows and make a great picture, i never thought about doing it. could you give a run down on what you did in post?
 
Sure, BC. I haven't seen that video. You mean I'm not the first one to notice this??? Damn!

I haven't evolved a fixed, rigid workflow, but one of the first things I often do is to try the Shadow/Highlight tool. People will tell you that this is a terrible idea, because S/H is destructive to the image. That may be true to some extent, because this tool, like many others, relies on resampling. However, prior to working on an image, I will sometimes upsize it, figuring that if I'm gonna give any pixels away, they might as well be extra ones. Actually, I've never experienced an image that was seriously harmed by doing so.

I will also create a duplicate layer and do the actual work on that one. That way, I can change the opacity to balance the tinkered image with the original one if needed. It also allows me to save the image with the original shot intact.

So, I'll use S/H to see what I have to work with. I won't try to milk every last lumen out of the shadows at this point, but will often adjust the image beyond the point of what looks good, sometimes even making the shadow areas seem to glow a bit. This is done in preparation for the next step, which is a Levels adjustment.

First thing is to set a black point using the eyedropper on the darkest pixels I can find. Then, I'll use the middle Levels adjustment to compress the tones a bit, which will make the image a bit darker. If I hadn't done the S/H thing first, my shadows would dissolve into a muddy mess. Bringing the detail out beforehand allows me to create a tonal range for the whole image that comes closer to my vision for the picture. At this point, it's important to make sure that nothing is wasted at either extreme of the brightness continuum, so check out the right and left Levels adjustments, too.

At this point, it's more or less a matter of making fine tweaks with Curves. Once I've done this, I have an image that's ready for whatever 'artistic' changes I want to make. On some occasions, I'll even repeat the process above to see if there's anything more to be gained, tonally. In the image above, you'll notice that I cloned in some windows because the original ones were reflecting the dark building that I was standing in, making the tall building across the street appear abandoned. Then I 'individualized' the new windows by messing with their reflections. I also darkened the clouds, removed antennas, splotches on the concrete and other annoyances; then small tweaks like spot saturation changes with the Sponge tool.

If there are any areas that have gone wonky, I'll merge the layers and then selectively use the History brush, a bit at a time, to achieve the look I'm after.

Last thing is a pass with Unsharp Mask.

The most important thing to remember is that you should have some idea where you're heading with the image. I usually consider the original capture as a sketch for the final image. Obviously, I'm not a photojournalist. However, this is a way to enhance even your factually accurate shots.

Feel free to give it a spin and post your results, and even the initial capture.
 
Last edited:
Murray...this idea you had, well it has been around for quite a long time. The exact method that you describe is the very reason for being for the Shadow/Highlight concept, and the "digital fill light" concepts which were both developed about a decade ago by software engineers. The nice people at Kodak, and at Adobe Systems invented specific software tools to make this process "slider-easy".

Use the shadow/highlight tool, or the newer "digital fill light" control, then tweak the curves....yes...millions of people have been using this method for eight years or so, give or take. This idea of having a shadow/highlight system, or a "digital fill light" system made it much less necessary to use masks and masking to do tonal re-assignment operations, and it vastly improved the average worker's digital output.

I too have heard people warning about the "dangers" of using fill light or shadow/highlight tools, but those warnings often totally neglect the fact that images which have had pretty broad corrections can be RE-optimized using other controls, like the curves tool you mentioned, as well as even newer tools like "clarity", as well as saturation, black point adjustment, contrast tools, and even unsharp masking with high percentage values, low radius and zero threshold, and so on.
 
Yup, I've had the idea for quite a long time, too. The image at the top of this thread was made in late 2007, but continues to evolve (as recently as last night). I'd seen similar techniques used on a 'spot' basis, but seldom globally. On the other hand, I don't read the photo press and haven't been active on this Forum since about 2008 until very recently. Even back then, I was just dipping a toe, so to speak. I'm a lone wolf and it's quite possible that I've steered a parallel course at times.

Yes, we have those engineers to thank for virtually everything we do nowadays. Things that used to take eons in the darkroom can now be accomplished in seconds, which is one of the reasons I returned to photography after a ten year hiatus, sometime around 2003 I think.

Ultimately, I think that for those who approach photography as art, as I try to, it's important to use whatever combination of tools and techniques will realize your vision. However, there's a big distinction between art and artsy, and I'm still pretty disdainful of what I call 'one button wonders.' This includes filters that will turn a photo into a painting; you know the type. Unfortunately, the art buying public doesn't always feel the same way. I remember a conversation with a gallery owner who was lamenting the same thing, despite the fact that she was selling quite a few 'tricked-up' photographs.

The point I'm trying to make with this thread is that, whatever the tools, it's important to evolve practices that, as I wrote above, will help you to achieve your vision. There are two distinct ways of working, in my opinion. One is to take a picture and play with it, seeing where it goes. The other is to know what you want from an image and then figure out how to get there. It's the difference between pre- and post-visualization. Both are valid. It doesn't matter whether your vision is purely artistic, or is about more mundane elements like realistic skin tones and detailed whites in wedding gowns. The tools are there. Take advantage of them and elevate your photography.
 

Most reactions

Back
Top