Is This Lighting Better?

JackRabbit

TPF Noob!
Joined
Dec 13, 2009
Messages
236
Reaction score
1
Location
Southern California
Website
www.flickr.com
Can others edit my Photos
Photos OK to edit
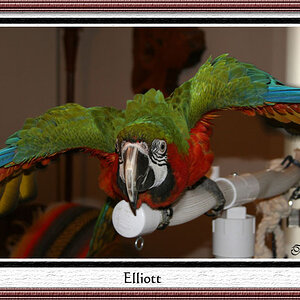
Many people told me to work on lighting and so I did. However, I tried a lot of things and still couldn't seem to get "the one" lighting that I absolutely loved. What do you guys think of this? Is it an improvement from before? Or could it still use some work?

Pasted from Flickr:
"I was instructed by many people to work on my lighting. So I did just that. I feel like in this, the lighting certainly isn't flat; but I feel like the shadows are too harsh now. I'm aware of the wrinkles in the backdrop, etc. I'm just asking about the lighting.

Strobist Info: Canon 430EZ shot through diffuser behind camera right, 1/32 power, triggered via optical slave

Vivitar 283 duct taped to tripod camera left, pointed left and bounced off a silver reflector, 1/2 power, triggered via PC sync cord.

Silver reflector held below and in front subject"

4291390399_e72fee981f_b.jpg
 
Last edited:
Well, the lighting is certainly different from before. I thinbk it might be helpful to post the other thread's image,so people can see the side-by-side. One of the ways the lighting in this new photo *is* betetr is that tou have adequate light on her clothing--in the first photo, from yesterday, her clothing was just an inky,black mess, but in today's shot, you can see the clothing's color and texture.

Today's horizontal photo has "harder" lighting. It has some shadows associated with it, and it also shows the texture of her skin, lips, and clothes. The skin on hr neck shows its actual nature quite well in today's photo. I personally think the lighting on today's photo shows a more-realistic lighting setup that yesterday's soft, totally diffused lighting.

I honestly think that if you want to do portraiture, you need to spend a few dollars and buy a decent reflecting umbrella, like the Photoflex Convertible in about the 30 or 32 inch size. A lighting quality somewhere in between a bounced speedlight and a direct speedlight, and you'll have a good source for location portraits like this one.

I'm glad you mentioned the wrinkles in the background. Your focal length, shooting aperture, and your camera-to-subject, and subject-to-background distance all have conspired to rendering the background well within the depth of field limits, and the ANGLE that the light is hitting the background is creating those shadows which emphasize the wrinkled. In the setup you did yesterday, the background was lighted and presented in such as way as to show NO wrinkles, so your setup yesterday was preferable in that area.
 
The nose shadow is something to watch out for. Although the transition isn't as harsh as some I have seen or done myself. You want some shadows to show depth, but you want them to transition very smoothly. To get an idea of this I would go checkout some of the studio stuff done in the professional thread. In this thread there are quite a few studio posts as well. Farrah does an awesome job using only natural light. The composition for this shot is ok.

For this shot, and remember I am a beginner too, I would try to move your 430EZ to camera right. I might also move up the Vivitar closer to the subject with less power. This could hopefully increase those catchlights. The flash at camera right would hopefully eliminate that nose shadow. Having them at different outputs should keep it from looking flat.

Just an idea, not certain I am right.
 
What kind of diffuser are you using for your key light?
 
The nose shadow is something to watch out for.
Absolutely.

What I'm seeing is that the nose shadow is going directly to the side and is just clipping into her left eye. This tells me that you should have moved the light higher, so that the nose shadow drops lower onto her cheek. Some would call that 'loop' lighting. Another cue to look for, is the position of the catch light in the eye. You want to to be around 2 or 10 o'clock, here it's at about 9.

One thing that my portrait lighting instructor always said, was that when you are trying to figure out your lighting, turn off/don't use a fill light. Concentrate on the key light...where the shadows fall, where the catch light is etc. These are the important things to be aware of. Think of your fill light as something that simply fill the shadows, and thus it's purpose is to control the ratio between light and shadow.
 

Most reactions

Back
Top