Just Off The Blue Ridge Parkway

vonDrehle

TPF Noob!
Joined
Jun 27, 2005
Messages
430
Reaction score
7
Location
North Carolina
Can others edit my Photos
Photos OK to edit
Hey Everyone,
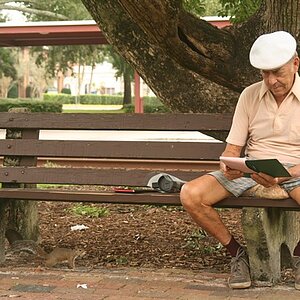
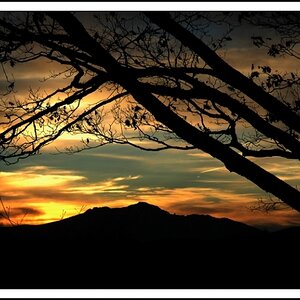
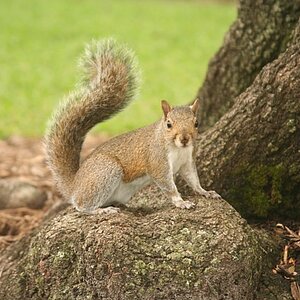
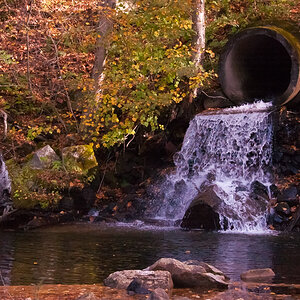
I took this shots this past weekend at Moses H Cone Memorial Park (MP 294 on the Blue Ridge Parkway). For these shots I used my Canon 6D and a 24-105mm F/4L USM lens with a polarizer. I don't have one yet to play with but I'm wondering if a ND filter might help out on some of these shots?

1.
pHsctkK.jpg


2.
K5BpN1E.jpg


3.
k2AIxdr.jpg


4.
P7NVFxF.jpg


5.
1zPBknR.jpg


Thanks for taking a look. (Let me know if these appear to big I was hoping it would resize them a bit smaller)
 
You have a very good camera and lens...you just need to practice more. Exposure and framing would seem to be priorities.
 
You have a very good camera and lens...you just need to practice more. Exposure and framing would seem to be priorities.

What would you do differently with the Framing on 1, 2, and 3?

Here are the camera settings for each. For shots 2 and 3 I believe I was using my camera's auto ISO mode. Also only used the Tripod for the night shots.

1. f/6.3 1/30 ISO 100
2. f/6.3 1/30 ISO 2000
3. f/6.3 1/40 ISO 500
4. f/4.0 8" ISO 3200 (17-4omm Lens)
5. f/4.0 15" ISO 3200 (17-400mm Lens)
 
I actually like the majority of the framing in 1 and 2 especially. I would like to see more contrast between foreground and background, especially in number 2. Distinguishing where the foreground turns into background is difficult, despite the fact that there is a well established line separating them.
 
You have a very good camera and lens...you just need to practice more. Exposure and framing would seem to be priorities.

What would you do differently with the Framing on 1, 2, and 3?

Here are the camera settings for each. For shots 2 and 3 I believe I was using my camera's auto ISO mode. Also only used the Tripod for the night shots.

1. f/6.3 1/30 ISO 100
2. f/6.3 1/30 ISO 2000
3. f/6.3 1/40 ISO 500
4. f/4.0 8" ISO 3200 (17-4omm Lens)
5. f/4.0 15" ISO 3200 (17-400mm Lens)

Don't care about the settings. #1 has too much sky, the next two could lose a lot of the side. Look at your shots WITHOUT your emotions(easier said than done I know) then look at each component in your frame and determine it it adds to, subtracts from, or does nothing for the composition. Even a perfectly composed picture can be mediocre if the there is no subject, or point of interest or something to distinguish. And anything that detracts from a weak point of interest kills a shot. And most of all remind yourself that a landscape shot does not have to encompass the universe...find the unique landscape, the interesting landscape within the larger and shoot that.
 
You have a very good camera and lens...you just need to practice more. Exposure and framing would seem to be priorities.

What would you do differently with the Framing on 1, 2, and 3?

Here are the camera settings for each. For shots 2 and 3 I believe I was using my camera's auto ISO mode. Also only used the Tripod for the night shots.

1. f/6.3 1/30 ISO 100
2. f/6.3 1/30 ISO 2000
3. f/6.3 1/40 ISO 500
4. f/4.0 8" ISO 3200 (17-4omm Lens)
5. f/4.0 15" ISO 3200 (17-400mm Lens)

I think you have a lot of potential here-- #2 is a very nice shot, but it needs some work. Here's a suggestion. How did you capture these? Do you have CR2 files?

Joe

smokies.jpg
 
I think you have a lot of potential here-- #2 is a very nice shot, but it needs some work. Here's a suggestion. How did you capture these? Do you have CR2 files?

Joe

View attachment 118590

Thanks. Yes I have the CR2 files for everything except for photo #1. I was playing with some of the featured of the camera and must of somehow reset my settings between my morning hike and evening hike. What processes did you use to lighten the foreground, just additional saturation?

Here's what I was talking about when I mentioned a landscape within the larger....
View attachment 118598

I think one of my problems is I like the grandeur of a large landscape photo and don't always break into its smaller bits. I will start trying to think about that more as I am shooting.
 
I think you have a lot of potential here-- #2 is a very nice shot, but it needs some work. Here's a suggestion. How did you capture these? Do you have CR2 files?

Joe

View attachment 118590

Thanks. Yes I have the CR2 files for everything except for photo #1. I was playing with some of the featured of the camera and must of somehow reset my settings between my morning hike and evening hike. What processes did you use to lighten the foreground, just additional saturation?

I used Photoshop blending modes applied selectively to alter the tone response, but had to do that with your JPEG file. A CR2 is a complete game changer in that regard. What processing software do you have?

Here's the histograms for your image:

smokies_hist.jpg


The luminosity histogram is very telling -- you've got to get it shifted further to the right and spread out better over the entire range. If you care to put the CR2 file on dropbox I'd can show you what I would do.

Joe
 
I used Photoshop blending modes applied selectively to alter the tone response, but had to do that with your JPEG file. A CR2 is a complete game changer in that regard. What processing software do you have?

Here's the histograms for your image:

View attachment 118625

The luminosity histogram is very telling -- you've got to get it shifted further to the right and spread out better over the entire range. If you care to put the CR2 file on dropbox I'd can show you what I would do.

Joe

I loaded image 2 & 3 up on google drive, hope that works OK. I definitely need to learn how to properly read the histograms.

Thanks for taking a look at these.

Got the file. Had to work this evening and just got home. I'll have a look in the am and get back to you.

Joe
 
I used Photoshop blending modes applied selectively to alter the tone response, but had to do that with your JPEG file. A CR2 is a complete game changer in that regard. What processing software do you have?

Here's the histograms for your image:

View attachment 118625

The luminosity histogram is very telling -- you've got to get it shifted further to the right and spread out better over the entire range. If you care to put the CR2 file on dropbox I'd can show you what I would do.

Joe

I loaded image 2 & 3 up on google drive, hope that works OK. I definitely need to learn how to properly read the histograms.

Thanks for taking a look at these.

I think you took a lovely photo here, congrats! Here's what I came up with processing your raw file:

blue_ridge.jpg


It's tricky because you want to keep the late day feeling, accentuate the sky color and still keep some light in the photo.

You mention reading histograms. A histogram is a graph of the tonal/color data in your photo laid over a range that represents the final output target. We process photos to an industry standard output target defined by the range of tone/color that we can fit onto a photographic print. When you look at a histogram and see the left (black) wall and right (white) wall you're looking at that print range. The values are 0 for black and 255 for white. As a basic rule we try and make our photso fit that range (makes sense if you ultimately want prints). If the photo falls short as in your first version then it will typically be flat -- lacking contrast with either no whites, no blacks or neither. It will look murky.

If the graph of the photo's tone piles up against the right wall then you're "clipping", "blowing out", posterizing the highlights -- you lose texture and tone variation and get a solid white/light color region in the photo which is generally pretty ugly. If the graph of the photo's tone piles up against the left wall then you're "clipping", "crushing", the shadows into black. As a rule we want the photo to reach black but only slightly. In your photo I pushed hard on black which shows in the histogram with the blacks piled up against the left wall:
hist.jpg

It helps with the late-day feeling to have some extra black in the photo and it also covers up noise in the shadows of that tree line since you were forced to use a high ISO to take the photo. If a lower ISO had been possible a different approach would have been to back off on the black push and raise contrast in the shadows instead -- in this case too much noise for that.

The struggle with your photo here is to get the sky color and rich saturation and still stretch the histogram over the full range. I used Adobe Camera Raw because I believe you mentioned you have LR. I only have LR at work now but I have Photoshop at home. So you can see everything I did, heres a link to the XMP file that contains all the processing. IMG_1073.XMP You should be able to copy the XMP file into the folder with your raw file and then LR should read it and show you what I did. Note that I used gradients and adjustment brushes for this photo. If this doesn't work for you let me know.

Joe
 

Most reactions

New Topics

Back
Top