Lightroom 3.4, set D7000 to "Adobe RGB"?

My pc screens are recalibrated every 6 weeks with a spider. I come from a large scale printing background.

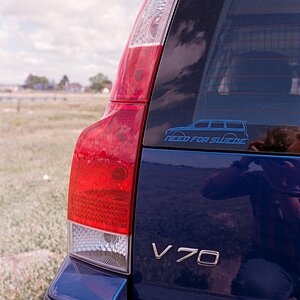
Yes it will never look exactly like a print but work in the wrong colour space and your reds turn toward oranges and so on.

It rely is about what you intend to do with the images. If you want to print don't use colours that printers can't produce, if you want to display online use web colours etc.
 
Ross I don't quite think you understand how colour spaces work in relationship to each other. Some quite pointers:

Printers definitely do not have AdobeRGB colour space. This is a space defined by a Red, a Green, and a Blue dot. It is physically impossible to make an additive colour system (such as a computer monitor with red green and blue) match a gamut of a subtractive colour system (such as a printer with it's CMYK). Printers have widely different looking colour spaces than monitors. Your typically very high end printer will have a half cyan/green that reaches just outside of the AdobeRGB gamut, and yet comes no where near the pure Green or Blue colours of AdobeRGB that can be achieved by high end computer monitors.

To clarify how things work you need to understand the differences between your working colour profiles, and your output profiles. You image taken with a camera in RAW is converted using the camera profile to the working space. This may be selected when you import into photoshop or if you use a tool like Lightroom you end up using MelissaRGB (a linearised variant of ProPhotoRGB). Typically most people will stick with sRGB as there is little advantage to doing anything else if your pictures don't go to print, and very many users don't print these days. The working profile you end up with defines the upper limits of the colour gamut.

Your calibrated display generates a display profile for you. What is happening is photoshop converts the working profile of the image to the display profile to ensure what you see is actually the right colour based on your earlier calibration.

When you print there's no such thing as "printers seem to use AdobeRGB". What happens when you hit the print button is photoshop will take the image along with it's working profile and pass it on to Windows Image Colour Management. The printer driver then feeds the colour profile for the current selected settings to ICM to do the conversion to the correct printer profile, and then it gets fed to the print spooler to splat on your paper. The key here is the "current settings" bit. Your Canon printer will actually load a different colour profile depending on the quality settings and type of paper used. For PiXMA printers this profile is called "Canon <printer model> <designator>" where the designator is something like PR1 for Glossy Photo Paper Pro on high res, MR1 for matte photo paper, and there's about 10 different profiles the driver has to work with.

Now this conversion is loss less providing the printer's colour profile is as large or larger than the working profile, which I can guarantee you will never be the case due to the aforementioned colour adding and subtracting issue. So ultimately the printer space is always smaller in some regard than the monitor colour space, and you can see that if you print a pure rainbow coloured gradient. For less dramatic (real life) type pictures the effect will be more subtle (unless you live in vegas and are doing night time photos :) ). So the added step of soft proofing needs to be done for that perfect match. Soft proofing takes the working profile, converts it to the printer profile, and then converts it back to the display profile and should show you the colours as your printer will reproduce.


If you're having issues where AdobeRGB gives you better results that match a monitor, and your monitor is not fancy wide gamut monitor, then I suggest disabling colour management completely in the windows driver and take control of it in photoshop. That would allow you to customise rendering intents and compensation as well as override whatever printer profile your driver blindly selects for you.
 
[FONT=&quot]Thanks. Well I understand colour addition and subtraction quite well but the IT drive side of things not so well. I know that AdobeRGB gives me a near perfect match every time. would it make a difference to me to meddle with colour management settings? how would I benefit from this? How would changing my colour space now effect the swatches I have developed?[/FONT]
[FONT=&quot] [/FONT]
[FONT=&quot]Thank you for a very comprehensive answer [/FONT]
 
I can answer that with only a bit more information.

How do you print? Just click file -> print and be done with it, or do you play with some colour settings in the driver windows?
What monitor do you have? A standard sRGB monitor like the 99.9% out there or something special?
Can you post a sample of what you typically print?
How do you compare the print to the screen? Room lighting? What colour temperature do you calibrate the screen to?

I ask this because in the past people have done strange things with the "it works for me" reply. In one case it resulted in a printing company printing my mother 200 wrong business cards. She picked the actual colours from a pantone chart, they showed her a proof in dodgy lighting and then the print matched the screen but was no where near the correct pantone value selected so the business cards had a background colour which didn't match the business colours at all.

But then sometimes also these hacks just get around buggy software and are actually just fine. :) That's why I'm asking the questions first.
 
Ross I don't quite think you understand how colour spaces work in relationship to each other. Some quite pointers:

Printers definitely do not have AdobeRGB colour space. This is a space defined by a Red, a Green, and a Blue dot. It is physically impossible to make an additive colour system (such as a computer monitor with red green and blue) match a gamut of a subtractive colour system (such as a printer with it's CMYK). Printers have widely different looking colour spaces than monitors. Your typically very high end printer will have a half cyan/green that reaches just outside of the AdobeRGB gamut, and yet comes no where near the pure Green or Blue colours of AdobeRGB that can be achieved by high end computer monitors.

To clarify how things work you need to understand the differences between your working colour profiles, and your output profiles. You image taken with a camera in RAW is converted using the camera profile to the working space. This may be selected when you import into photoshop or if you use a tool like Lightroom you end up using MelissaRGB (a linearised variant of ProPhotoRGB). Typically most people will stick with sRGB as there is little advantage to doing anything else if your pictures don't go to print, and very many users don't print these days. The working profile you end up with defines the upper limits of the colour gamut.

Your calibrated display generates a display profile for you. What is happening is photoshop converts the working profile of the image to the display profile to ensure what you see is actually the right colour based on your earlier calibration.

When you print there's no such thing as "printers seem to use AdobeRGB". What happens when you hit the print button is photoshop will take the image along with it's working profile and pass it on to Windows Image Colour Management. The printer driver then feeds the colour profile for the current selected settings to ICM to do the conversion to the correct printer profile, and then it gets fed to the print spooler to splat on your paper. The key here is the "current settings" bit. Your Canon printer will actually load a different colour profile depending on the quality settings and type of paper used. For PiXMA printers this profile is called "Canon <printer model> <designator>" where the designator is something like PR1 for Glossy Photo Paper Pro on high res, MR1 for matte photo paper, and there's about 10 different profiles the driver has to work with.

Now this conversion is loss less providing the printer's colour profile is as large or larger than the working profile, which I can guarantee you will never be the case due to the aforementioned colour adding and subtracting issue. So ultimately the printer space is always smaller in some regard than the monitor colour space, and you can see that if you print a pure rainbow coloured gradient. For less dramatic (real life) type pictures the effect will be more subtle (unless you live in vegas and are doing night time photos :) ). So the added step of soft proofing needs to be done for that perfect match. Soft proofing takes the working profile, converts it to the printer profile, and then converts it back to the display profile and should show you the colours as your printer will reproduce.


If you're having issues where AdobeRGB gives you better results that match a monitor, and your monitor is not fancy wide gamut monitor, then I suggest disabling colour management completely in the windows driver and take control of it in photoshop. That would allow you to customise rendering intents and compensation as well as override whatever printer profile your driver blindly selects for you.

That is very interesting.
 
What part? That different papers and settings will produce different colours, or that photoshop can do the colour management for you?

If you have a fully colourmanaged workflow from start to end it involves making a printer profile for a specific type of paper. That printer profile is then soft-proofed in photoshop. But in order to use the profile as soft-proofed you need to have the printer not colourmanage itself.
 
I suggest disabling colour management completely in the windows driver and take control of it in photoshop.
I have been wondering if you could do that. Now I am wondering how.
 
Well the photoshop side of things is easy. In the print dialogue set the option: "Let printer manage colours" to "Let Photoshop manage colours" which will automatically give you access to the profile conversion options. Lightroom is even smarter with how it is done. Just set the option "Profile" at the bottom of the print page to "Other" and it will give you a list of all profiles specific only to the selected printer, and underneath the rendering intent. Shame there's no soft proofing native in Lightroom yet but there is a plugin for it.

In the printer driver it gets harder and quite printer specific. In the Canon PIXMA drivers I go to "Colour / Intensity" set it to manual, click set, and then under "Colour Correction" I set it to "None".


You MUST do both. You can't do one or the other. If you disable printer colourmanage without adjusting photoshop no profile gets applied. If you adjust the photoshop settings but not the driver the colour conversion will be done twice and you will also get garbage.
 
Thanks, that seems like a good thing to do.
 

Most reactions

Back
Top