You are using an out of date browser. It may not display this or other websites correctly.
You should upgrade or use an alternative browser.
You should upgrade or use an alternative browser.
Need Help Setting Up Canon MARK III 5D For Macro Jewelry.
- Thread Starter Roomka
- Start date
Robin Usagani
Been spending a lot of time on here!
- Joined
- Jun 6, 2010
- Messages
- 10,347
- Reaction score
- 2,174
- Location
- Denver, CO
- Can others edit my Photos
- Photos OK to edit
It is all about the light. If you truly bought the camera only for jewelry macro.. yikes! It is a nice camera but I hope you use it for more than that. Your D5100+macro lens+good lighting+good background will yield really nice jewelry shots!
MLeeK
TPF Noob!
- Joined
- Oct 20, 2011
- Messages
- 6,761
- Reaction score
- 1,380
- Location
- NY
- Can others edit my Photos
- Photos OK to edit
Start here and get a little education... Digital Photography Tips and Tutorials
Roomka
TPF Noob!
- Joined
- Mar 13, 2012
- Messages
- 149
- Reaction score
- 0
- Location
- NYC
- Can others edit my Photos
- Photos OK to edit
- Thread Starter 🔹
- #8
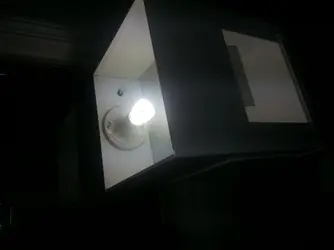
yeah will def read that when i get home, dont get me wrong its not like i only know how to switch it to auto and take photos, i never use auto. on the nikon d5100 i used only manual with a fixed manual lens. I dont want to get ahead of myself so i guess i should first start with my lightbox.
View attachment 16888
 <- gives off a yellow tone such bs
View attachment 16888

 <- gives off a yellow tone such bs
TCampbell
Been spending a lot of time on here!
- Joined
- Mar 31, 2012
- Messages
- 3,614
- Reaction score
- 1,558
- Location
- Dearborn, MI
- Can others edit my Photos
- Photos OK to edit
The basics of exposure don't care what brand name is on the camera. Put the camera on a tripod. Set the ISO to 100. Set the aperture to something in the middle (e.g. f/8). Set the shutter speed to whatever it takes to create a balanced exposure.
As for the yellow... this is a white balance problem caused by your lighting.
When you do product photography (especially when representing products that come in colors) you MUST MUST MUST use a proper color-managed workflow. This "starts" with the camera, but includes your computer and, if you get printing done (it's not just for on-screen catalogs) then the printers have to be calibrated. Even if you send out to a printing service, the printers STILL need to be calibrated (better printing services provide this information -- even Costco (of all places) will send you the color calibration profile of the specific printers located in the labs in each store.)
You can use the white balance settings in the camera IF you are shooting JPEGs. If you shoot RAWs the white balance is ignored (you always fix white balance in post processing when you shoot in RAW.)
To get accurate white balance (and for product photography you really NEED accurate white balance) you need to buy a true neutral "gray" card. I use a collapsable gray card for shoots, but if I were doing product photography I might pick up a DataColor SpyderCube (it's a self-standing gray card you can set inside your light box.) One of the interesting things about this "cube" device is that instead of just calibrating the neutral gray at the midtones, it also lets you set the white point and black point. It has a black spot on the underside in the shadows and white highlights on the top where it'll pick up highlights. This gives you a little more control over your image processing then you'd get with just a straight gray card.
If you shoot in JPEG, take a close-up photo of the gray card so that it mostly fills the frame (it doesn't need to fill the entire frame, but it needs to dominate the center.) Then pick "custom white balance" as the white balance setting on the camera. It'll ask you to select a reference photo from the card. Pick the shot of the gray card. Now... everything you shoot in that box using those same light bulbs will get the white balance corrected perfectly.
If you shoot in RAW, just take a photo of the gray card (doesn't even need to be close nor centered). Then shoot your products (don't worry about wonky colors at this point.) When you import the photos into the computer, you'll "white balance" the shot of the gray card. But most decent post processing apps (Photoshop, Lightroom, Aperture, etc.) will let you "copy" the white balance adjustment required for one frame and apply it to any other shots you took. That will result in all those photos having perfect color.
ALSO... be careful about trusting your monitor or printer. Unless you've bought a calibration tool and calibrated your monitor and printer, then the colors you see are probably not accurate. If you adjust things so they "look" normal to you, then everyone else will get wonky colors on their monitors. I color-calibrated my monitors and my printers using an X-Rite ColorMunki.
Brands don't matter so much here (well... actually since a monitor calibration tool includes software, people will declare that they prefer one over another because they like the software and ease-of-use features, but for gray cards... it's just a neutral gray surface and there's normally no software involved.)
Roomka
TPF Noob!
- Joined
- Mar 13, 2012
- Messages
- 149
- Reaction score
- 0
- Location
- NYC
- Can others edit my Photos
- Photos OK to edit
- Thread Starter 🔹
- #10
yeah its funny you say that, i bought a new dell ips monitor and the colors looks very good, when i got home and looked at it with my laptop it was very very bad. is this what you are talking about
Amazon.com: Xrite CMUNDIS ColorMunki Display: Camera & Photo?
Amazon.com: Xrite CMUNDIS ColorMunki Display: Camera & Photo?
MLeeK
TPF Noob!
- Joined
- Oct 20, 2011
- Messages
- 6,761
- Reaction score
- 1,380
- Location
- NY
- Can others edit my Photos
- Photos OK to edit
yeah will def read that when i get home, dont get me wrong its not like i only know how to switch it to auto and take photos, i never use auto. on the nikon d5100 i used only manual with a fixed manual lens. I dont want to get ahead of myself so i guess i should first start with my lightbox.
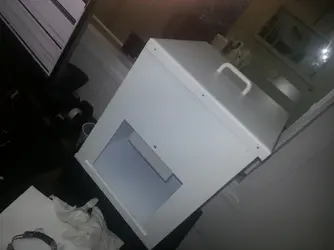
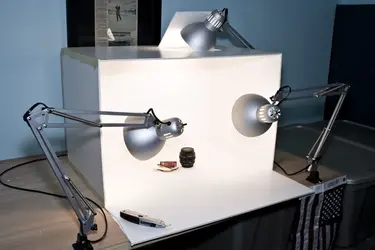
View attachment 16888View attachment 16889View attachment 16890 <- gives off a yellow tone such bs
That yellow tone has nothing to do with the camera, but your poor lighting and the color of the light. Set a custom white balance.
Take a photograph of a completely neutral gray card in your light tent and use that to set your white balance.
I'd get about a dozen daylight balanced bulbs to put all of the way around your light tent so you can get ample lighting and proper exposure.
If you are using an assisted mode you will probably want about a +2 exposure compensation.
If you are using manual you'll want your meter to read +2. Not zero.
LShooter
TPF Noob!
- Joined
- Jun 29, 2012
- Messages
- 245
- Reaction score
- 65
- Location
- South Texas
- Can others edit my Photos
- Photos NOT OK to edit
I have the exact camera and lens and it takes amazing macro photos. You need to go buy yourself an aftermarket manual. There are many out there now. Start there. It's a very easy to use camera, but can be complicated if you''re not use to Canon's system. I wouldn't even know where to begin in explaining things. I only shoot in Manual and use all the advaced features.
MLeeK
TPF Noob!
- Joined
- Oct 20, 2011
- Messages
- 6,761
- Reaction score
- 1,380
- Location
- NY
- Can others edit my Photos
- Photos OK to edit
Continuous light is very weak over flash.
A 100W continuous bulb delivers 100W of light over one second. Your shutter has to remain open for one whole second to get all 100W
A 100WPS flash delivers 100watts of power in one burst-all at once. MUCH more light is delivered in that burst. Your shutter can fire as fast as 1/250 and capture all of that light
With continuous lighting you need MANY MANY More lights than with flash.
The box you show will work, though I'd prefer a light tent because the sides are translucent and you can shine your lights through it. It softens the light to prevent harsh glare and you can light all of the way around the subject.

Last edited:
Similar threads
- Replies
- 0
- Views
- 132
- Replies
- 0
- Views
- 123
- Replies
- 0
- Views
- 179


![[No title]](/data/xfmg/thumbnail/37/37105-0f1ebcc8381303893e9a7ce0764e86fe.jpg?1734169829)
![[No title]](/data/xfmg/thumbnail/39/39497-93752210dd49247220721e5ac8c61245.jpg?1734173613)


![[No title]](/data/xfmg/thumbnail/33/33027-0118cfc4034a37ef267ca6f8aa2fe04a.jpg?1734163031)