Problem with light falloff

lapsruckus

TPF Noob!
Joined
May 12, 2010
Messages
1
Reaction score
0
Location
Dunedin, NZ
Can others edit my Photos
Photos OK to edit
I have just set up my first darkroom and made my first prints, however I am getting a strong dropoff in light from the center of my photos outwards, no matter what height or aperture I use. I have to check but I believe the bulb is 75w. The enlarger is like this:
3405326068_6e01345c0e.jpg

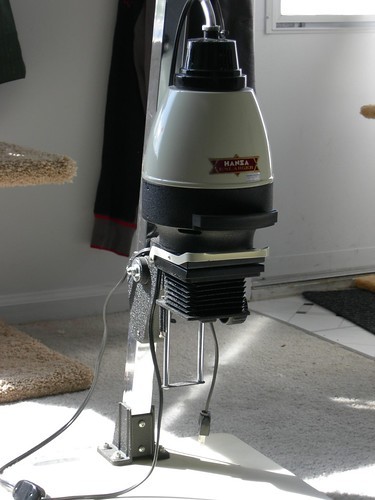
The enlarger came with a piece of light blue glass I have put in the filter tray, and I have not yet acquired multigrade filters. Any suggestions would be much appreciated.
 
I'm not familiar with this exact model enlarger, but the bulk of the many similar models all share the same basic design. Most are designed to handle both 35mm and 120 (6x4.5 and 6x6, but rarely 6x7 or 6x9). They have two fixed condensor elements and one additional changeable element. The two elements are used by themselved when you use a 75-80mm lens, the choice for 120. The third element is added with using a 50mm lens, the common choice for 35mm. If you use a 50mm lens without the added 3rd element you'll find that there is rather severe light falloff.

The optical principle involved centers on having the condensors focus an image of the light source (bulb) at the plane of the iris in the projection/enlarging lens. This gives even illumination. If the projected image of the light source is too far on either side of the plane of the iris (either closer to the neg or further) the illumination will be uneven.

You can test to see if this is the case rather easily:

1. Put a small mark on the side of the enlarging lamp closest to the condensors. A spot of dark tape, or similar, will do. You will want this to be removable.
2. Setup the enlarger with a negative in the carrier and adjust the height and focus so that you have about an 8x12 image (10x10 if using 6x6) sharply focused on the easel.
2. Remove the negative and return the carrier to its normal position.
3. Remove the enlarging lens.
4. Measure the position of the lens stage (distance from some fixed point on the enlarger body or distance from negative carrier, ...)
5. Tape or hold a piece of white paper over the lens mount opening and with the lamp on change the focus until the mark on the lamp forms a reasonably sharp image on the paper.

If this new position for the lens standard in step 5 is significantly different than its position in step 4 then you've found your problem. If you are using a 50mm enlarging lens and the distance in step 5 is some 30-40mm greater than in step 4 then the problem is that you enlarger needs a 3rd supplementary condensor element when using the shorter 50mm lens.

Other reasons for the problem could involve someone having removed the condensors, possible for cleaning, and reinstalled them incorrectly. Condensor systems of this type generally use plano-convex lenses (one side flat, plano, and one side curved outward, convex). You assemble the pair so that the flat, plano, surfaces are on the outside of the pair and the convex sides facing together in the center. Most often these two lenses are identical, but occasionally the two differ slightly; mixing them up (wrong one toward the neg) could also create illumination problems.

The third cause for uneven lighting is a mis-positioned bulb. This style of enlarger rarely has and adjustment, but if it does repeat the test steps, above, except in step 5 adjust the position of the lamp instead of the position of the lens standard/focus. When the spot on the lamp is the sharpest its the right distance from the condensors. You may find that some twisting or lateral movement (if allowed) is still needed.
 
Last edited:

Most reactions

New Topics

Back
Top