Real Estate Photography | Ballenger Photography (Round 2)

You can correct some of it by using the Perspective Correction tool in Photoshop, but the best plan would be to prevent it before-hand. Ideally, using either a PC/Tilt-shift lens or view-camera, and if those aren't an option, than you could try shooting a panorama; capture many small images and stitch them together. Irrespective of what tools you use, you can minimize the effects by ensuring that your camera is level and square in relation to the surroundings. Think, "Tripod".
 
Schwettylens said:
this image for example. Do you think you accomplish a lot doing HDR/tonemapping? Is it necessary to show the neighbor house with truck and portable toilet outside? I felt like I would just shoot it with 1 exposure and get blown out window.

I see what you mean. With this window, I totally agree. I've just be so conditioned that if the window is blown, the shot is off.

Thanks for the perspective.
 
tirediron said:
You can correct some of it by using the Perspective Correction tool in Photoshop, but the best plan would be to prevent it before-hand. Ideally, using either a PC/Tilt-shift lens or view-camera, and if those aren't an option, than you could try shooting a panorama; capture many small images and stitch them together. Irrespective of what tools you use, you can minimize the effects by ensuring that your camera is level and square in relation to the surroundings. Think, "Tripod".

View cameras aren't an option, as I've never shot film, have none of the necessary equipment, and I'm $20,000 invested in DSLR.

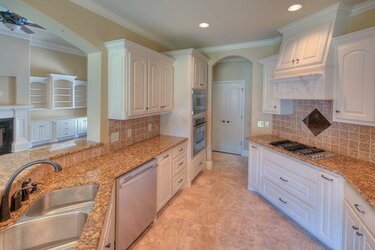
The PC-E lens is looking like a very good option. I also need to work on staying square and level on many shots. Those kitchen shots were on a tripod and RRS head, but it was tilted forward, which caused those intersecting verticals...

See, this is why I'm on this forum. I learn so much from you guys that I can't seem to grasp on my own. I really wish I'd studied photography in school. I have no formal education at all. Completely self taught... :(

Makes learning a long and tedious process.
 
tirediron said:
You can correct some of it by using the Perspective Correction tool in Photoshop, but the best plan would be to prevent it before-hand. Ideally, using either a PC/Tilt-shift lens or view-camera, and if those aren't an option, than you could try shooting a panorama; capture many small images and stitch them together. Irrespective of what tools you use, you can minimize the effects by ensuring that your camera is level and square in relation to the surroundings. Think, "Tripod".

View cameras aren't an option, as I've never shot film, have none of the necessary equipment, and I'm $20,000 invested in DSLR.

The PC-E lens is looking like a very good option. I also need to work on staying square and level on many shots. Those kitchen shots were on a tripod and RRS head, but it was tilted forward, which caused those intersecting verticals...

See, this is why I'm on this forum. I learn so much from you guys that I can't seem to grasp on my own. I really wish I'd studied photography in school. I have no formal education at all. Completely self taught... :(

Makes learning a long a tedious process.

eh, I mean imagine you took photography in school, you'd be learning this over a 4-5 year span. For people who really are dedicated to taking criticism and listening (and also figuring out who to listen to), I think you can learn on here faster than just about any environment that isn't tagging along with a master photographer.
 
Personally I'd fix the distortion. It's such an easy fix in ACR/LR now.
I'd also much prefer the blown or nearly blown window in this one. The window really draws the eye in 3 and 5.
The edge of the roof in 2 looks like sloppy brush work in masking. The brick is too bright in that one. I like the idea of HDR or double processing on those shots, but yours are REALLY bright on the brick and I think that's making them appear un-natural. I like the second much better. You can see the door and the details, the shadows aren't dark and hiding things.
In all honesty? They're beautiful images, we're photographers so we're picky!
 
View cameras aren't an option, ...

Makes learning a long and tedious process.

Perhaps the cheapest and easiest way to learn is to observe what the pros are using.

As I posted on your previous thread, the only architectural photographer that I am personally aquainted with uses a view camera.
 
MLeeK said:
.
In all honesty? They're beautiful images, we're photographers so we're picky!

I post them here so you wonderfully picky photographers can tear them apart, tell me how much I suck and give me lots to work on.

If I wanted empty, nice sounding compliments, I'd show them to my mother :wink:
 
Designer said:
Perhaps the cheapest and easiest way to learn is to observe what the pros are using.

As I posted on your previous thread, the only architectural photographer that I am personally aquainted with uses a view camera.

I don't know the first thing about view cameras. I had to google "view camera" when you posted in the other thread. I have thousands of hours invested in what I'm doing now. From what I've read, the 24mm PC-E that Robin suggested is probably the best choice for me.

And, I want to do real estate, not just architectural. Very fast turn around time is very important to the people I'm shooting for. Like 24 hours fast. Good luck with that on a view camera.

Thanks for the perspective though. It might be fun to play around with.
 
I hope you dont mind me correcting it.

Before:
Liebrum-130-Wolf-Creek-1-L.jpg


After:
$Liebrum-130-Wolf-Creek-1-L-2.jpg
 
Ok, this is an area where I can help...

First... never shoot buildings flat. You pretty much always want to see two sides of a building- even if it is just barely off-angle. Flat structures tend to look unappealing. The depth adds a lot.

Next, those exterior shots are pretty washed out and the colors are wonky. The interior ones are a little off as well, but not as bad. This monitor I'm on is not color corrected, but it's close enough that I'm pretty sure I'm correct. This might be post processing and HDR choices, but it almost looks like you didn't cover enough of the darker range of the exposures.

Third, I'm not sure an HDR was worth the effort and impact on the exterior shots. In mid-day light all you're going to do is level out any shadows, and you can reasonably do that with RAW and a bit of very minor tweaking. Remember... your time is valuable, and residential real estate fees don't tend to add up to much. You need to get the best images but without spending too much time. $/hour. Think $/hour. If you can make more money delivering papers or working at McDonalds than shooting AND PROCESSING the images, you're doing something wrong. If you're going to do HDR (some people do ALL HDR- I think it's crazy, but it's a nice gimmick) then you need to make sure they are KILLER. They need to pop. These don't. You just need practice with HDR is all.

Next... WIDE. WIDTH IS KING. You need to maximize the width and get as much of every room as you can. I literally put my 10mm lens to 10mm and cram the tripod into the corner and stand so I can't be seen and take the shot. 14mm should be wide enough... but these shots don't feel like you got enough of the room in them, so either they are crazy small or you're not shooting from a corner. When you can, try to get a field of view that crosses multiple rooms as it gives the rooms a sense of space and really pulls people in.

Next... your height. Don't shoot the images always at your height. Get down a little bit. I'd say around chest-height. First it's more complimentary to the room and avoids that "I'm looking down from on high" thing, and second it helps with perspective correction later.

###th... perspective correction. This is a must-have, but I think the PCE lens is a waste, personally. They are neat, but they are old-school- AND what's more is 24mm goes right against your width thing. That is SO not going to work. For $15 go buy PTLens and it gives you a very nice perspective correction tool that you can manipulate via a WYSIWYG interface. Note that you WILL lose a small percentage of the image from the correction, but it's far less than you'll lose going from 14mm to 24mm.

Lighting... for complex setups, multiple flashes on remote triggers is great, but a good starter trick is to use a bounced flash on the camera with a longer shutter time (on a tripod). This lights the room nicely and also allows ambient light to fill in. It makes for a reasonably appealing setup for relatively little effort. Also... TURN THE LIGHTS ON! Anytime there is any kind of interior light fixture, make sure those are turned on for the shoot. It makes the place look warm and alive. (yes, even when using the flash)

Distractions... one of the big things that separates an ok RE photog from a great one is cleaning up distractions. I carry cleaning supplies, a small tool set and duct tape wherever I go. If there's stuff around that distracts, clean it up. Check heights on window blinds, make sure ther isn't stuff lying around, organize magazines and remotes, watch to be sure the furniture looks neat and not frumpy, etc. Details. Details are KEY. In your shot showing the driveway there's leaves or something on it. Sweep them up before you shoot. Little things like that detract a lot. I spend a good amount of time on my shoot with my camera down just looking around to see what is out of place and adjusting it. (always remember to put things back, btw)

There's probably more, but that's a start.
 
I was coming here to write a giant response (I shoot 5 houses/day..probably one of the few areas I actually know what I'm talking about ;)), but I'm pretty sure manaheim covered everything.

Not sure if it was said or not (it's late, I'm tired& only skimmed) but the MOST important thing in real estate is to shot SQUARE. Everything needs to be square. Your shots in the kitchen don't work because they are tilted down. You'll drastically cut back on your warped edges if you make sure the photo is squared up& level. Use a tripod .. use the level on it. I use mine like a monopod& just always make sure that it is square. I know real estate agents around here would chop me to pieces if I did HDR or really ANY post-processing other than a few minor adjustments.
 
Wow, Mannheim. Great advice. Thanks for asking the time to write it.

The part about not taking flat exteriors is big. Shooting chest level is big too.

Couple concerns:

At 14mm, the distortion is killer once you get away from the center. How do you wide without worrying about having to crop later when you fix the distortion in post?

How do you shoot longer shutters with bounced flash during daylight hours without blowing out all your highlights and/or getting secular highlights everywhere?

Again, great advice. Thanks.
 
yv0nne said:
I was coming here to write a giant response (I shoot 5 houses/day..probably one of the few areas I actually know what I'm talking about ;)), but I'm pretty sure manaheim covered everything.

Not sure if it was said or not (it's late, I'm tired& only skimmed) but the MOST important thing in real estate is to shot SQUARE. Everything needs to be square. Your shots in the kitchen don't work because they are tilted down. You'll drastically cut back on your warped edges if you make sure the photo is squared up& level. Use a tripod .. use the level on it. I use mine like a monopod& just always make sure that it is square. I know real estate agents around here would chop me to pieces if I did HDR or really ANY post-processing other than a few minor adjustments.

Yvonne, thanks for putting the square advice out there again. I'm never again going to shoot off-level. I'm still new to real estate shooting, and I honestly didn't consider the perspective distortion I caused from shooting at an angle. Won't make that mistake again!
 

Most reactions

Back
Top