Removing grain?

JDP

TPF Noob!
Joined
Aug 16, 2006
Messages
285
Reaction score
0
Location
Minneapolis, MN
Website
www.pavleck.com
Can others edit my Photos
Photos OK to edit
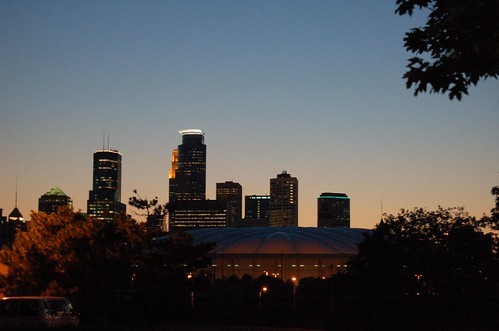
Hello, I have a pic I took of the Minneapolis skyline at dusk - it needs work in the cropping department for sure, but I want to tackle a bigger problem I have - grain.
If you look closely (A larger pic is here) you can see definite grain in the metrodome, I'd like to remove it or tone it down, especially since I think the Metrodome looks neat lit up from the inside.
I found a plugin called 'Grain Surgery', but I'm not sure how well it works nor do I have the money right now to buy it - so are there any tips for removing or fixing grain? Thanks.

221201566_74aceee0be.jpg
 
Check out 'Neat Image' and/or 'Noise Ninja'

Both are (or used to be) free as stand alone programs and also avaliable to purchase as Photoshop Plug-ins.
 
Ah, excellent, thanks Big Mike. Any other 'must have' Photoshop plugins or stand-alone programs I should get?
 
In case it helps and works for you, I often use a process using the PS CS2 reduce noise filter. On its own, even using the preserve details slider, you lose the sharpness of the original. Because of that I use an alpha channel to create a mask as follows:

1. Copy your image to a new layer.
2. Create an alpha channel from the image.
3. With this new channel selected use the find edges filter so that you get a black line drawing of your picture, but don't worry if it looks a little grainy.
4. Re-select the RGB channels and then run the reduce noise filter on the copied image layer. I tend to use a strength of 5 (but you can use more if needed) and set the 'Preserve Details' slider to around 20%. 'Color Noise' is set at about 50% and the 'Remove JPG Artefacts' check box ticked.
5. Now go to the channels palette and Ctrl + left mouse click on the alpha channel you created.
6. Now go back to the layers palette, and ensuring that the copy layer is selected, click to add a layer mask.
7. You can then also merge the layers if you need to save it back as a JPG.

This allows almost all of the edge/sharpness detail from the original, underlying image to show through the reduced noise layer. As noise tends to be most visible on large single colour/hue areas, such as sky or the smooth metal work of a vehicle, you get the effect you want with the minimum loss of sharpness. There is some loss of edge detail, but it is pretty small, and it allows you to use the PS filter at a higher level than you could normally.

I have the above steps set up as an action, so it takes about 1 second to repeat each time. If you want to download a copy of the action I have added it below. Right click on the link and choose "Save Target As..." from the options.

Reduce Noise Mask - Photoshop action

I have added some stops to the action to explain what's going on, so it will take a bit longer than the 1 second advertised above. Please feel free to remove these to make it faster, or change it in any other way to suit your needs/workflow. You can also look at the History palette once the action has run, to see what actually happened as set out in the steps above.

I hope this helps, and the following link shows the resulting version of your image based on the 'standard' settings quoted above.

Reworked image using above action.

Regards,

David. :wink:
 
Interesting technique david, thanks for sharing..... i'll have to see how your action compares with Neat Image :thumbup:
 
Cheers Archangel, I hope it bears up. Let me know the results if you get the chance. I like to try and see if PS can provide the solution to a problem before resorting to plug-ins. That said there have been many occasions when I've ended up
41616-4.gif
and just opted for the plug-in. Richard Rosen's Depth of Field Pro is one such example which, whilst it seems aimed more at animation professionals, allows you to produce excellent results with a still image too.

I use a similar method to the noise reduction when I need to quickly sharpen an image:

Create the alpha channel, find edges, invert, gaussian blur (normally at 2px radius) and then auto levels. Ctrl click on the alpha channel, and then use the selection to sharpen the image via unsharp mask.

This way you only sharpen the edges, and leave the large 'flat' areas alone. It really keeps the noise and artefacts down, and the blur makes for a seemless blend with the unsharpened part. I often use this rather than the convert to LAB mode method. If you try the above and then run the same unsharp mask settings on the same image, the difference can me quite pronounced.

David
 
Thanks for the action David. I've found it works well in certain situations where Noiseware doesn't do so well (some HDRs produced from Photomatix for example) :thumbup:
 
yea i'v given it a try now David..... i think its good, especially with the mask... the effect can be subtle which is useful for blocked areas of colour..... without having to compromise detail, good job :thumbup:
 

Most reactions

New Topics

Back
Top