Shifting and Tilting Micro 4:3

VidThreeNorth

No longer a newbie, moving up!
Joined
Oct 21, 2016
Messages
1,175
Reaction score
214
Can others edit my Photos
Photos NOT OK to edit
"FotodioX Pro Lens Mount Shift Adapter for Nikon F-Mount Lens to Select Micro Four Thirds-Mount Cameras"
B&H # FOPSLMANGLM
MFR # NK(G)-MFT-PRO-SHIFT
Price ~$86 US.

Basics:

If you do not know "shift" and "tilt" basics, there are a few good videos that will give you enough background. There are probably web pages too, but I have not looked for them. There have been books as well, but I do not have one handy.

This video is long (18:14), but it is well presented and quite thorough. If I had found a clip featuring my particular setup, I might well have still chosen this clip or something else. One should understand that the basics have nothing to do with "brands" or specific mechanical approaches.

"Tilt-Shift Lens Basics with Vincent Laforet -- Explore Tilt Shift Lenses in New York City at night", posted by "LowLightVideos", May 26, 2014,


Report:

I was warned that this product would not work with the Olympus OM-D series bodied cameras, but unfortunately, that is not the extent of the problems. There were more. In the end, I am able to get around the problems, but I would suggest that anyone interested should look to other similar products. However, it is possible that other "branded" products might not be better.

I will be uploading sample pictures later. They were taken with a used Nikkor 28mm F3.5 lens which I bought mainly for its price and known quality. I knew at the time that this combination of lens and adapter would not be "spectacular", but it would be enough to use as a beginning test setup. In general, for "tilt" functions, a lens as long as 28 mm, and even longer, can be quite good, but for "shift" functions, wider lenses, like 20mm and wider would are more generally useful. I did get some images which benefitted by this combination, but the amount of benefit is not as great.

Possible Usage:

Possible subject matter that might benefit from this particular combination are: small architectural (small houses), cars -- particularly when photographed in front of buildings, and perhaps portraiture.

Other Brands:

Here is an example of a different brand product with similar intent. I have never seen or used it. I am simply pointing out that there are alternatives available:

"Kipon Shift Adapter for Canon EOS EF Lens to Micro Four Thirds M4/3 MFT Camera"
- ebay seller: "sh_photo_1 (1680 )" price $198.00 US + $20.00 US shipping

About The Pictures:

NOTE: This set of pictures was taken using a Panasonic GF3 which has the following deficiencies:
1. cannot force "fill flash", it is always "automatic" once you turn it on at all. Some pics have flash and some don't, not really my choice
2. NO Manual focus -- ironic when regarding this subject matter


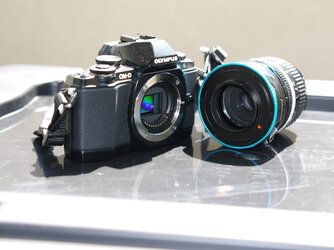
"P1010266_JPG-a-rsz1640-C1.JPG"
The size discrepancy of the mounting flange on the body and the width of the adapter is the source of most of the problems. The outer diameter of blue ring at the "back" of the adapter is ~66 mm.

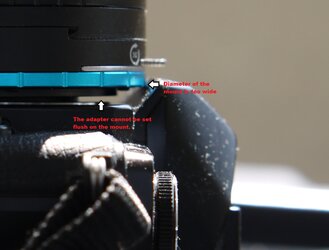
"P1010278c-Crop01-C1.JPG"
This detail crop shows that the adapter cannot be mounted on the OM-D bodies (in this case, the EM10) because the top "hump" protrudes and the blue ring blocks the mount. I do not know if the latest upper line Panasonics will work. Their body design is similar in this way.

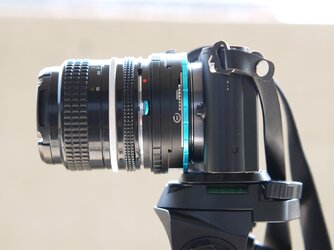
"P1010283a-rsz1640-C1.JPG"
The blue ring is larger than the height of the Yi-M1 and, most importantly, when mounted on a tripod, the base of the camera is not supporting the weight because the blue ring extends below the bottom of the camera. This might not be a problem on some other M43 bodies -- but I expect that it is a problem on most of them.


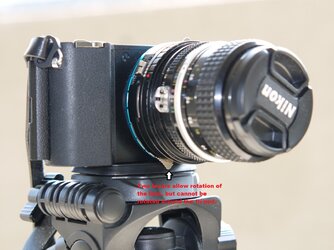
"P1010285a_JPG-rsz1640-C1.JPG" and "P1010286c_JPG-rsz1640-C1.JPG"
These two images show that the release levers which allow the mount (and the lens) to rotate are blocked by the tripod mount. To rotate the lens past this point requires un-mounting the body. In this case the tripod can be modified to accommodate the adapter, but So far, I have not needed that rotation angle so I have not made the modification. I do not think I can buy more spares of the tripod part, so I am reluctant to do so. Image "285a" shows the side view and "286c" shows it about 45 degrees off the front view.

"P1010293a_JPG-rsz1640-C1.JPG"
The problem illustrated here is that the lock points for the mount rotation do not line up to true horizontal. The vertical lock points are off by the same amount.
 

Attachments

  • P1010266_JPG-a-rsz1640-C1.JPG
    P1010266_JPG-a-rsz1640-C1.JPG
    256.8 KB · Views: 237
  • P1010278c-Crop01-C1.jpg
    P1010278c-Crop01-C1.jpg
    254.4 KB · Views: 232
  • P1010283a-rsz1640-C1.JPG
    P1010283a-rsz1640-C1.JPG
    243.1 KB · Views: 206
  • P1010285a_JPG-rsz1640-C1.JPG
    P1010285a_JPG-rsz1640-C1.JPG
    237.6 KB · Views: 195
  • P1010286c_JPG-rsz1640-C1.jpg
    P1010286c_JPG-rsz1640-C1.jpg
    287.5 KB · Views: 177
  • P1010293a_JPG-rsz1640-C1.JPG
    P1010293a_JPG-rsz1640-C1.JPG
    230.7 KB · Views: 223
As an eBay Associate we earn from qualifying purchases.
Shifting the Nikkor 28 F3.5
- Yi-M1
- Tripod

The advantage of a separate adapter compared to a specifically designed lens unit is the ability to swap out the lens for another. In my case, I get to start with a lens I got at a relatively low price, and later I will probably get a better performing lens. The quality of the Nikkor lens is known to be good, but the 28mm F3.5 is not a particularly good specification for shift usage. In general, wider lenses benefit more from usage on a shift adapter.


The Point of Shifting in Digital:

When you see a "Basic" explanation of shifting lenses, the presentations usually describes the effect and makes the point that you correct perspective and stop there. If you have been using post processing software, then the your first response is "So what? I can do that in post."

The answer to this criticism is that doing it with the lens is better because 1 more detail is "acquired" and 2 more detail can be "retained".

If you point a camera with a wide angle lens upward for a picture of a normal rectangular building, you might find that width at the top of the building might use a line of pixels 2500 wide, whereas the base of the building is 3500 pixels wide. So pointing a camera up has lost 1000 pixels across the top of the building. In an ideal case, that directly represents the loss of detail in that picture. You cannot have more detail than you have pixels to represent. If you have an ideal case, then shifting the lens should result in the top of the building being represented by 3500 pixels. You can do the math and calculate fairly precisely the amount of detail that was acquired and the theoretical improvement.
[2018-0911 clarified.]

Now, after you have recorded the file, you have a choice. If you print the un-shifted picture as-is, you retain its detail. But what if you decide to correct the perspective in post? First, the actual straightening can be done either by stretching the top, or shrinking the bottom, or a combination of both. In all three cases, there is at least "some" loss of detail from recalculation of pixels, but ignore that for this analysis.

In the first case (stretching the top) you end up with a picture that might look poorly because the lack of detail might start to show up.

In the second case, there is the corresponding loss of detail in the lower part of the building to the loss of detail at the top of the building when the picture was taken.
[2018-0911 clarified]

In the third case, it simply depends on how much stretching and shrinking is used.

In no case can you re-create the detail that you lost when you took the picture.

In the end, the largest acceptable print of such a picture works out the same because you end up not being able to enlarge the final to a point where the top of the building "looks bad" for lack of detail, or if you shrink the picture for a specific purpose, then the same result occurs.

So the answer to "what's the point?" is that there might not be any point at all in using a shift. It depends on how much "distortion" you start with, and the size of the final render, and what is acceptable detail for you needs or preferences.

Looking at my first set of sample pictures, because of the narrow field of view of the 28mm lens, I had to move as far back as I could, which, I think was about 200 M. I might be wrong about that. In fact, since the lens is known to be fairly good for lack of distortion, I could probably estimate the height of the building and calculate a rough distance. But I am not interested, so I won't.

The point is that I was so far back that there is little of the "wide angle distortion" in these pictures in the first place. In fact, I barely got this set of pictures because there was nowhere left for me to move further away. I was at the limit of possible compositions with the lens. If I had a 24mm lens I could have moved forward and had more compositional choice. I can say that in fact, I would have done so because as I tested possible camera locations, I found better views. But using a 24mm lens and moving towards the subject is exactly what would increase the "wide angle distortion", making the shifting more beneficial. The same can be said for using a 20mm lens.

For these small final pictures (about 2MP each) the remaining detail is so low that I could have simply not bothered to shift. But if I want to go large with a print, then retaining all the detail I can get could be significant. Or in my case, I just like having that much detail available.

About the Sample Pictures:

All the three pictures were taken with the camera on a tripod at the same location. If you look at the first picture, you can see the "wide angle distortion" and in the second picture, I have used the lens shifted.

"P8080012_JPG--rsz1230-C1.JPG"
The lens has not been shifted.

Partial EXIF (from JPEG)
Software ASDK-00141
Date and time Aug 8, 2018 13:27:09
Pixel height 3888
Pixel width 5184
Component configuration YCbCr
Color space Uncalibrated (AdobeRGB)
White point 0.31 0.33
Primary chromticities 0.64 0.33 0.21 0.71 0.15 0.06
Exposure mode Manual exposure
Exposure bias 1.00 ev
Exposure time 1/400 sec.
F number [F5.6 or F8]
Focal length 0.0 mm [28 mm]
ISO speed 200
Metering mode Center weighted average
Gain control Low gain up
[EXIF data added 2018-09-11]

"P8080020_JPG-rsz1230-C1.JPG"
The lens has been properly shifted.

Partial EXIF [from DNG]:
Software ASDK-00141
Date and time Aug 8, 2018 13:33:07
Image width 5200
Image height 3902
Components per pixel 1
Pixel height 3888
Pixel width 5184
Component configuration YCbCr
Color space Uncalibrated [AdobeRGB]
Exposure bias 0.70 ev
Exposure time 1/1600 sec.
F number F/0.0 [probably 3.5]
Focal length 0.00 mm [28mm]
ISO speed 200
Metering mode Center weighted average
Gain control Low gain up
[2018-09-13 I thought the F-stop was 5.6 or 8.0, but it appears more likely it was accidentally set at F3.5]

Because we are accustomed to seeing the convergence of tall buildings, the second picture can look distorted when first viewed. In fact, I did not have the camera set up perfectly and there is still a small amount of convergence towards the top. Yet to me, sometimes the top looks stretched wide.

This brings up a point of style. Over the past few years, I have tended to re-adjust many of my pictures correcting perspective "perfectly". In the last year or so, I have changed my mind and more often, I am not correcting pictures at all, and in some cases I do partial corrections. In these latter pictures people probably assume they are "uncorrected". But the point is that unless you have a specific reason to correct in a certain way -- like a contract to make pictures for an architectural company, it is really up to you to decide what looks good.
[2018-08-15 added EXIF data and following:]


"P8080022_JPG-rsz1230-C1.JPG"
Yi 12-40mm kit zoom lens

Partial EXIF [from DNG]
Aug 8, 2018, 13:35.52
Image width 5200
Image height 3902
Components per pixel 1
Pixel height 3888
Pixel width 5184
Component configuration YCbCr
Color space Uncalibrated [AdobeRGB]
Exposure mode Manual exposure
Exposure bias 0.70 ev
Exposure time 1/400 sec.
F number f/8.0
Max aperture f/3.9
Focal length 14.0 mm
Focal length in 35mm 28 mm
ISO speed 200
Metering mode Center weighted average
Gain control Low gain up
[EXIF data and lens information added 2018-09-11]

The third picture answer the question why not just go wider without shifting and then crop? With half the focal length, the final crop is about 1/4 the amount of pixels (and thus ~1/4 the detail). The choice is yours. . . .
[2018-09-11 correction "half" the focal length]

Recommendations:


If you need a recommendation, then a simple one is to start with a wider lens than 28mm if you can afford to do so. I have said before and will repeat that really, a 20mm lens is probably a better starting point for shifting for Micro 4:3. But even a 24mm lens would have been worth its price if I had found a good used one.

I do think this 28mm lens can be useful as I noted above.
 

Attachments

  • P8080012_JPG--rsz1230-C1.JPG
    P8080012_JPG--rsz1230-C1.JPG
    517.7 KB · Views: 195
  • P8080020_JPG-rsz1230-C1.JPG
    P8080020_JPG-rsz1230-C1.JPG
    461.3 KB · Views: 259
  • P8080022_JPG-rsz1230-C1.JPG
    P8080022_JPG-rsz1230-C1.JPG
    578.6 KB · Views: 218
Last edited:
Here's lens movements in a nutshell:

If the film/sensor plane is perpendicular to the optical axis of the lens (shift, rise and fall), you are adjusting perspective.
Otherwise (tilt and swing) you are adjusting depth of field.
 
Yi-M1
Fotodiox M43 camera, Nikon lens shift adapter
Nikkor 28mm F3.5 lens
Tripod

The 28mm F3.5 Nikkor lens on the shift mount might not be as versatile as a wider lens, but there are opportunities to put it to good use. In this case there was a fence which was about three feet high on a sloped sidewalk. There was a lot of traffic on the street, so I could not get much distance. The fence was probably damaged by a fallen tree branch in a storm, probably in the 2017 - 2018 Winter.

"P8090025_JPG-rsz930-C1.JPG"

Partial EXIF (from JPEG)
Software ASDK-00141
Date and time Aug 9, 2018, 08:17:42
Pixel height 3888
Pixel width 5184
Component configuration YCbCr
Color space Uncalibrated (AdobeRGB)
Primary chomaticities 0.64 0.33 0.21 0.71 0.15 0.06
Exposure Mode Auto exposure
Exposure bias 0.00 ev
Exposure time 1/200 sec.
F num 0 [5.6 or 8]
Max aperture f/1.0 [f/3.5]
Focal length 0.0 mm [28 mm]
ISO speed 200
Metering mode Center weighted average
Gain control Low gain up

Picture "25" was taken from below the damaged section and the camera was naturally fairly level. The lens is not shifted.
[2018-09-13 clarified lens not shifted]

"P8090031_JPG-rsz1240-C1.JPG"

Partial EXIF (from JPEG)
Software ASDK-00141
Date and time Aug 9, 2018, 08:21:08
Pixel height 3888
Pixel width 5184
Component configuration YCbCr
Color space Uncalibrated (AdobeRGB)
Primary chomaticities 0.64 0.33 0.21 0.71 0.15 0.06
Exposure Mode Auto exposure
Exposure bias 0.00 ev
Exposure time 1/320 sec.
F num 0 [5.6 or 8]
Max aperture f/1.0 [f/3.5]
Focal length 0.0 mm [28 mm]
ISO speed 200
Metering mode Center weighted average
Gain control Low gain up

But picture "31" was taken nearer and from above the damaged section, so shifting the lens maintained the verticals despite being on a downward angle.

The detail rich pictures are camera JPEGs using the normal finish but with AdobeRGB color space and resized in Corel Paintshop Pro Ultimate 2018.
 

Attachments

  • P8090025_JPG-rsz930-C1.JPG
    P8090025_JPG-rsz930-C1.JPG
    487 KB · Views: 206
  • P8090031_JPG-rsz1240-C1.jpg
    P8090031_JPG-rsz1240-C1.jpg
    521.1 KB · Views: 231
Last edited:
Here's lens movements in a nutshell:

If the film/sensor plane is perpendicular to the optical axis of the lens (shift, rise and fall), you are adjusting perspective.
Otherwise (tilt and swing) you are adjusting depth of field.
Not quite.
Tilt & swing are adjusting the plane of focus. With a single isolated subject this can effectively be DOF, but it can allow part of something at one distance to be focused along with something(s) at quite different distances. It would be relatively easy to photograph a straight fence going into the distance & have the TOP of each fence pole focused without the bottom halves of the nearest poles focused - very different from DOF.
 
I've played with a couple of different tilt adapters for MFT (indeed it's why I first brought a MFT body).
The first model (Pixco IIRC) I got was excellent to begin with, but soon started getting stuck on the cameras lens mount, so was retired. My second model (Fotga) brought several years later proved very difficult to control and is effective unusable without a tripod.
I've been intrigued by shift adapters, but have never found one cheap enough for my level of interest.

For tilt alone I found a simple DIY plunger set up using enlarger lenses actually worked quite well. My setup allowed about 2mm of shift but this wasn't noticeable on any of the lenses I have that fit it. (My DIY setup is shown in the first few shots here and here is one of my early efforts with it (trying to keep the ground in focus)
freelensing portrait by Mike Kanssen, on Flickr
 
Here's lens movements in a nutshell:

If the film/sensor plane is perpendicular to the optical axis of the lens (shift, rise and fall), you are adjusting perspective.
Otherwise (tilt and swing) you are adjusting depth of field.
Not quite.
Tilt & swing are adjusting the plane of focus. ...........

Which directly adjusts DOF.
only in a two-dimensional subject.
In my example shot above my son is focused, as are the houses in the background (almost) yet the top of tower at a distance between the two is well out of focus. What's the DOF here???
 
I went back to the high-rise condominium that I photographed before and carefully re-setup, and yes, I am pretty sure that I understand what I did wrong the first time. The "proof" is in the EXIF data, which is why EXIF data is such a good idea. In particular, looking at the exposure times, the first image set are very fast -- fast enough to be from a full open aperture. In fact, the first pics I took in this re-do were accidentally fully open, (F3.5) which was a repeat of the same mistake.

What Probably Happened:

With all the setting up, I forgot that there are two "rings" that control the aperture together. This is not that unusual for manual lenses. The lens' ring has click stops, so I use that as a "limit" for the aperture. The adapter's ring is not clicked, so I use that to open for focusing and then turn it "closed" to the aperture I have set on the lens. It works very well, as long as I remember to turn the adapter's ring to close down the aperture to where I have "pre-set" it on the lens.

So looking at the earlier set of pictures, the ones I posted from the Nikkor 28 F3.5 were probably both taken at full F3.5 rather than the F5.6-8.0 setting that I thought I was using. I will try to change my previous post to correct it. The off-axis image quality was, as should be expected, lower than what I anticipated.

P9110009.DNG
Partial EXIF:
Sept 11, 2018, 16:51:55
Image width 5200
Image height 3902
Components per pixel 1
Pixel height 3888
Pixel width 5184
Component configuration YCbCr
Color space Uncalibrated [AdobeRGB]
Exposure mode Manual exposure [actually P]
Exposure bias 1.00ev
Exposure time 1/80 sec.
F number f/0.0 [probably F11]
Max aperture f/1.0 [actually f/3.5]
Focal length 0.0mm [actually 28mm]
ISO speed 200
Metering mode Center weighted average
Gain control Low gain up
[2018-09-13 Added EXIF data]

Today I am posting images based on "P911009" which was taken at F8.0 or F11.0 which were the apertures I chose to use for that day. In fact, I am fairly sure it is F11, because I started at F11 and then changed to F8.0 later. The result was much better detail at the top of the building than the pictures that were probably at F3.5.

I am posting three variations today:

"P9110009a-rsz1230-C1.JPG"

This is a resize of the original camera JPEG with no changes aside from the resize. My setup was not quite perfect, and if you examine it carefully you will see a bit of convergence towards the top. Also, harder to detect is a slight rotation


"P9110009b-Crop1640-C1.JPG"

The second image is a full resolution detail crop from the top of the frame. The detail is quite good. Unfortunately, this lens has some strong chromatic aberration (magenta - cyan) off-axis. More unfortunately, Corel PaintShop Pro 2018's chromatic aberration fixing tool is not working on my computer. It might be working on other people's computers. I don't know. I called Corel for help with is a long time ago, and they told me to watch a video that was supposed to teach how to use it. The video did not help, but I did not have time to get back to them. But no, it is not working.

The chromatic aberration does not seem to be affected by changes in aperture. My only real solution right now is to make final images monochrome if they are large enough to show the problem. One particularly good point for this Nikkor lens is that linearity is excellent, and for shifting, that is very important because correcting barrel or pincushion in a picture with a shifted center might not even be directly possible for some picture editing programs.


"P9110009 -1e-rsz1560-C1.jpg"

I decided to make a third file starting from the DNG (raw) file and correct the "distortion" (convergence) and rotation, and other general "corrections" in Corel's "Smart Photo Fix" tool, which is what I would normally do to "finish" a project. The result is the third image.
 

Attachments

  • P9110009a-rsz1230-C1.JPG
    P9110009a-rsz1230-C1.JPG
    503.2 KB · Views: 213
  • P9110009b-Crop1640-C1.JPG
    P9110009b-Crop1640-C1.JPG
    290.9 KB · Views: 230
  • P9110009 -1e-rsz1560-C1.jpg
    P9110009 -1e-rsz1560-C1.jpg
    391.3 KB · Views: 237
Last edited:
Uh, petrochemist's terminology is correct. I didn't have any problem understanding what 480sparky meant, so I didn't bother to correct it. But for beginners, using the right terminology can help them understand what is going on. Well, actually, in this case, it would help if I drew a diagram. Then again, if you saw a diagram that I drew, it might not be so helpful either. Oh well. . . .
 
Uh, petrochemist's terminology is correct. I didn't have any problem understanding what 480sparky meant, so I didn't bother to correct it. But for beginners, using the right terminology can help them understand what is going on. Well, actually, in this case, it would help if I drew a diagram. Then again, if you saw a diagram that I drew, it might not be so helpful either. Oh well. . . .
Linking to someone else's one on-line would probably work :)
Got to leave for work any minute so not time to find one now.
 
Using tilt and swing to 'adjust' DOF is the same principle as using rise, fall and shift to 'adjust' perspective.

It's all semantics.
 
I just found out that Adorama is carrying Kipon's mount adapters. It looks like they have a fairly complete set of the shifts and tilts available. The prices are better than what I have seen before as well.

"Kipon Tilt-Shift Lens Mount Adapter For Nikon G Mount Lens To Micro Four Thirds Camera"
[SKU: KATSNKGM43 MFR: KP-LA-TS-NKG-M43]
- current price (sale) $288 US (20% off)
Kipon Lens Mount Adapter
"Kipon Shift Lens Mount Adapter For Nikon F Mount Lens to Micro Four Thirds Camera "
[SKU: KASNKM43 MFR: KP-LA-S-NK-M43]
- current price (sale) $113.60 (28% off)
Kipon Shift Lens Mount Adapter
NOTE: This one does not look like it has a control for the Nikon G aperture so it is probably old F mount only.

One review reported a loose M43 body mount for a Nikon F shift adapter. This might have been a single bad unit or a bad batch. No other reports with that complaint.
 

Most reactions

New Topics

Back
Top