Shooting against a sky - advice please

classixuk

TPF Noob!
Joined
Jan 2, 2012
Messages
33
Reaction score
9
Location
UK
Can others edit my Photos
Photos OK to edit
As some of you know, I got my first camera a couple of weeks ago. It's a Canon 600D.

I've yet to take any shots which are true photos. They are all snapshots and not worthy of wasting time asking for C&C.

What I am after in this thread is advice on how to best avoid the following:

This morning, the birds were back in the garden. They don't stay for long at all and are very fast moving. I ran to grab my camera (which still had yesterday's 28-75mm lens attached) and started snapping away.

When I saw the results, I was :grumpy:

In this post is an example.

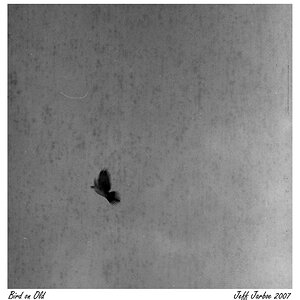
I didn't have time to manually focus before the bird flew away (nor compose my shot). So I need tips on how to get a quick-auto focus when your subject is so tiny. The camera couldn't decide if it wanted the sky in focus or the branches that the bird was perched on.

Next, if you look at the original image you will see that the bird is very dark as I was shooting against the sky (no flash and around 20-30ft away from the subject). There was certainly no time for reflectors and lighting kits. How can I avoid future shots of birds coming out so dark? In theory I am thinking that I should point my camera somewhere else to get a light reading and then point it back at the bird - but what happens to auto focus if I do that?

Lastly, to try and fix the image a bit (i.e. see it LOL) I took it into Lightroom and upped the exposure by 2 stops. This helped somewhat, but blew the sky away to white. :grumpy:

In the last image, I took the image into photoshop instead and lightened the shadows, but how else could I have achieved the same thing?

I know this image is only a snapshot and there are focus issues etc. but I really would like to learn how I can avoid those technical issues in future - dark birds against bright sky and where to take a light-reading/focus point from in shots such as these? I am only 2 weeks into this and feel I am learning all of the time, but everyday a new problem arises that I haven't come across before and prevents me from having anything to offer for C&C.

Many thanks for your help.

1. Original Image - Bird too dark

birdasis.jpg


2. Lightroomed to up the exposure - Sky too light

birdskyblownout.jpg


3. Photoshopped to lighten shadows - still unhappy LOL

birdlightened.jpg
 
There is too much dynamic range to get both the sky and the underside of the bird properly exposed. You can:

1) Use a fill flash to properly expose the underside of the bird
2) Use HDR and bracket shots each side of the exposure
3) Live with the blown sky
4) Live with the blocked details on the bird

The most common fix in situations like this is to use a flash to fill in the underexposed areas and meter for the highlights.
 
Best bet is to use a fill flash when shooting this sort of thing.

For this image, or images like it, you can also try a faux HDR. By tonemapping the single image, you may be able to bring out the dark areas without losing the lighter areas. If you don't get too crazy with it and turn it into a cartoon, it can make for a pretty good adjustment.

Another thing off the top of my head that you could use after the fact like this is to learn to do masking and use it to your advantage. Basically, you would have two copies of the image on top of each other in layers. The bottom layer would have the sky looking right. The top layer would have the bird looking right. Then you mask it so that you can see the sky of the bottom layer against the bird of the top layer.

Masking is a pretty fundamental skill to learn for lots of photo editing and compositing stuff, so it's a good thing to learn, if you don't know how to do it already.
 
Hi, ok so I'm going to preface this by saying that I'm also very new and this is my first time on the commenting side of this process.

These shots look rather familiar, I came across the same issues. It looks to me like your light is coming from the left and a bit behind the bird from your vantage point.

You want to shoot the side of the bird that is in the light so position yourself so the sun is behind you.

You won't save the dark exposures you are getting without adding noise and losing the fine details in the feathers, it is better to over expose a smidge and add in the dark as opposed to brightening.

Meter off of the bird, I'm sure that with shooting the lighted side of the bird you will start to see better exposures.

When I set up to shoot the birds I start with 1/500, f5.6, ISO200, al servo af, and a high burst rate to catch takeoffs and tweak from there.
 
If you look at bird shots, you'll probably notice that the sky very seldom is the only background. You'll see the out-of-focus area to be trees, grass and stuff that reflect about the same amount of light as the bird. That means that they won't blow the background if they expose for the bird.

If you're exposing for the bird with a bright sky behind, the sky will be blown - as you've nicely illustrated. Fill flash (flash used to fill in the shadows) is maybe the easiest way to fix this. If the bird isn't too far away, your on-camera flash might do the trick (though the light might be a little flat).

I'm seeing that you want help on how to improve in vivt, so to speak - in the field, and not fix it digitally. Always be aware of your background! Important in most everything. Try to control it. For future bird shots, you might want to try and not have the sky as the only part of the background, but rather trees or other colourful things that will be pleasant to look at when out of focus. The background needs to be out of fucus 99% of the time when you're shooting bird shots like these, to separate the bird from the environment.
 
There is too much dynamic range to get both the sky and the underside of the bird properly exposed. You can:

1) Use a fill flash to properly expose the underside of the bird
2) Use HDR and bracket shots each side of the exposure
3) Live with the blown sky
4) Live with the blocked details on the bird

The most common fix in situations like this is to use a flash to fill in the underexposed areas and meter for the highlights.

OK, so I need to start exploring fill flash. So far, I have been terrified of flash altogether since I saw what it did in auto-mode on the first day. :(

Is there a fast way to set the flash to "fill" rather than "full" using the Canon, or will this be calculated automatically by the camera as long as the pop-up flash is on?

Best bet is to use a fill flash when shooting this sort of thing.

For this image, or images like it, you can also try a faux HDR. By tonemapping the single image, you may be able to bring out the dark areas without losing the lighter areas. If you don't get too crazy with it and turn it into a cartoon, it can make for a pretty good adjustment.

Another thing off the top of my head that you could use after the fact like this is to learn to do masking and use it to your advantage. Basically, you would have two copies of the image on top of each other in layers. The bottom layer would have the sky looking right. The top layer would have the bird looking right. Then you mask it so that you can see the sky of the bottom layer against the bird of the top layer.

Masking is a pretty fundamental skill to learn for lots of photo editing and compositing stuff, so it's a good thing to learn, if you don't know how to do it already.

Thanks Buckster. I tried masking first but it left a strange halo around the bird and looked 'pasted' in. I then looked at every branch and thought "no way" LOL.

I then tried a selection by "colour range", but this too left a haze around the bird/branches etc. once the 2 layers were shown together. I am going to look at you faux HDR idea and see what results that generates. :)

Hi, ok so I'm going to preface this by saying that I'm also very new and this is my first time on the commenting side of this process.

These shots look rather familiar, I came across the same issues. It looks to me like your light is coming from the left and a bit behind the bird from your vantage point.

You want to shoot the side of the bird that is in the light so position yourself so the sun is behind you.

You won't save the dark exposures you are getting without adding noise and losing the fine details in the feathers, it is better to over expose a smidge and add in the dark as opposed to brightening.

Meter off of the bird, I'm sure that with shooting the lighted side of the bird you will start to see better exposures.

When I set up to shoot the birds I start with 1/500, f5.6, ISO200, al servo af, and a high burst rate to catch takeoffs and tweak from there.

Thanks for that PR. I never thought about trying al servo mode. The sun was behind me and slightly to my right (my garden faces North West). Any idea how I would meter off the bird? Is there a setting I need to change in my camera so that it meters the light from the one-stop focus point? I'm assuming that's what you mean?

Thanks so much again everyone. :)
 
If you look at bird shots, you'll probably notice that the sky very seldom is the only background. You'll see the out-of-focus area to be trees, grass and stuff that reflect about the same amount of light as the bird. That means that they won't blow the background if they expose for the bird.

If you're exposing for the bird with a bright sky behind, the sky will be blown - as you've nicely illustrated. Fill flash (flash used to fill in the shadows) is maybe the easiest way to fix this. If the bird isn't too far away, your on-camera flash might do the trick (though the light might be a little flat).

I'm seeing that you want help on how to improve in vivt, so to speak - in the field, and not fix it digitally. Always be aware of your background! Important in most everything. Try to control it. For future bird shots, you might want to try and not have the sky as the only part of the background, but rather trees or other colourful things that will be pleasant to look at when out of focus. The background needs to be out of fucus 99% of the time when you're shooting bird shots like these, to separate the bird from the environment.

Thanks Compaq. Yes, you are correct. I want to learn about fixing this at source, and not digitally, otherwise I feel as if I wasted my money on the camera if I simply photoshop every mistake. Know what I mean?

I tried changing position and placing the bird against more colour (hard to find trees with leaves in January) but the browns of the bird seemed to melt away into the background. I think it might be time to invest in a bird feeder and put it exactly where I want to the birds to be! LOL. :)
 
By the way, for more ability in post processing when you need it for stuff like this, shoot RAW.
 
OK, so I need to start exploring fill flash. So far, I have been terrified of flash altogether since I saw what it did in auto-mode on the first day. :(

Is there a fast way to set the flash to "fill" rather than "full" using the Canon, or will this be calculated automatically by the camera as long as the pop-up flash is on?
I can't speak for Canon since I shoot with a Nikon, however with my cameras if the flash is on (pop-up or in the hotshoe) AND if the metering is set to matrix then the camera automatically assumes that fill flash needs to be used. Generally speaking, especially in cases such as this, the light from the flash will have no affect on the sky (there is nothing to reflect from) and will only affect the bird. This is commonly the case when using fill flash since the subject is far enough from the background that the light falls off enough to not cause a lot of problems.

Don't be afraid to use a flash. It is a tool. Learn how and when to use it and you will benefit from one. Pop-up flashes are of far less use than a hotshoe flash or an off-camera flash but they most assuredly do have their uses. The biggest problem with pop-up flashes is that the axis of the light from the flash is so close to the axis of the lens that it causes a lot of problems. The problems are not insurmountable though and they are handy to have around in a pinch.
 

Most reactions

Back
Top